Version 1.20.0 (Standalone)
(May, 2021)
New
- Add NAS-ID as required parameter when using one of the Enterprise security modes
- Add option to configure “Multicast” parameters for the LigoDLB Managed network
- Add “WACL” feature to the LigoDLB Managed network
- Add “Seamless roaming” feature to the NFT Bridge network
- Option to disable Access Point radio in LigoDLB Managed networks
Improvements
- Updated input field highlighting when field is not valid
Fixes
- Fix User deletion issues
- User roles not updated after user profile edit
- User profile information was not saved after update
Version 1.19.0 (Standalone)
(March, 2021)
New
- Add possibility to select “Wireless scenario” for specific Countries in LigoDLB Managed 5G networks
- Add option to configure “Multicast” parameters for the LigoDLB Managed network
- Add “WACL” feature to the LigoDLB Managed network
- Option to disable Access Point radio in LigoDLB Managed networks
Improvements
- EIRP recalculation and error handling
- “Letsencrypt” certificate changed
Version 1.18.0 (Standalone)
(October, 2020)
New:
- Add history logs for user accounts
- Add Compliance Testing (CT) Country code to Stand Alone version
- Floor maps for NFT networks
- DLB networks supports more than one device with AP mode
- Linktest for DLB scenarios
- Added support for 6GHz and 4GHz products
Improvements
- Changed way to add new devices (from the list or by MAC address) to the network
- Added FW version on the main Devices table
- Updated VerneMQ MQTT broker to v1.9.2
- Some charts had rotated labels on x-axis
- Changed chart style: no dots on the chart line by default
- Changed UID and GID to fixed values inside Docker container
Fixes
- “Invalid network config” if friendly name is longer than 32 char
- Tornado connects to the MQTT broker only after Collector service is restarted
- Fixed collector service problem with startup when MQTT broker is down
- Fixed collector service to correctly shutdown when MQTT broker goes offline
- CSV export with data that include special characters
- Direct FW upgrade: add check on HW platform
- Styling issues on Internet Explorer
- “Device removed from network” alert update
- Fixed issue related with WPA2 security display on the device UI
- Fixed issue when notification about new unregistered devices did not show without reloading the page
Version 1.16.1 (Standalone)
(July, 2019)
New:
- Added Antenna Gain control for the NFT and DLB devices.
- Added possibility to upgrade the product file and the OEM configuration on devices.
- Added possibility to upload and update Firmware directly on the device for Network Manager.
- Added Bandwidth limitation per SSID for DLB.
- Added STP configuration on NFT and DLB networks.
- Added display of the Ethernet port status and speed on the DLB, NFT, PTP.
- Added possibility to kick the wireless client on NFT network.
- Added LigoDLB remote statistics.
Improvements:
- Active alerts now are marked as inactive after disabling alerts functionality.
- On device registration the custom Friendly name now is not overwritten with default network’s value.
- Improved some GUI issues on error messages.
Fixes:
- Fixed unified sections of the network tab on NFT networks.
- Fixed issue when it was impossible to save the HotSpot profile with empty black/white list.
- Fixed issue when it was not possible to create HotSpot profile with internal splash page.
- Removed unnecessary parameters on HotSpot profile.
Version 1.13.1 (Standalone)
(March, 2019)
Limitation:
- Disabled Multi Organization support
New:
- Added device alerts configuration and visualization for DLB networks.
- Added device alerts suppression for specified time per device (Maintenance mode).
- Added configuration of IEEE mode for NFT networks.
- Added max data rates configuration for DLB networks.
- Added NTP service configuration for DLB networks.
- Added limit legacy data rates for NFT networks.
- Added scheduled reboot on all network devices.
- Show signal level for all radio chains.
- Added radio mode (SISO/MIMO) control per device added.
- Allow to download or upload Hotspot profile as file.
- Added LigoDLB device configuration
- Added device LED control
- Started using Bing Maps instead of Google maps
- Fixed LigoDLB ECHO 5D registration
- Added monitoring modes for LigoDLB and RapidFire networks.
- Implemented multi-channel option for the channel list configuration.
- Added wireless access list (WACL).
- Added option to upload UAM profile as file.
- Added wireless clients statistics with total counters and history up to 50 last sessions.
- Added paid services.
- Added Nigeria country.
Improvements:
- Save LigoDLB device IPv4/IPv6 static configuration on registration to the Controller.
- Parameter name unification “Session time”.
- Implement ACL logic in collector service.
- WiFi Analytics service allows to use third party data collectors.
- Lots of other small UI/UX improvements (styles, notifications, icons, data loading, form validation etc.).
- Hotspot profiles now have GUI with forms and validation.
- Make countries list sorted by country name instead of country code.
- Lots of small UI/UX improvements (styles, notifications, icons, data loading, form validations).
- Improved Cache data for charts
- Improved Auto channel selection
- Charts visual improvements.
- Refactored Alert messages using new library (toaster).
- Network list API endpoint optimizations to exclude not used data.
- Improved ugly channel visualization when device has only one radio.
- Added various input fields validation error messages.
- Added channel width in network device table and device dialog.
- Added an error message when Telnet and SSH ports are the same.
Fixes:
- Network Management VLAN button defect.
- Fixed issue with “Operating Frequency” display on Spectrum Analyzer.
- Incorrect display of connected router’s MAC on HotSpot network.
- In DLB network running Spectrum Analyzer on Station device becomes unreachable.
- Fixed HotSpot profile: corrected newtork group selection rule.
- DLB ac device set radio mode to SISO after controller config update.
- Access Point starts “Site survey loop” when registering to the controller.
- Corrected client graph time axis display in Network dashboard.
- Do not limit any VAPs with same VLAN ID.
- Incorrect auto firmware upgrade time in monitor view.
- OpenStreet maps max zoom does not show map.
- “DFS CAC active” status is missing.
- DLB show device name on Stations table.
- Fixed Hotspot network section DNS servers validation.
- Unable to move device with the status “Waiting for device”.
- Devices that have never been connected to the controller should be hidden in Firmware management list.
- Fixed Root group renaming
- Fixed WPA enterprise without DAS creation
- Fixed Clients statistic graphs incorrect values
- Fixed new products registration to the network
- Fixed data cleanup process to allow recently deleted device registration
- Fixed networks information loading
- Fixed client periodic statistics which visible from wrong groups
- Fixed chart time line labels when switching to week period
- Fixed unregistered device selection when list is mixed branch
- Fixed missing channel width in device list.
- Fixed ‘HW reset button’ value in network and device.
- Fixed Maps, network info: sync info with counters on the network header.
- Fixed browser back button glitch after logon or logout.
- Fixed missing channel width in device list.
- Fixed WPA Enterprise VAP configuration on bridge network.
- Fixed Greece country code selection issue.
- UAM portal secret is not mandatory.
GUI Changes:
- Disabled option to create network in root group
Version 1.9.2
(February, 2018)
Fixes:
- Fixed network devices list for mesh and hotspot scenarios (extra column each).
Improvements:
- Channel info is shown in the network device list.
Version 1.9.1
(February, 2018)
Fixes:
- Fixed device went offline once registered in the new bridge network (wrong DNS configuration)
- Fixed can’t change configuration per device.
Version 1.9
(February, 2018)
New:
- New design and layout for Network configuration section.
- Added SNMP service control to network services section.
- Added possibility to set custom DNS servers at WAN section in “Mini hotspot” network scenario.
- Added channel selection inside individual device configuration dialog.
Fixes:
- Fixed notifications when virtual AP limits are reached.
- Fixed notifications when adding new devices by MAC address list to the network and there are already registered MAC addresses.
- Fixed radio scheduler time format to support time from 00:00 to 24:00.
- Fixed error message when country code does not support 5GHz.
- Fixed incorrect warning message when changing country code.
- Fixed problem when device receives reversed time zone value from controller.
Improvements:
- Performance improvements to load data faster.
- GUI layout improvements to better fit small screens.
- Changed dialog with notification message for unregistered devices.
Version 1.8
(November, 2017)
New:
- Added four layers support in the network section.
- Added client count column on main device table.
Fixes:
- Fixed Maps, network info: missing info what counters are displayed.
- Fixed new users creation, when some groups are empty.
- Fixed HotSpot network: corrected validation on Welcome URL.
- Fixed negative device amount in organization settings.
- Fixed cloud controller does not show IP address on device in Easy mesh network.
- Fixed it is not possible to enable 5GHz radio when it was disabled.
- Fixed “Hotspot profile updated” message is displayed, but nothing happens.
- Fixed double error message on wireless settings in Hotspot network.
- Fixed cannot update device configuration once Device name is set to automatic.
- Fixed issue when controller allows to save management and data VLAN with same ID.
- Fixed issue when automatically set device name starts from _2.
Improvements:
- Optimized and improved controller system performance.
- Improved drop-down’s length per device in graphs’ choice.
- Improved validation on Welcome url for Hotspot network.
- Improved client table on device: no gap between MAC and IP.
- Improved static ip address range validation.
- Improved validation of min/max values, which have manipulation via up/down ‘arrows’.
- It is not allowed to move device into the same network.
- Improved device sorting by uptime.
- Improved google maps responsiveness with 20+ devices per network.
Version 1.7
(July, 2017)
New:
- Google Maps added for visual devices representation.
Fixes:
- Group assignment to parent group issue fixed.
- Wireless client listing fixed for the Network section and the table (not all clients were shown).
- Second SSID with data VLAN fixed on bridge AP (mini-hotspot scenario).
- VLAN indication on UAM wireless profile fixed (mini-hotspot scenario).
- Incorrect indication of connected client number fixed (mini-hotspot scenario).
Improvements:
- Firmware version indicator added to the single device configuration section.
- Firmware version upload check added.
- “Cancel upgrade” button removed from when the firmware is already updating.
- Additional information/warning added for when deleting a Network with active device.
- Confirmation for resetting a device to its default factory settings added.
- 2.4GHz Spectrum Analyzer selection option removed from devices that do not support it.
- Added Automatic firmware selection added to drop-down menu for devices upgrade.
Version 1.6
(June, 2017)
New:
- New network type—Easy Mesh.
- Option to disable management VLAN wirelessly added.
- Indication, signifying devices are scheduled for a firmware upgrade, added.
- Option to add offline devices to the queue for firmware upgrade added.
- RADIUS failover server support added.
Fixes:
- NFT controller backup fixed (some system files were missing).
- Repeating refresh fixed on Closed device settings.
- Radio scheduler validation error fixed (even if the feature was disabled).
- Issues with information about offline devices missing fixed.
- Device button status fixed in the Devices menu.
- Device tool capability information fixed in the Channels tab.
- Device firmware upgrade validation fixed for when the device has a newer firmware version than the NFT controller system.
- System crash fixed for when devices are being upgraded with a firmware that is deleted from a system.
- UI elements visual look&feel fixed.
Improvements:
- Current operating channel added to Network Channel tab when “Autochannel selected by device” is enabled.
- Visualization improved for radio scheduler.
- Network search using Organization or Group ID improved.
- Device ‘Uptime’ changed to ‘Last Seen’ information while the device is down.
- Wireless clients tab column renamed from “MAC” to “Client MAC”.
- Wireless clients tab column renamed from “Uptime” to “Session time”
- Firmware upgrade notification messages improved.
- Sorting by device status added.
- Validation improved for when deleting the Mini hotspot profile.
Version 1.5.1
(April, 2017)
New:
- Network scenarios added: Office/Home LAN, Hotspot.
- VLAN configuration feature added for NFT 2ac/3ac products.
- Hotspot profile tab added for global UAM settings configuration.
- Mixed mode and WPA2 only selection added to the wireless network profiles.
- Hotspot welcome URL added.
- Option to override hotspot black/white lists added.
- Option to disable/enable the reset button added.
- Network group ID added.
Fixes:
- Validation of ‘Start upgrade’ time improved in the radio scheduler.
- Network and group statistics updates fixed on GUI.
- Configuration settings fixed for the NFT 3ac for when an 80MHz channel is selected.
- Super user limitation to change their own password fixed.
Improvements:
- The default 2.4GHz channel size is set to 20MHz.
- Requirement to set up two NTP servers removed.
- Access point info and wireless clients can be accessed from the Devices page.
Version 1.4.2
(January, 2017)
New:
- Option to create two-level groups added.
Fixes:
- Issues with the Spectrum Analyzed not turning off when changing radios fixed.
- Expanded group collapse once statistics are updated issue fixed.
- Time input field validation for “Auto firmware update time” and “Radio on/off schedule time” fixed.
- Fixed Last hour throughput value fixed in dashboard mini-diagram.
Improvements:
- User permission handling improved by allowing to assign permission for a group only, not network.
- Most active networks (by client count) display in dashboard improved.
v1.4.1
(January, 2017)
New:
- Unregistered device list added for network manager user type.
- Individual organization IDs added for Free Cloud users.
Improvements:
- Device discovery is now always enabled.
v1.4
(January, 2017)
New:
- Management VLAN configuration added.
- Traffic shaping per VAP added.
- Option to move the device to another network added.
- Option to use a native-based device auto-channel function instead of the controller-based one added.
- Daily automatic firmware upgrades added to schedule.
- Network config copying option added.
- System alert (SNMP traps) configuration added.
- Option to disable Ethernet LAN ports added.
- Device, network, and user count limits added to network groups.
- Radio scheduling added.
- Automatic firmware upgrade, if hidden features are available, added.
- Option to configure whether the uploaded firmware will be visible to all users added.
- Option to disable VAP for individual devices added.
Fixes:
- Mini- and normal chart inconsistencies in dashboard fixed.
- Issues with first data points always being zero charts fixed.
- Most active network table renewal issue fixed.
- Throughput measurement units fixed in dashboard.
- Wireless profile save issue fixed for when some fields are left empty.
- Network config saving issue fixed for when a county with no 80MHz (5G) bandwidth is selected.
- Tx-power config saving error fixed with countries that do not have a 5GHz frequency band.
- Fixed Issues with missing expansion button after a network search fixed.
Improvements:
- Cloud stability and performance improved by migrating all users to a single organization.
v1.3
(November, 2016)
New:
- Network search added to Device Registration page.
- Unregistered device count added to the Registration page.
- Pagination added for network list in the Registration page.
- Multiple device firmware upgrade option added.
- Network groups added.
- Network manager and network monitor user permissions added.
- Spectrum Analyzer added.
- Troubleshooting file download tool added to network and device.
- Reset to default settings option added.
- Device reboot tool added.
- Quick-access drop-down menu added to the Network page.
- Serial number and radio MAC added to device info modal.
- Option to postpone firmware upgrades added.
- Instant data renewal added to network table.
Fixes:
- 5GHz radio handling fixed for when a country code does not have a 5GHz frequency band.
- IE10 select option issue fixed.
- Modal handling fixed for when using the browser’s back button.
- Issues with being able to create multiple organizations by accident fixed.
- SSH and Telnet port configuration fixed.
- Date selection fixed in Firefox.
- Settings validation issues fixed in WPA-Enterprise configuration.
- Issues with devices showing up in the unregistered list incorrectly fixed.
Improvements:
- Auto-channel selection improved to always use the maximum available channel width.
- Device uptime value representation improved.
- Device Rx/Tx value representation improved.
- Dashboard improved with new graphs and counters.
- Device radio configuration improved to be in a single tab.
- Responsive design improved in most pages.
v1.2
(September, 2016)
New:
- Product name added to device inventory table.
- Option to override SSID on individual device added.
Fixes:
- ‘Leave organization’ button fixed on small resolutions.
- ‘Superadmin’ menu responsive design fixed.
- Channel width info fixed in channels table.
v1.1
(August, 2016)
New:
- Product name and device IP information added to Registration table.
- User self-registration wizard added.
- Landing page added for cloud version.
- New user type—owner—added.
- Tooltip added to organization name.
- Organization management and exporting to Excel options added.
- All client table added to dashboard.
- User password recovery via email added.
Fixes:
- Device modal animations fixed.
- Issues with device friendly name prefix update being too long fixed.
- Wireless profile frequency change issue fixed.
- Unsupported CT country code removed.
Improvements:
- Responsive design improved.
- Error message readability improved.
v1.0
(June, 2016)
Initial Release
The Infinity Controller is a software platform for configuring and managing Wi-Fi networks based on LigoWave devices. An Infinity Standalone Controller trial account is free and does not have limitations.
Follow the steps provided below to create an Infinity Standalone Controller account and to add Infinity devices to it.
Step 1. Install the Infinity Controller Linux or Windows (VM) image. Instructions how to install are provided here:
How to install the Infinity Controller on Windows
How to install the Infinity Controller on Linux
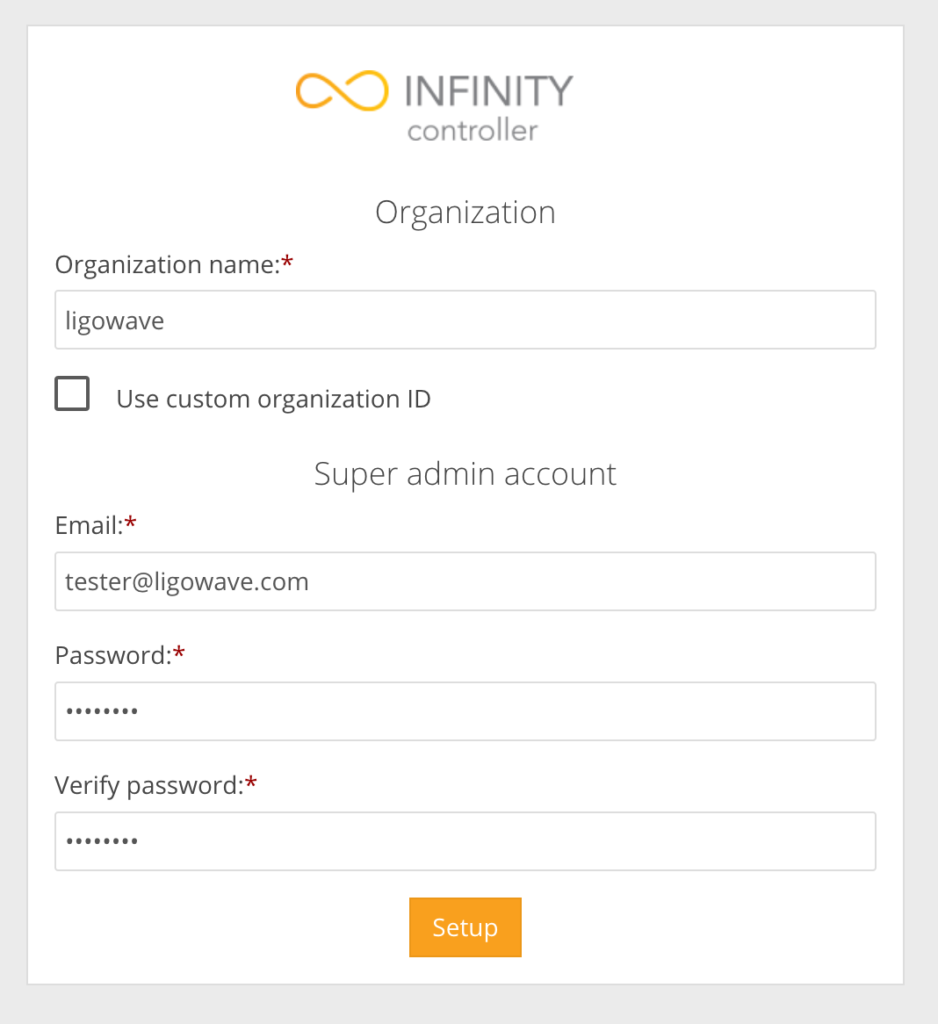
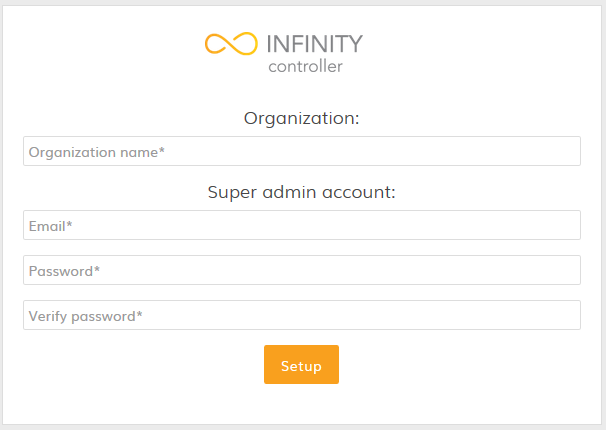
Step 2. First-time log in into Standalone Infinity Controller will require to add super-user information and login credentials:
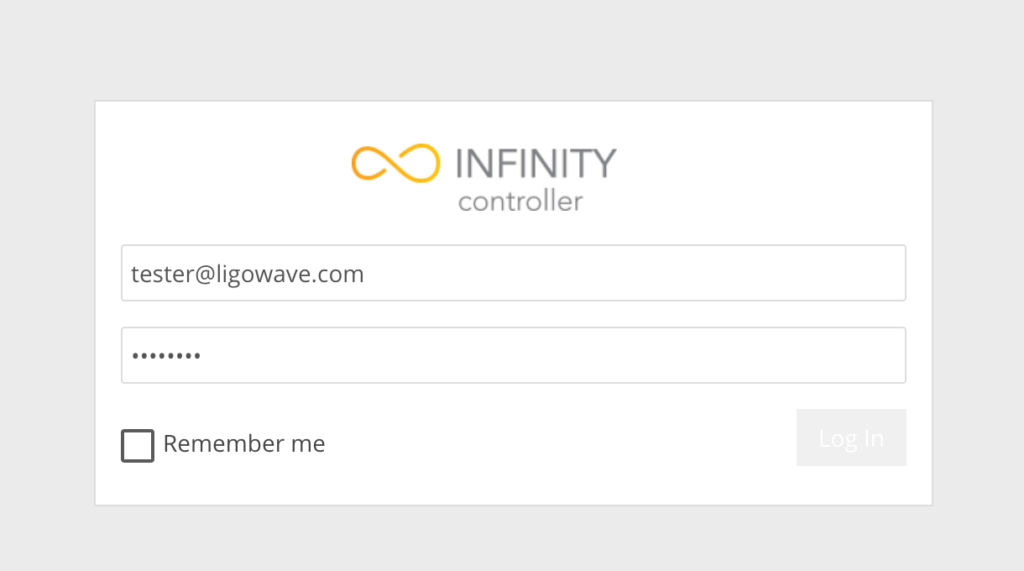
Step 3. Enter your credentials and click Log In to enter the Infinity Cloud Controller:
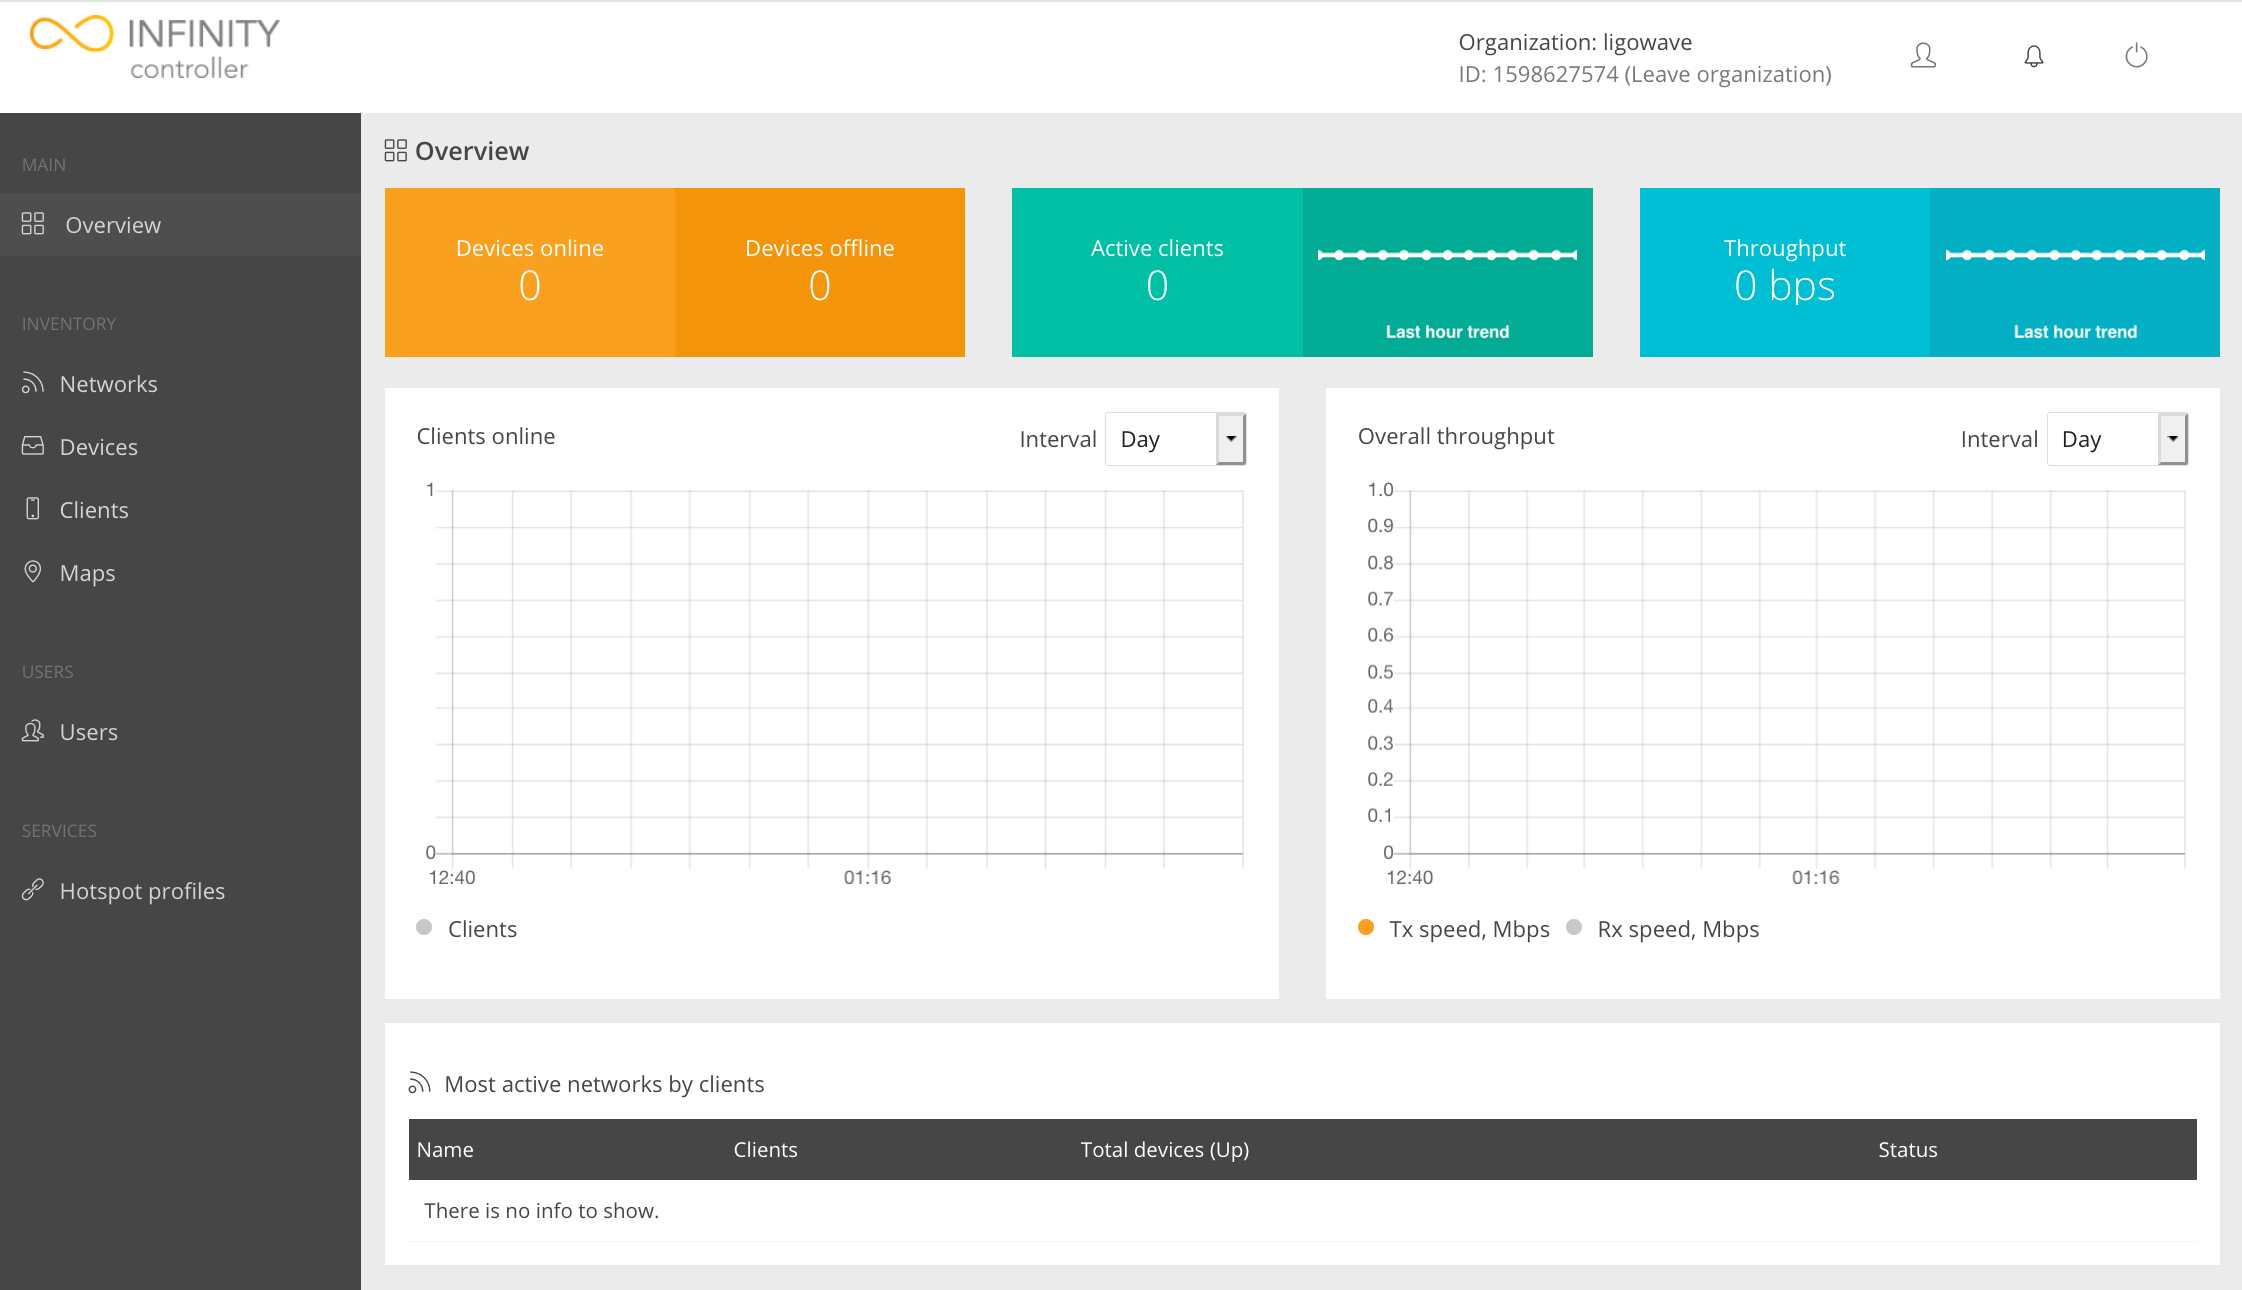
The Infinity Controller’s management interface:
Step 4. Log on to the device (instructions on how to log in for the first time can be found in the FAQ), read the User Agreement, and select your operating country code:

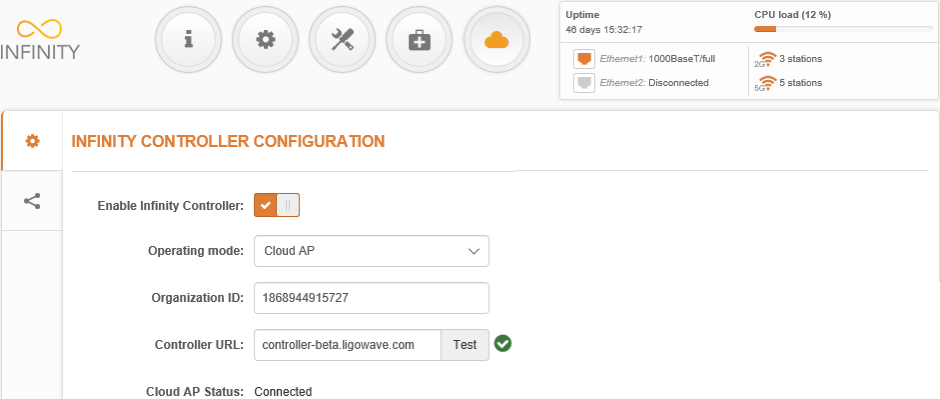
Step 5. Choose Cloud AP to change the LigoNFT’s operating mode. Once this Cloud AP device is connected to the network, it will download the network-specific configuration from the External Infinity Controller:
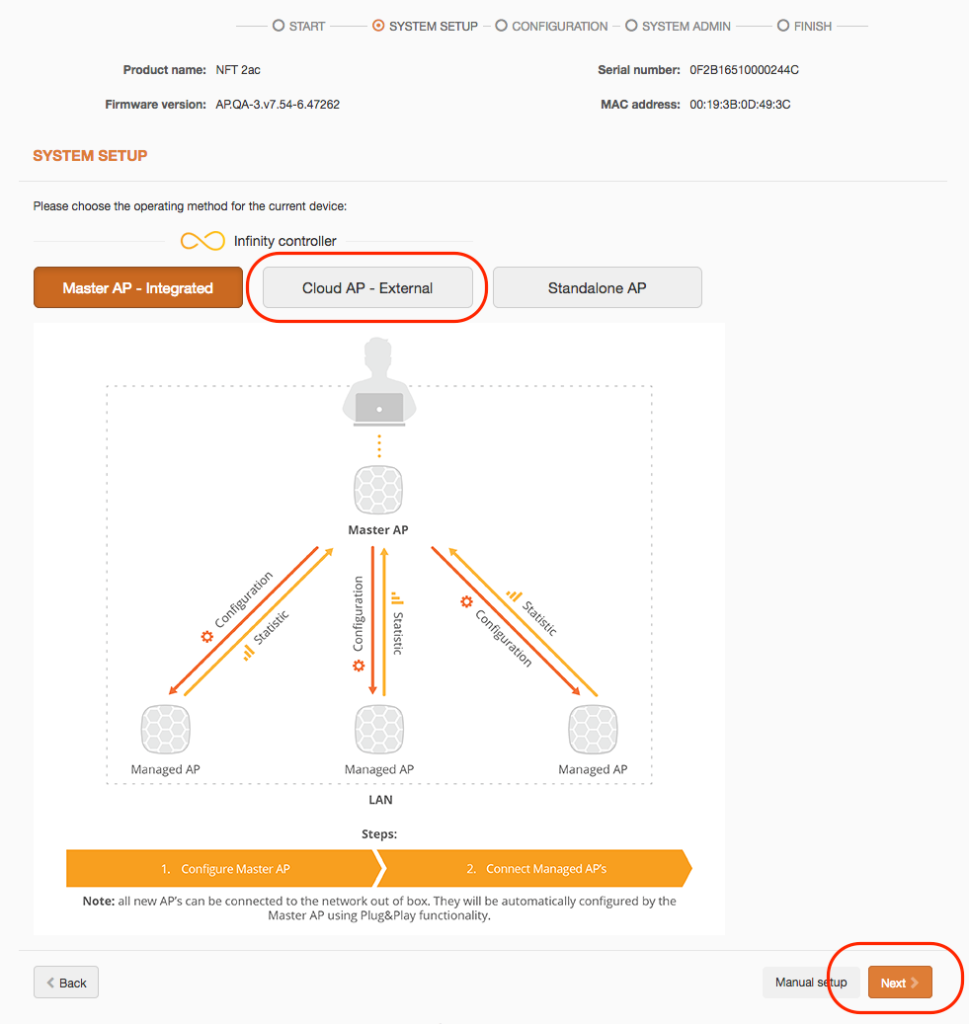
Step 6. Assign the Organization ID and the Controller URL of the particular Infinity Controller server:
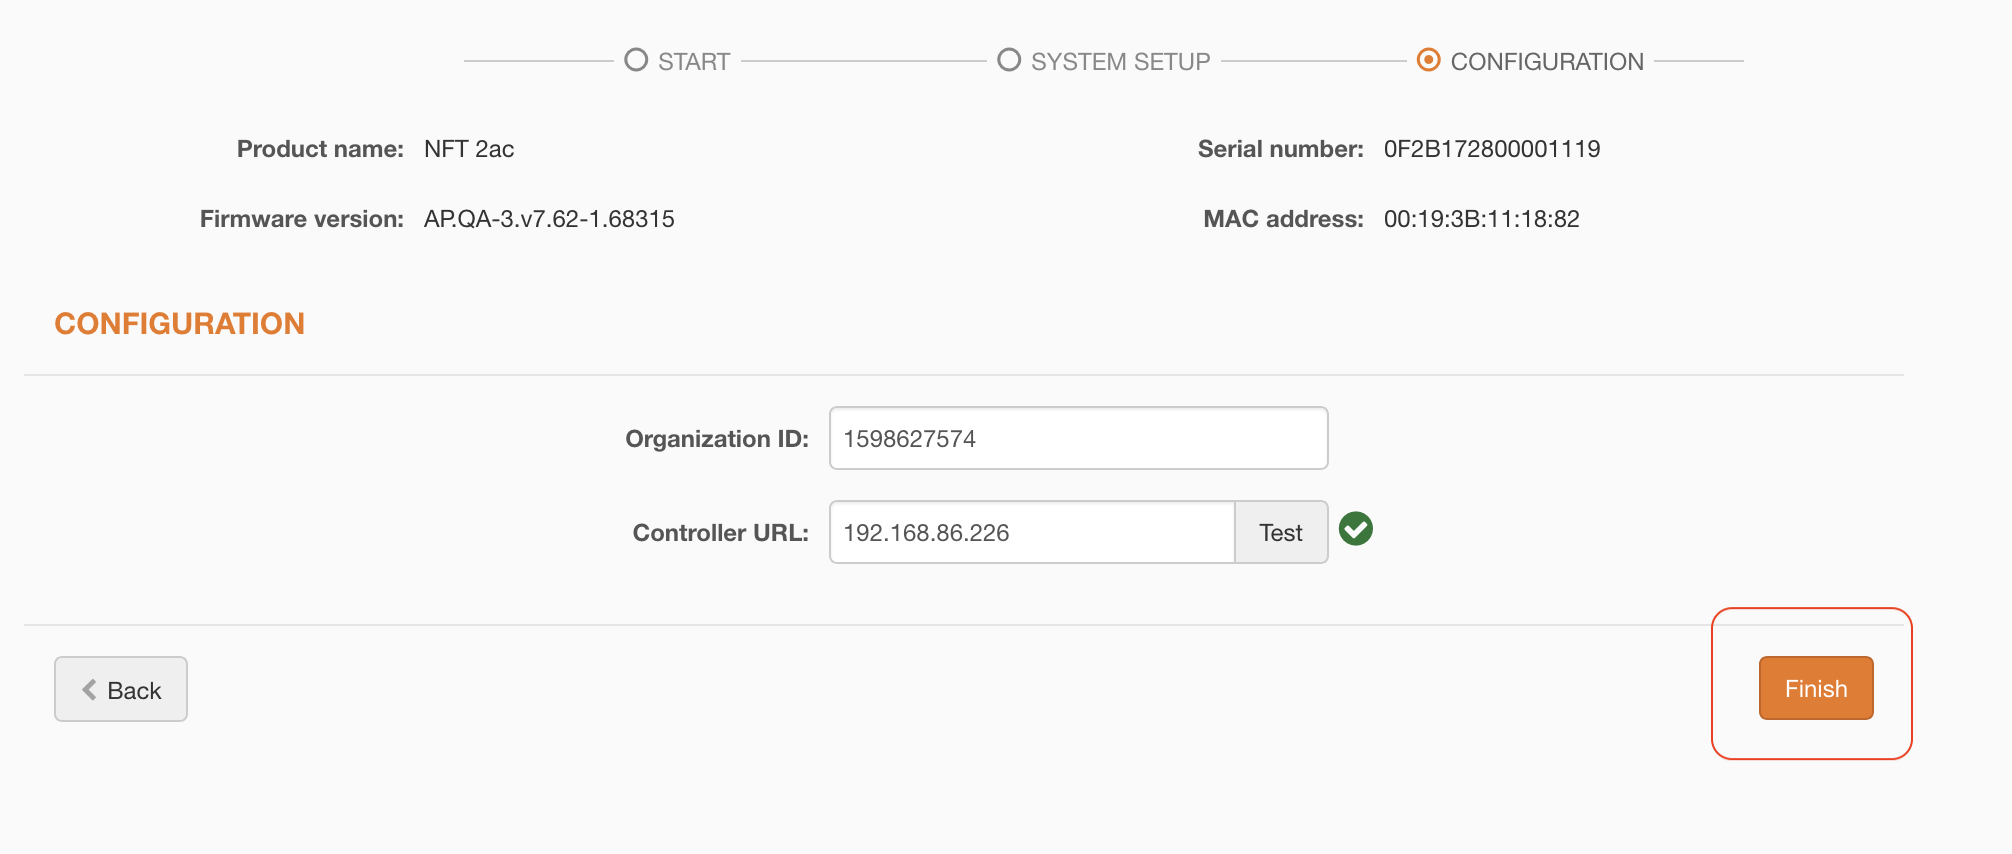
- Organization ID – enter the Organization ID provided by the External Infinity Controller.
- Controller URL – specify the correct External Infinity Controller’s URL where the Cloud AP will be registered and managed. Use Test to check the availability of the controller’s URL.
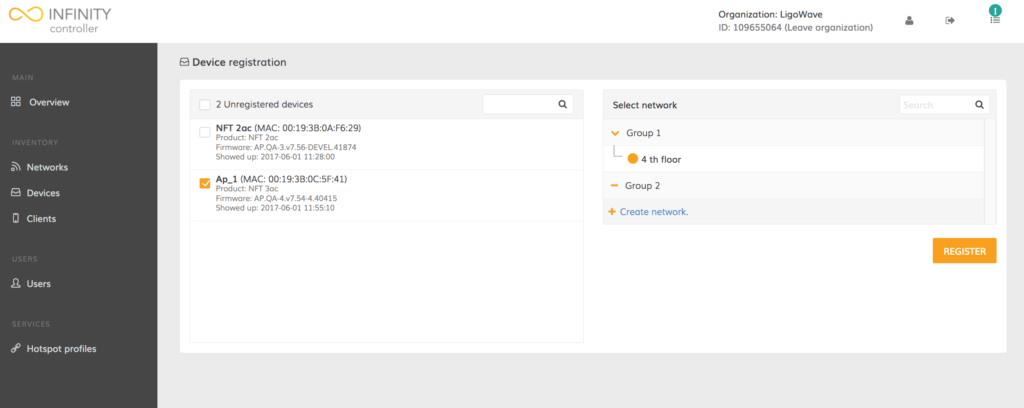
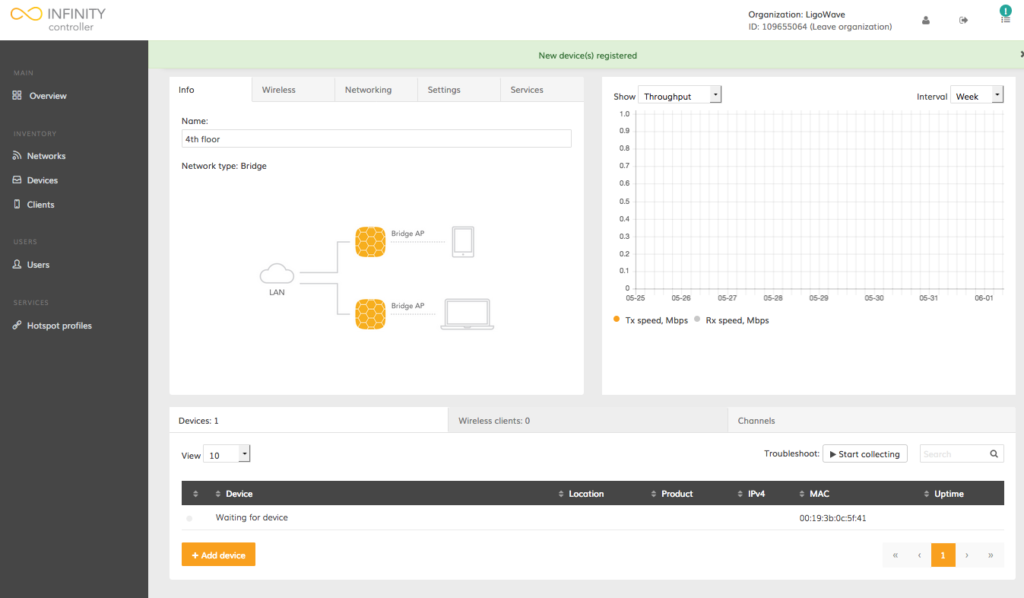
Step 7. Once the device is configured, load the Infinity Controller’s management interface and wait for the device to appear under the unregistered devices list. Wait until the green exclamation icon appears on the upper-right corner of the web management system and click it:
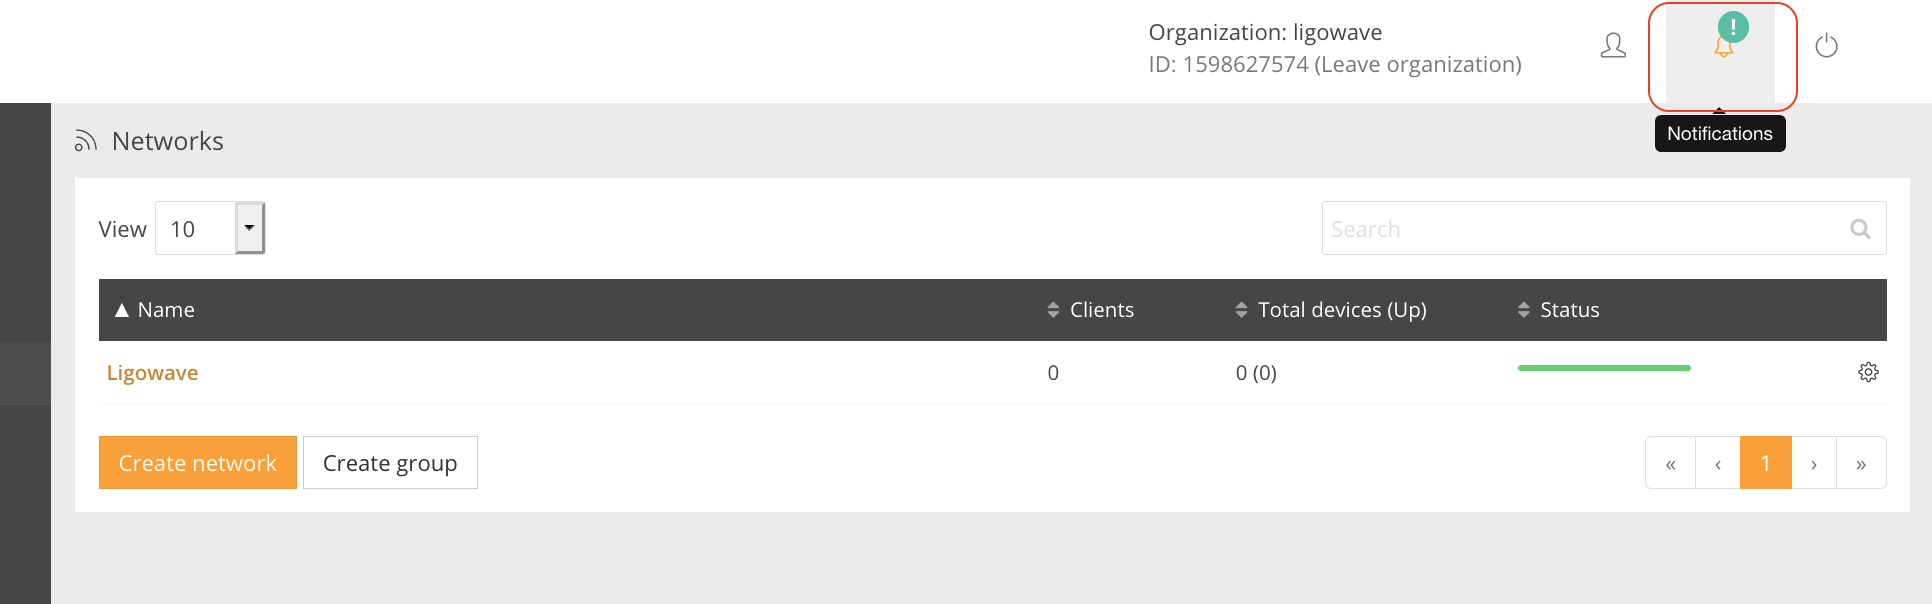
Step 8. Click on the exclamation icon. The notification indicating the count of the unregistered devices will appear:
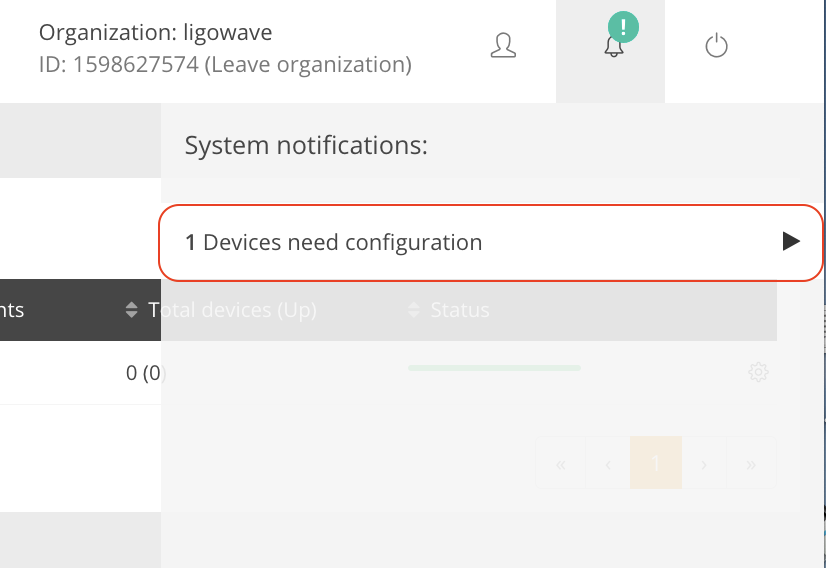
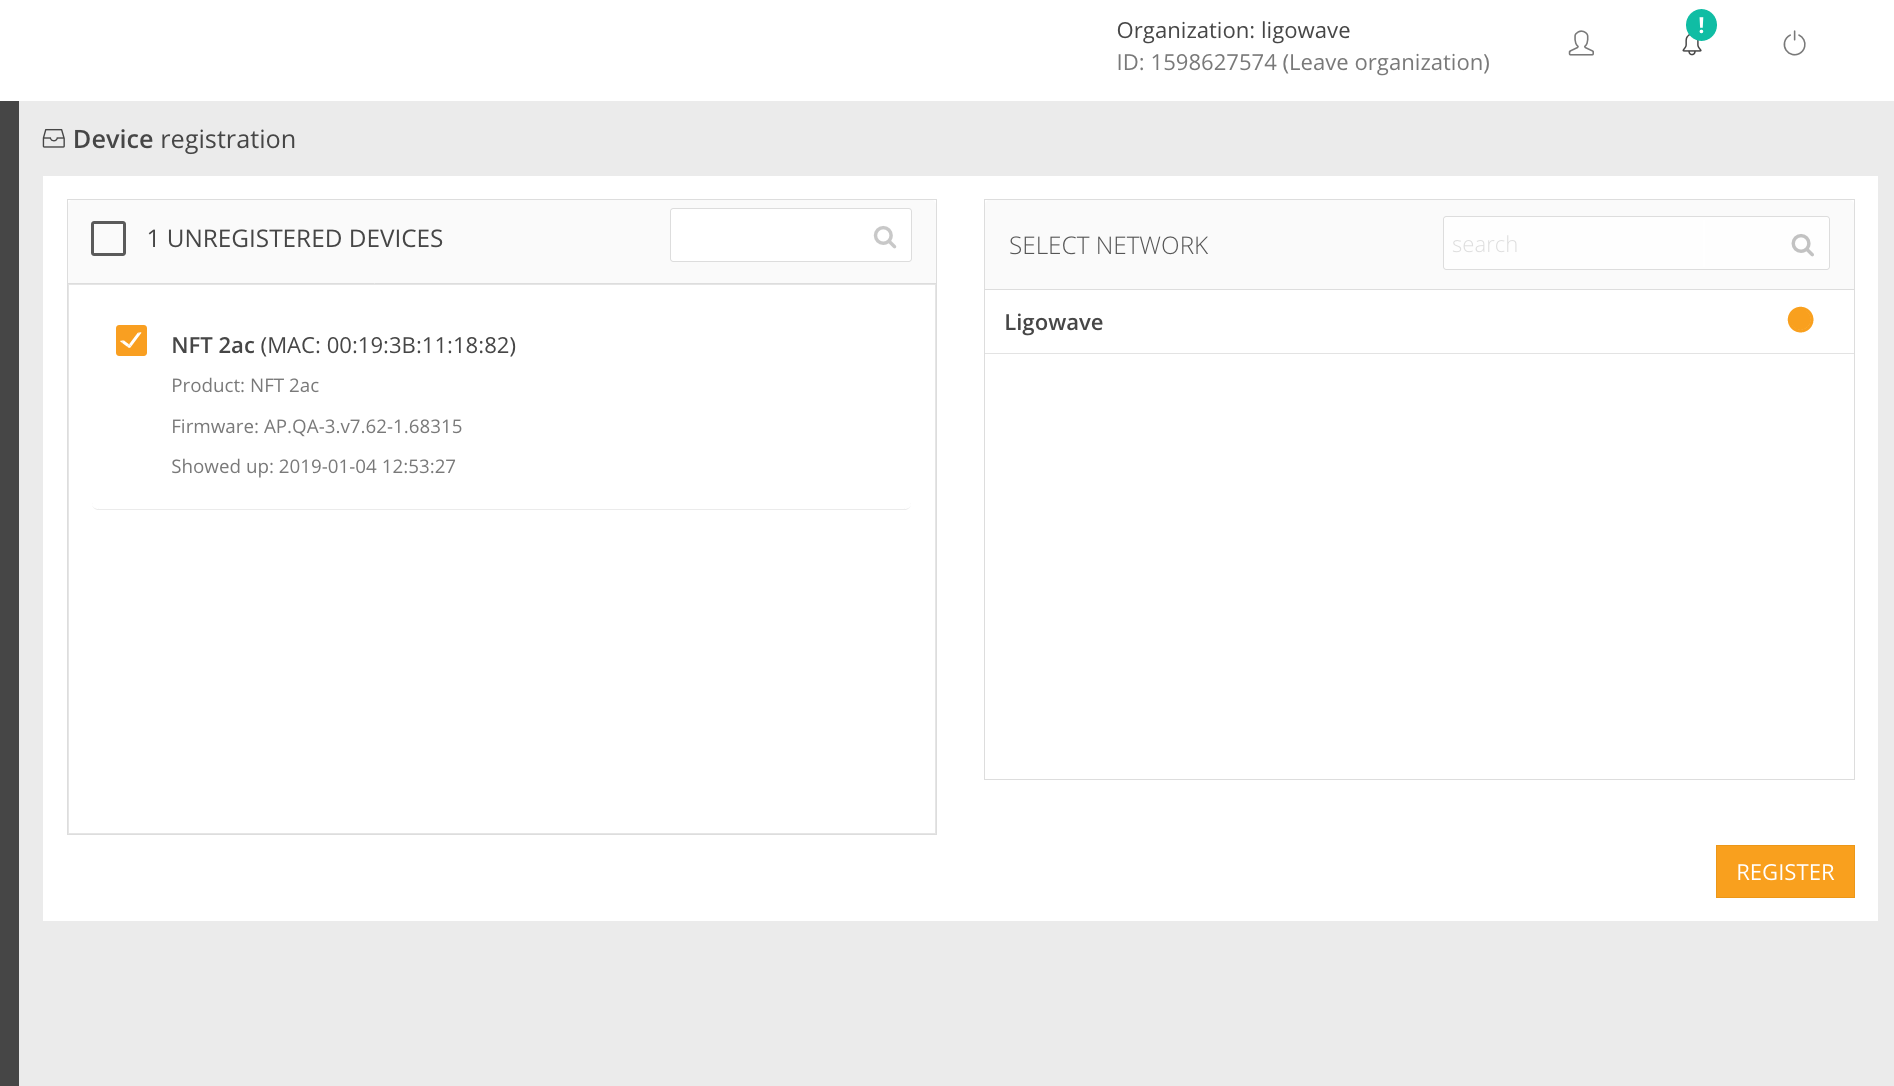
Step 9. Click on the notification and select the devices for registration to the selected network:
Detailed instructions on how to configure the Infinity Cloud Controller can be found here.
Creating a network
The Infinity Controller can categorize devices into logical groups and networks. Follow these steps to create a new network and to assign it to a group in the Infinity Controller
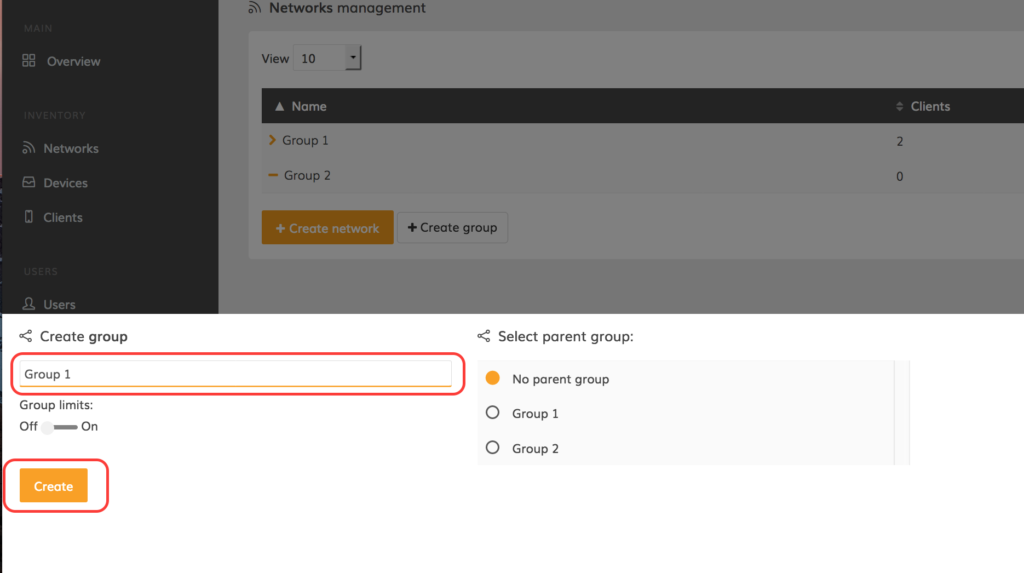
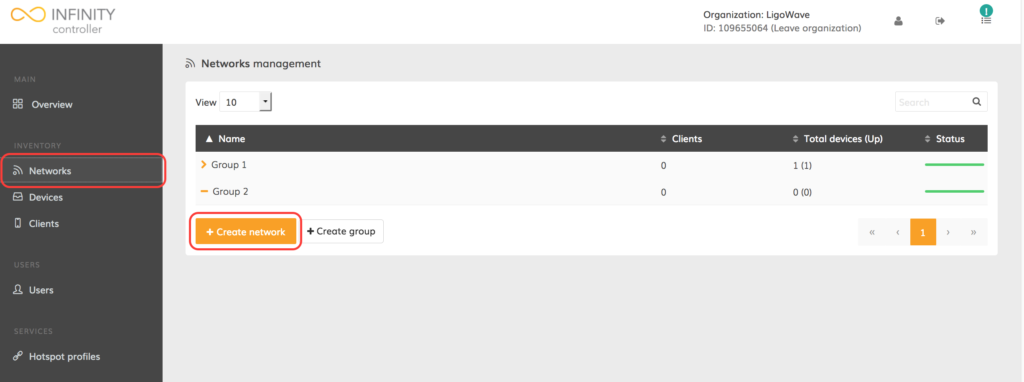
Step 1. Click on Networks (found in the navigation menu on the left side of the screen). An empty group table should open up.
Step 2. Click Create group to add a new group.

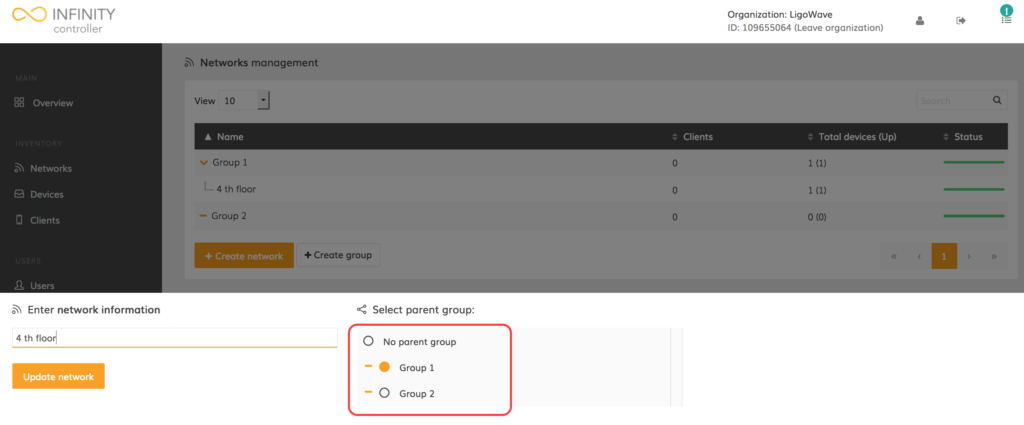
Step 3. Indicate the group’s name and select to whether set the current group as a part of a parent group. Once done, click Create group:
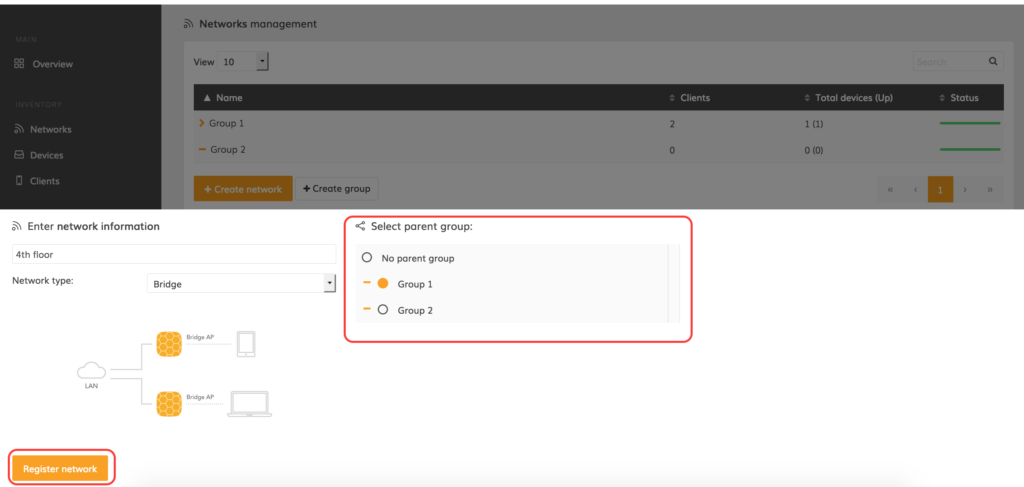
Step 4. Click on Networks (found in the navigation menu on the left side of the screen). An empty group table should open up.
Step 5. Click Create network to add a new network.
Step 6. Indicate the network’s name and select to whether set the current network as a part of a parent group. Once done, click Register network:
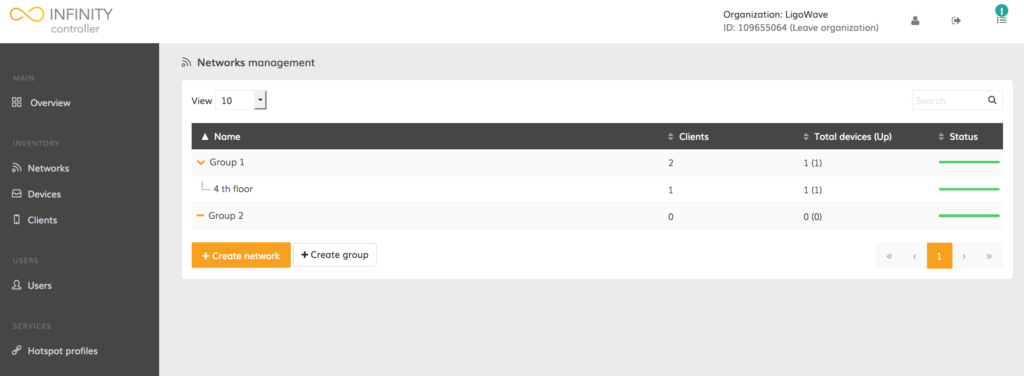
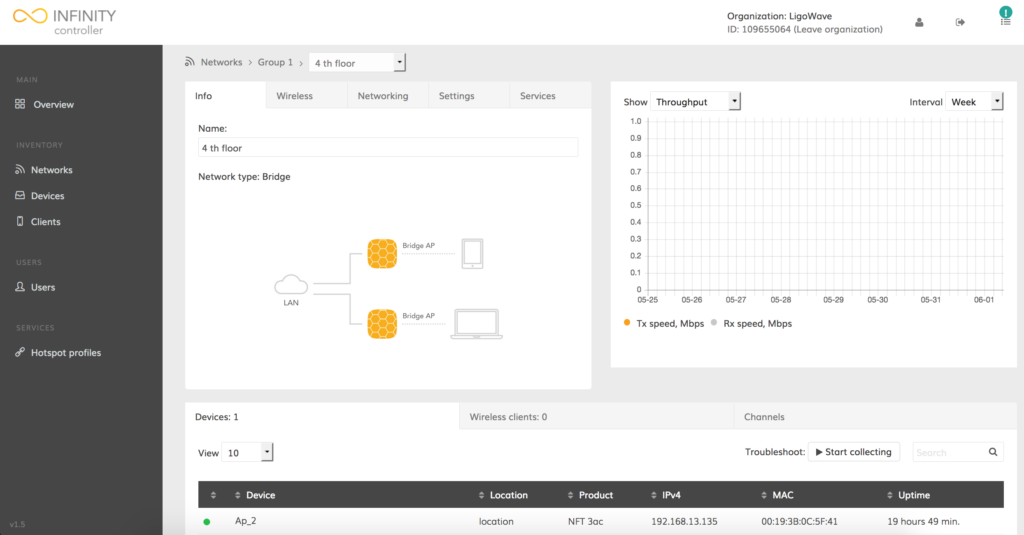
The newly-registered network will now be visible in the network management table. This table contains information on how many devices are registered onto the network, what the status is each of these devices, and the number of wireless clients present on the network.
Adding device to a network
Before monitoring and configuring LigoWave devices, they must first be added to a network within the Infinity Controller. Device registration to the Infinity Controller begins on the device’s end. Only a properly configure device will be able to send information to the Infinity Controller, thus allowing registration and management. Follow these steps to add a device to the network.
Step 1. Access the device management suite
Step 2. Navigate to the Controller menu.
Step 3. Set Operating mode to Cloud AP, and indicate the Organization ID and the Controller URL of a particular Infinity Controller:
Step 4. Once the device is configured, load up the Infinity Controller Management Interface and wait for the device to appear in the list of unregistered devices.
Step 5. When a green exclamation mark appears on the upper-right corner of the management suite, click it.

Once clicked, a notification should pop up, indicating the number of unregistered devices:

Step 6. Click on the notification
Step 7. Select the devices to be registered onto the selected network and click Register:
Step 7. Once the registration process is complete, the device should be listed under the selected network:
Modifying Networks
The Infinity Controller may contain a lot of networks with many different devices. These networks should be named and/or grouped appropriately to facilitate management.
Navigate to Networks and click Edit (pencil icon) next to the appropriate network:

Here users are able to change the network name and/or assign the network to a group. Update the fields as necessary:
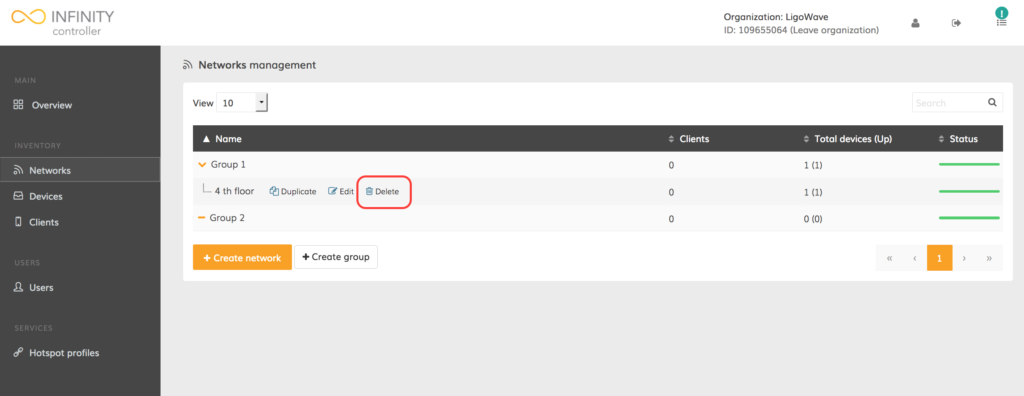
Deleting Networks
Networks can be deleted when they are no longer needed on the Infinity Controller. The devices from a deleted network will remain as unregistered devices and users will be able to assign them to new networks later.
Navigate to Networks and click Delete (trash bin icon) next to the appropriate networks:
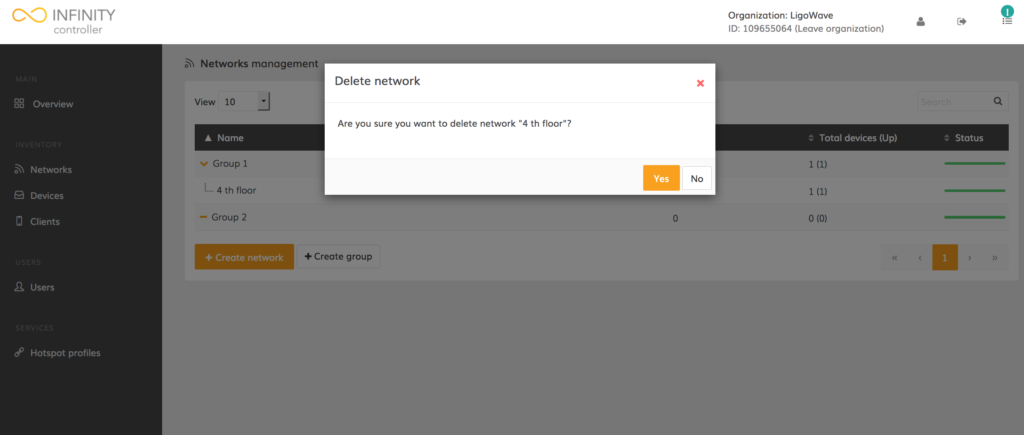
Click Yes to confirm the permanent deletion of a network:
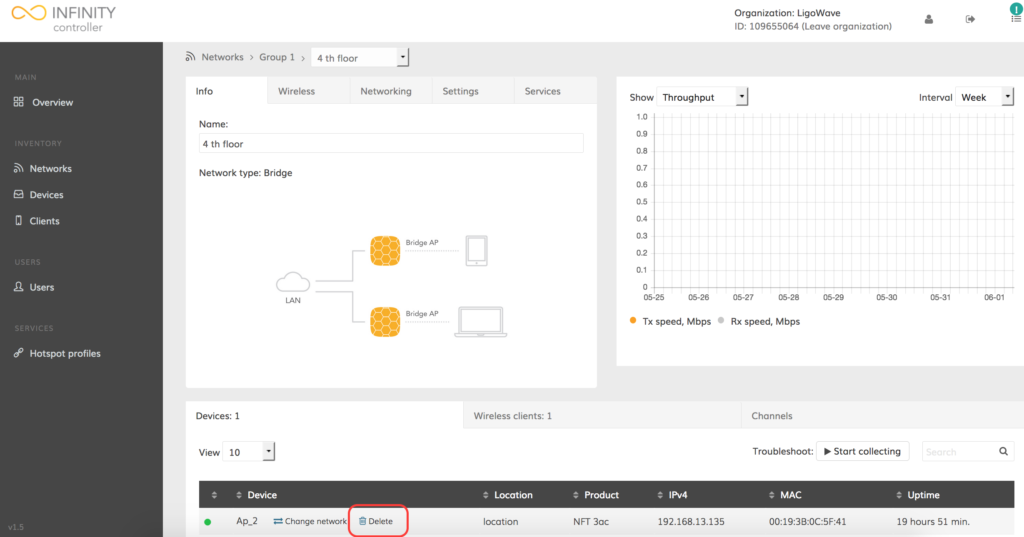
Deleting Devices
Sometimes devices need to be removed from networks or from the Infinity Controller. This can be due to replacement, moving to a different location, or other reasons. Once a user deletes a device from the network, it will be assigned to the list of unregistered devices. The only way to remove the registered device from the Infinity Controller permanently is to reset the device to its default factory settings.
Follow these steps to remove a device from the Infinity Controller:
Step 1. Find the necessary device by navigating to the Networks menu.
Step 2. Click Delete (trash bin icon) next to the necessary device:
Step 3. Click Delete to confirm the deletion process, or click Cancel to terminate deletion.
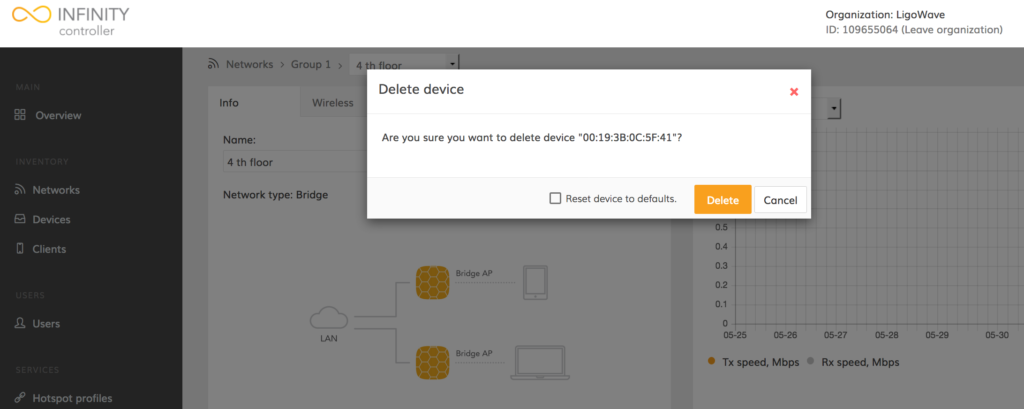
The option to reset the device to its default factory settings restores the device’s initial configuration and permanently deletes the device from the Infinity Controller.
Adding/Deleting User Accounts
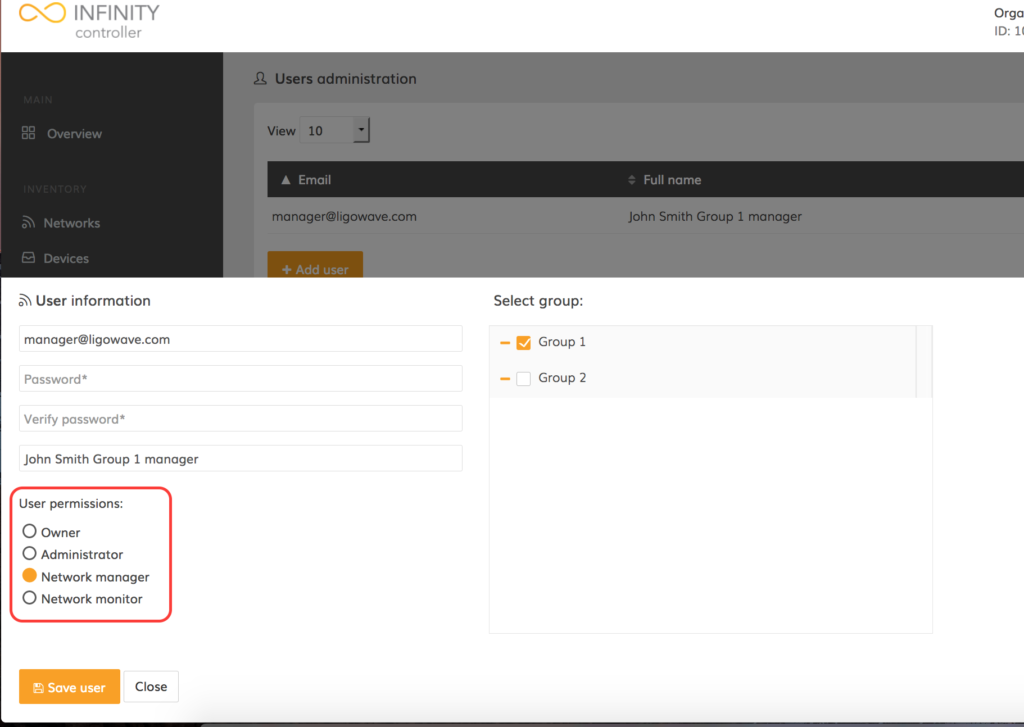
There are four types of user accounts, each possessing different permissions and limitations:
- Owner – this user account is provided after registration on the Infinity Controller. The owner can control all system functions and their account cannot be deleted.
- Administrator – this user has complete access to all networks and settings, including new account creation.
- Network manager – this user has read-write permissions, granting full access to the assigned network information.
- Network monitor – this user has read-only permissions, granting access to the assigned network information.
Follow these steps to add a new user with the appropriate permissions:
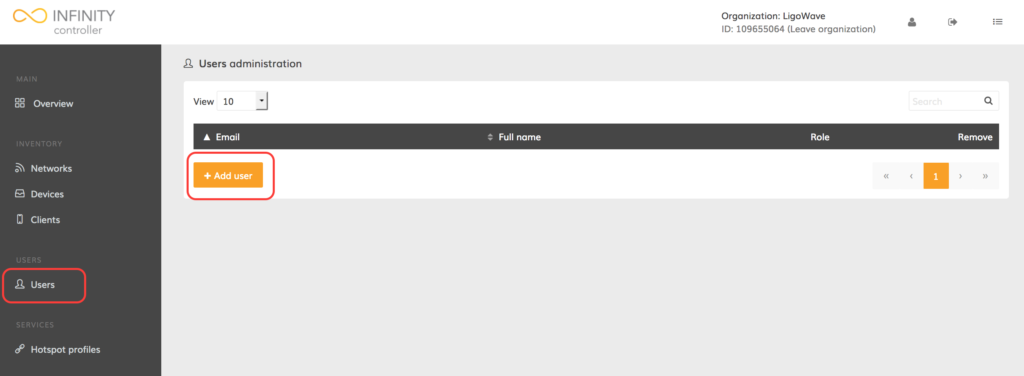
Step 1. Click Users to open up the user administration window.
Step 2. Click Add user:
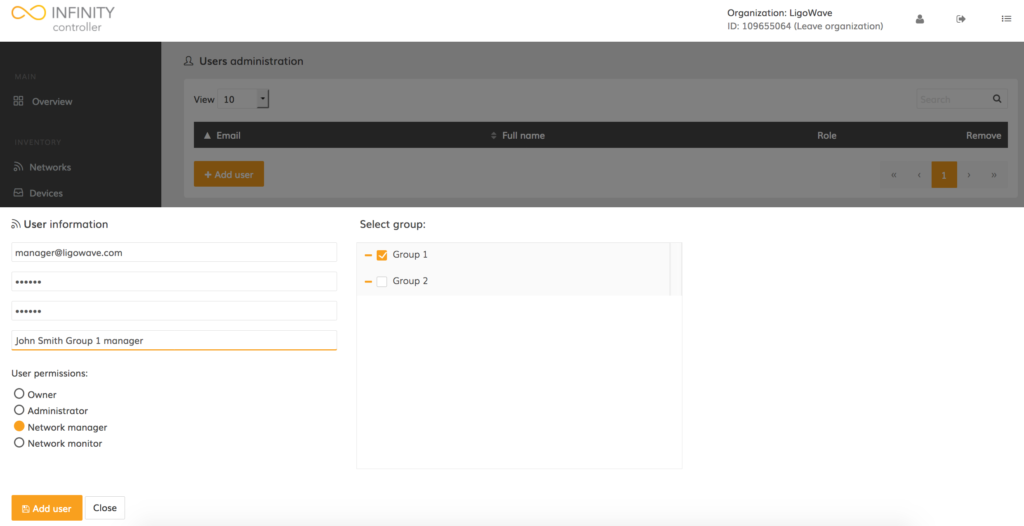
Step 3. Enter the user’s e-mail address, set a custom password, select the appropriate permissions, and assign the networks or network groups that the user will be allowed to access:
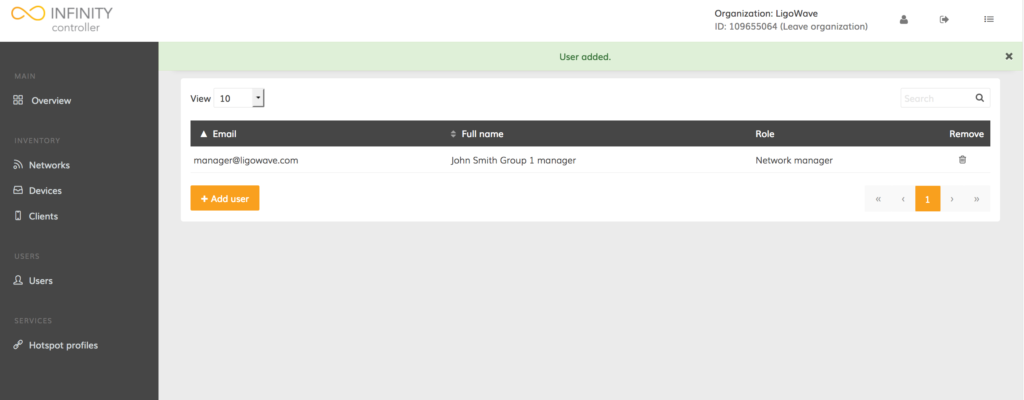
The new user account has been successfully created. This user will only be able to access 1 group.
Changing User Permissions
Follow these steps to change a user‘s permissions:
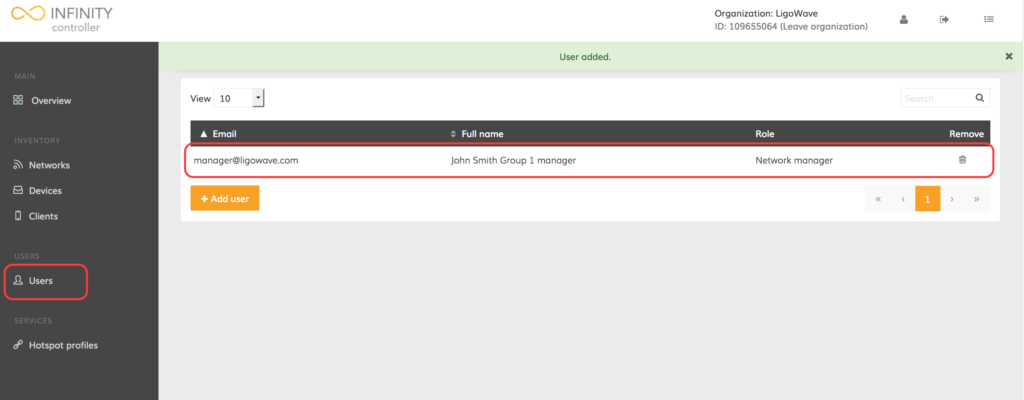
Step 1. Click Users to open the user management window.
Step 2. Click on the appropriate user to load the user’s information page:
Step 2. In the user information window, change the user account type (permissions) as necessary.
Step 3. Click Save user.
The new permission level has now been changed for the appropriate user.
Change User Password
Users who are logged in can very easily change their passwords:
Step 1. Click on the user icon found at the top right corner to load the user profile settings:
Step 2. In the user information page, enter the current password in the Old password field and then enter the new password in the Password and Verify password fields.
Step 3. Click Save user to update the account’s password.
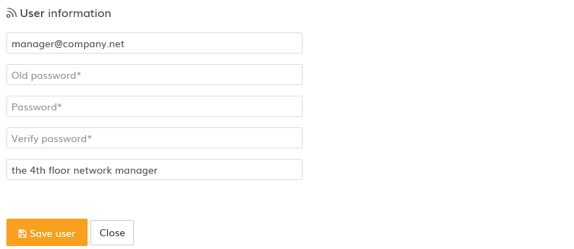
The new password has now been successfully changed.
Manual Adjustment of Wireless Channels on a Network
The Infinity Controller allows users to manage the properties of all devices within one network.
Step 1. Navigate to Networks.
Step 2. Find the necessary network name and click it to load network properties:
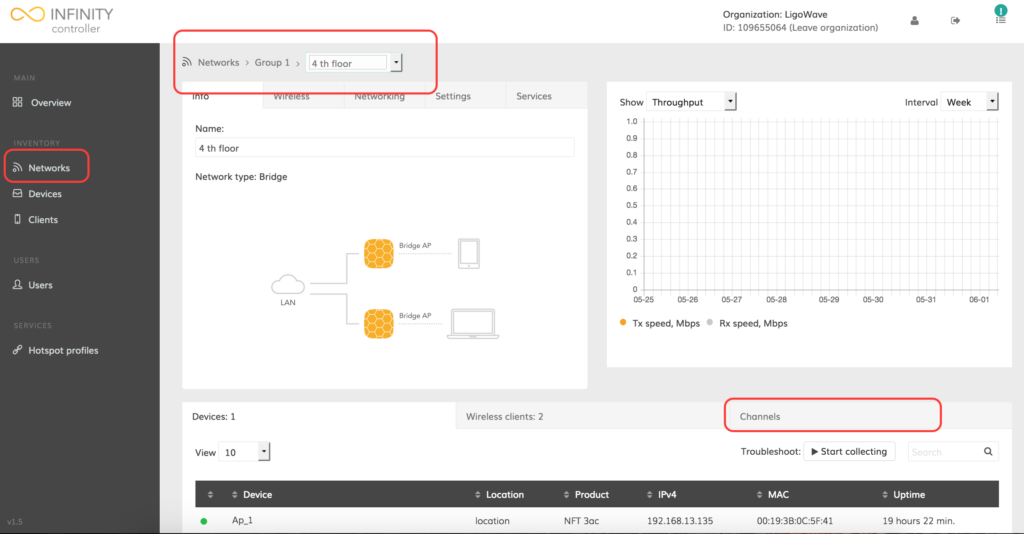
Step 3. Click Channels to load the wireless channels properties of the network devices.
Step 4. Select the required radio (2.4GHz or 5GHz) and modify the width, channel and/or enable the auto-channel feature:
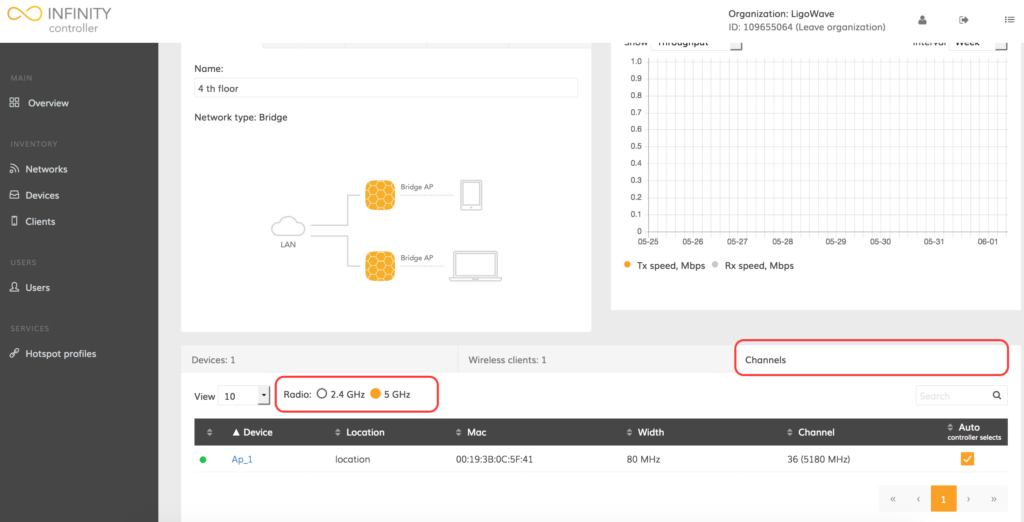
Step 5. Once the settings are changed, click Save changes.
![]()
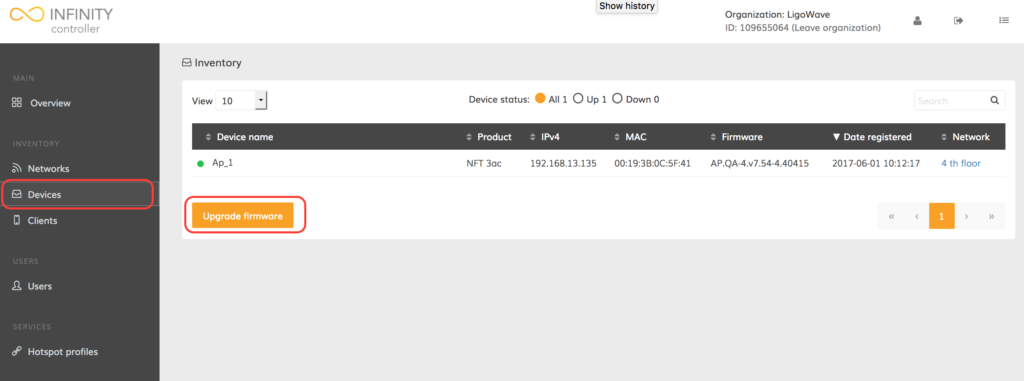
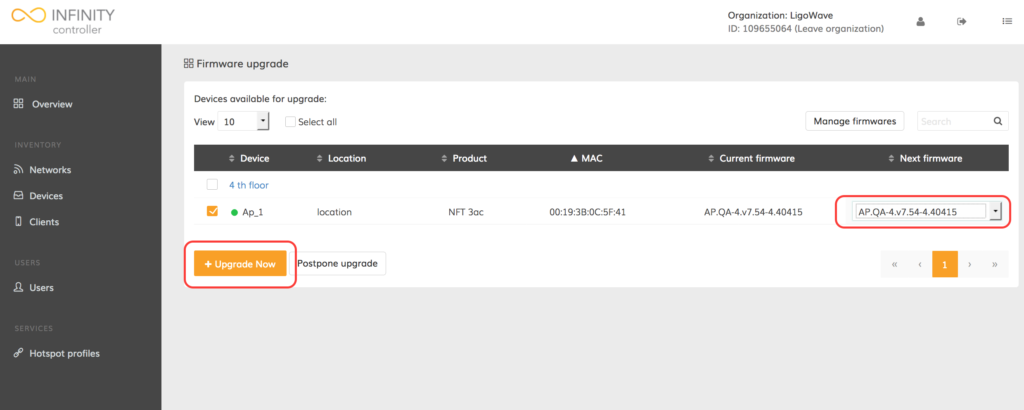
Upgrading the Firmware
Before upgrading the device, a proper firmware images must be uploaded to the Infinity Controller. Users can upgrade immediately after uploading, or schedule the device’s firmware upgrade to be performed at a later time.
Follow these steps to upgrade the firmware on the selected device(s):
Step 1. Navigate to Devices.
Step 2. Click Upgrade firmware. A list of upgradeable devices will be provided:
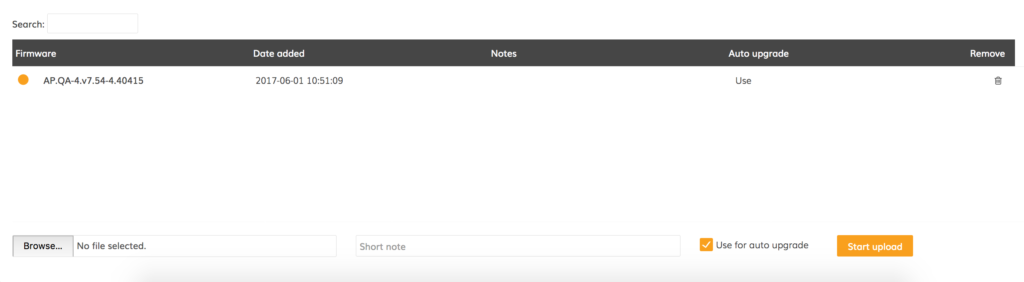
Step 3. Click Manage firmwares:
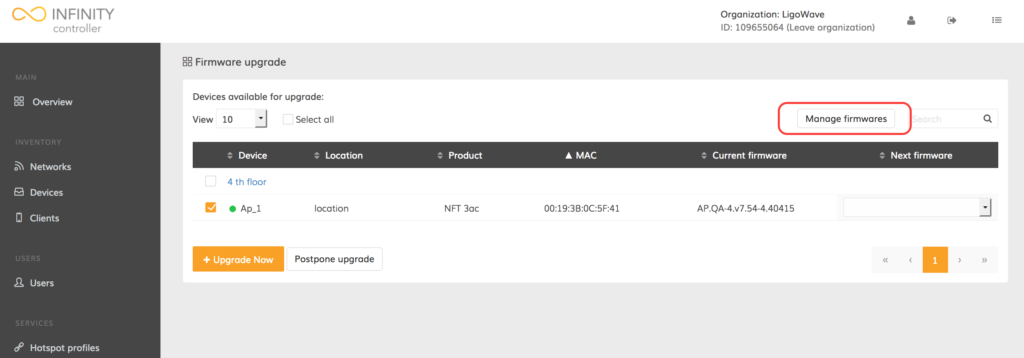
Step 4. Click Browse… to select the necessary firmware image and then click Start upload to begin the process of uploading the firmware:
Step 5. Once the proper firmware image is uploaded to the Infinity Controller, navigate to Devices > Upgrade firmware
Step 6. Select the required device, choose the appropriate firmware image, and click Upgrade now:
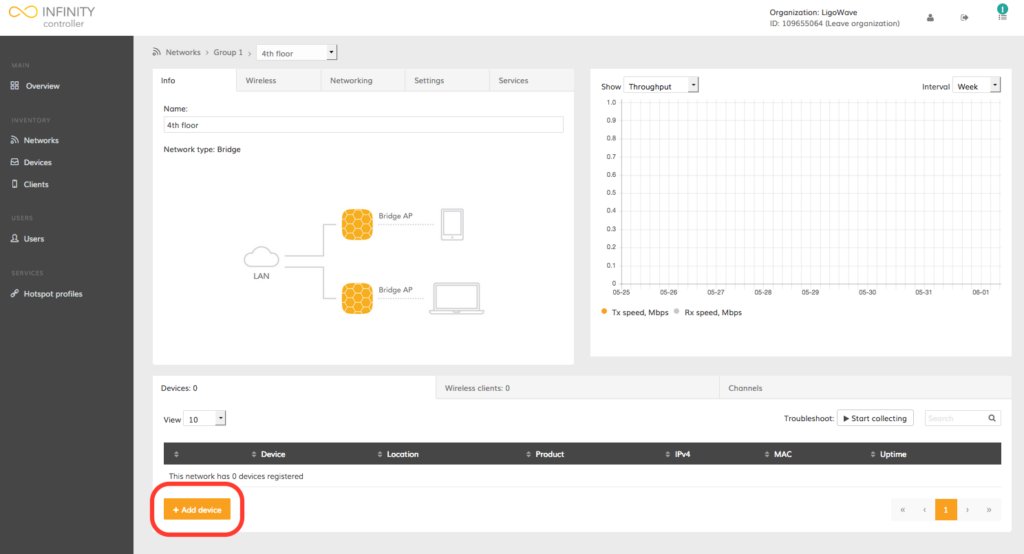
Manual Device Registration
Step 1. Navigate to Networks.
Step 2. Click on the appropriate network name in the networks management table:
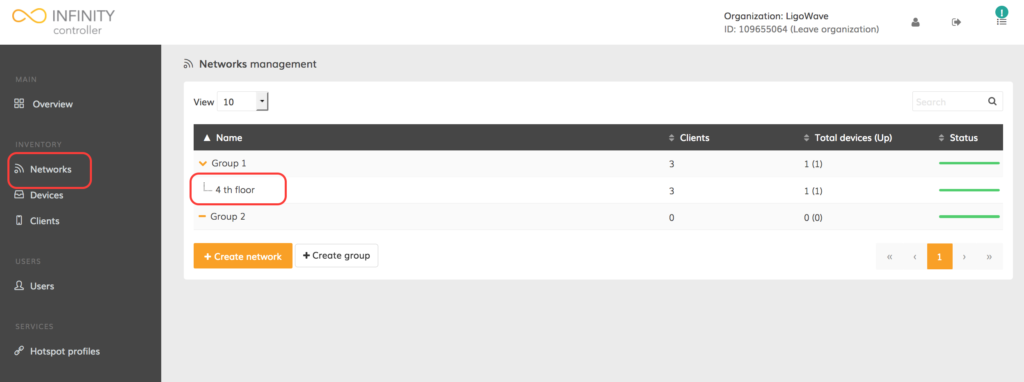
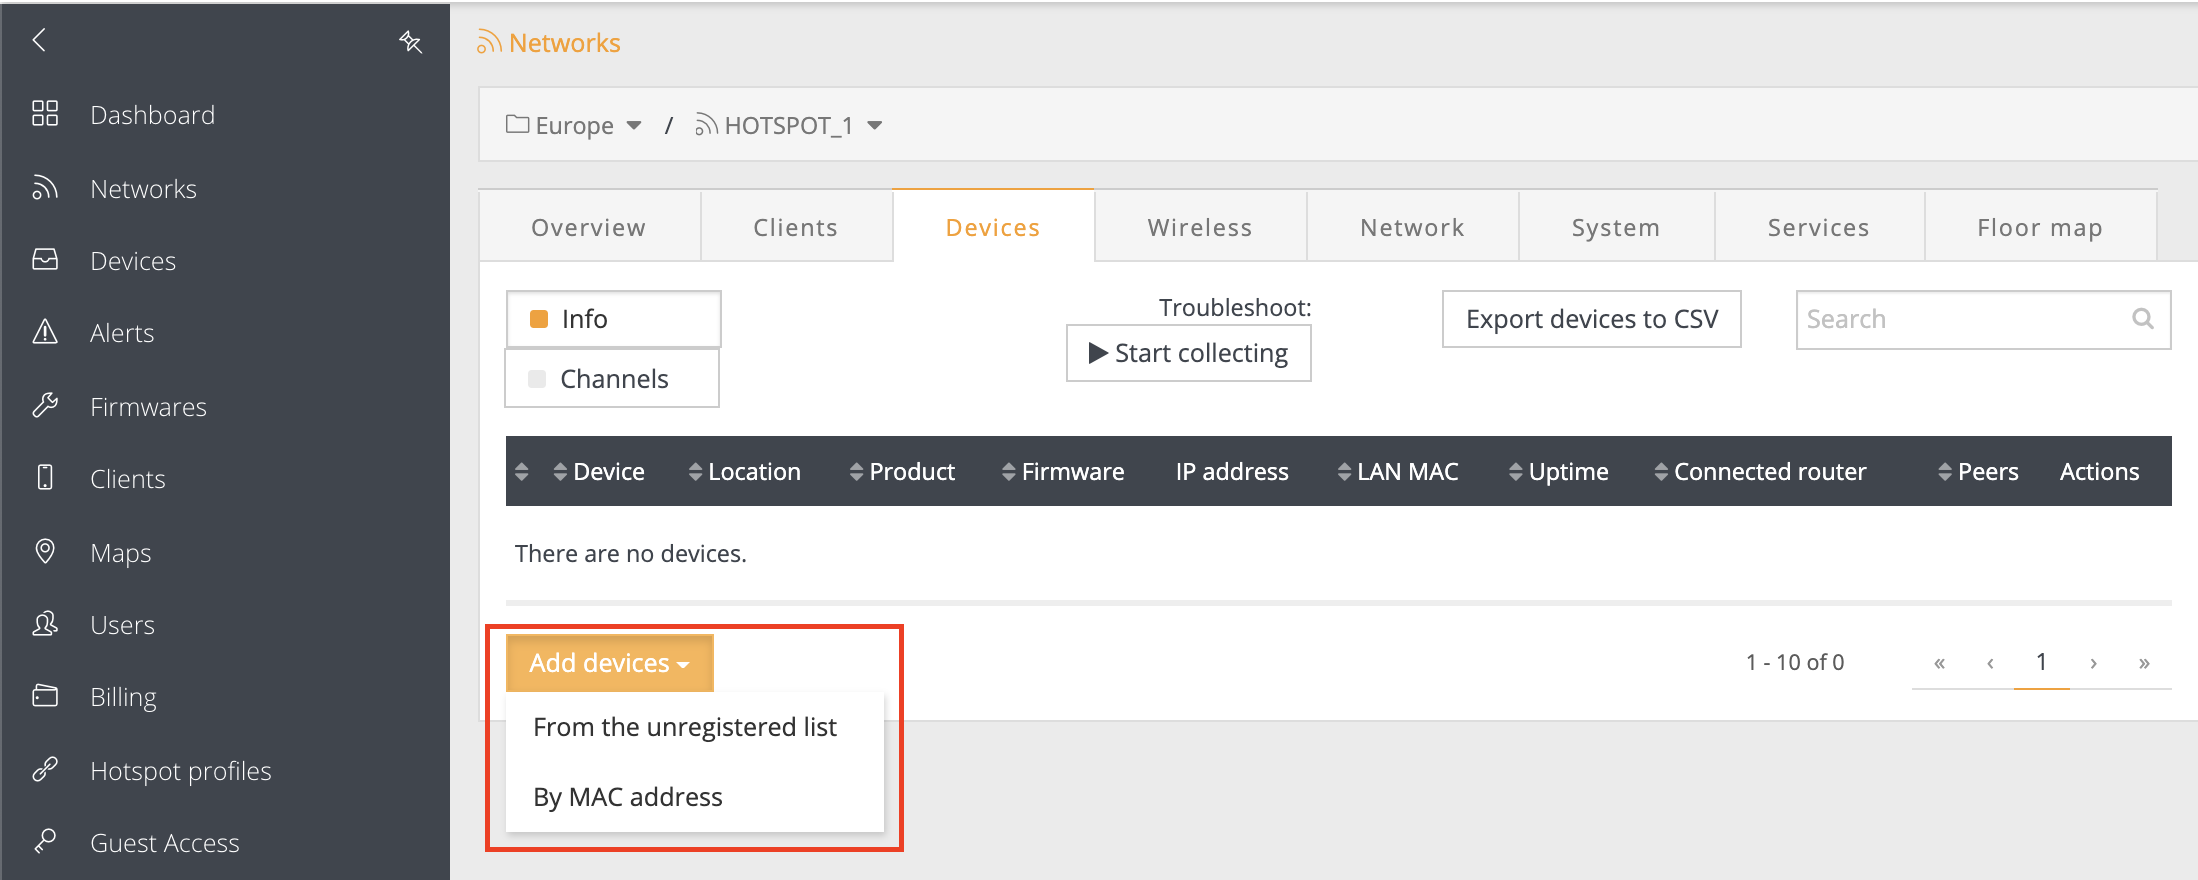
Step 3. The network page provides information about the devices within the network. To add a new device to an existing network, click Add device:
Step 4. Indicate the MAC address of a particular device(s) and click Register device:
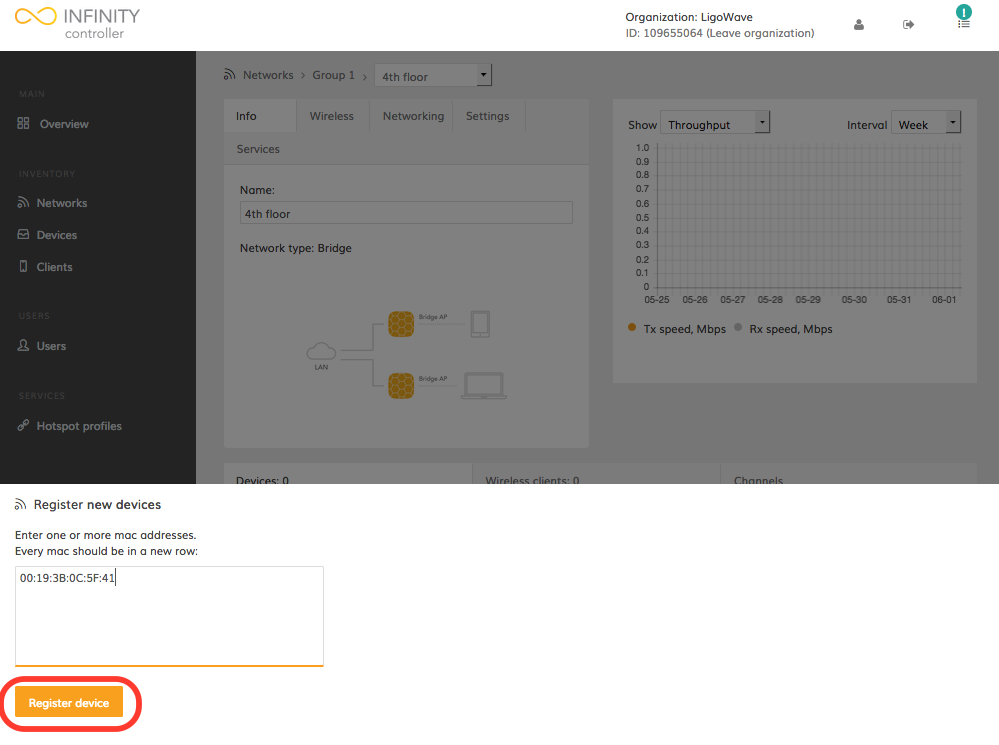
Once the device is successfully added to the network, it is necessary to wait for the device to send its information to the Infinity Cloud.
Step 5. Wait until the device sends its information:
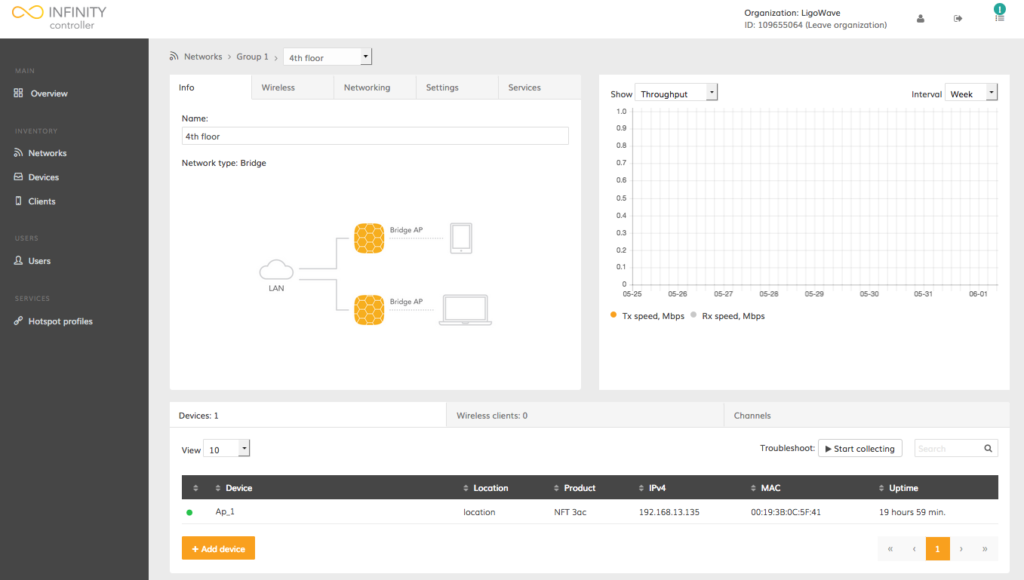
The device should now be successfully added to appropriate network, ready for configuration and monitoring.
Step 1. Get the External Infinity Controller package from LigoWave’s website:
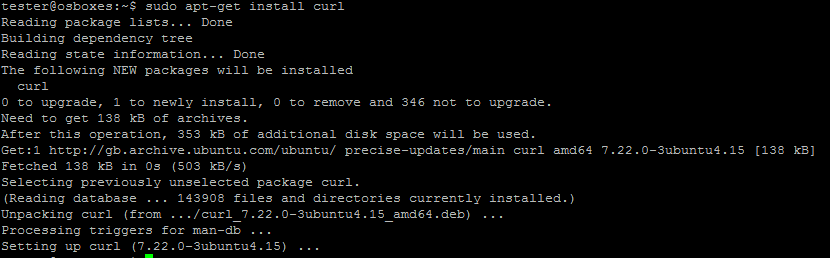
Step 2. Install docker:
sudo apt-get install curl; curl -fsSL https://get.docker.com/ | sh

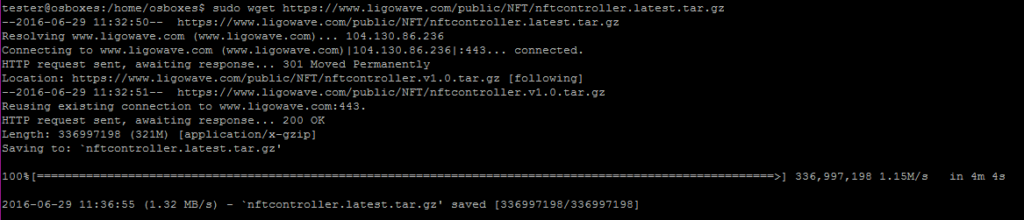
Step 3. Get the External Infinity Controller package from LigoWave’s website:
wget https://www.ligowave.com/public/downloads/nftcontroller.latest.tar.gz
Step 4. Extract the External Infinity Controller package (note that the file name can differ for each new release):
tar -xvf nftcontroller.latest.tar.gz
![]()
Step 5. Install the External Infinity Controller:
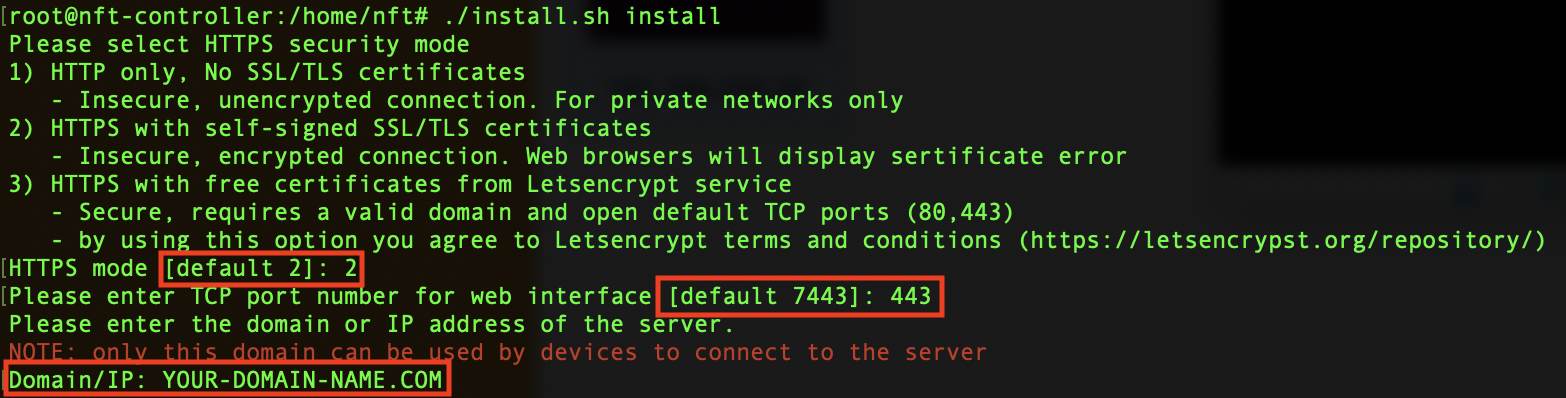
sudo ./install.sh install
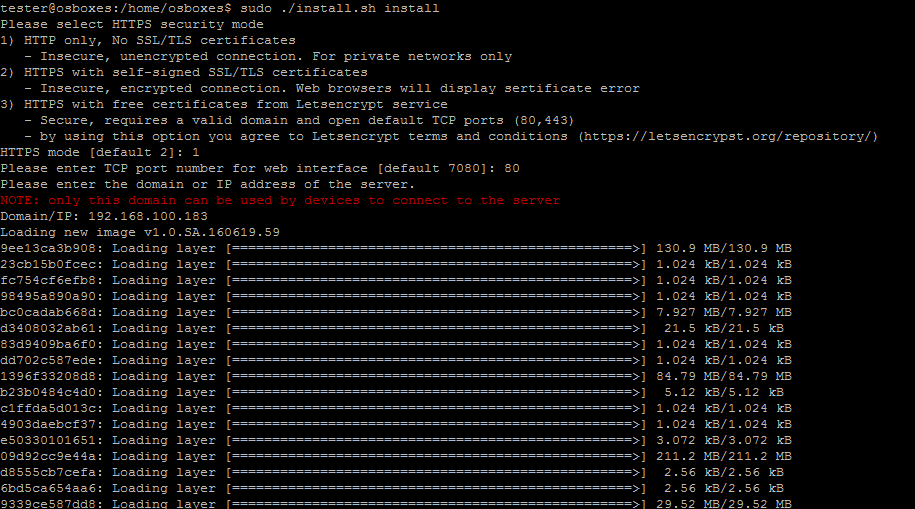
Step 6. Select the HTTPS security mode:
1) HTTP only, No SSL/TLS certificates: insecure, unencrypted connection. For private networks only.
2) HTTPS with self-signed SSL/TLS certificates: insecure, encrypted connection. Web browsers will display certificate error.
3) HTTPS with free certificates from Letsencrypt service: secure, requires a valid domain and open default TCP ports (80,443) (by using this option you agree to Letsencrypt terms and conditions).
Step 7. Enter the TCP port number for the web interface.
Step 8. Enter the domain or the IP address of the server (Linux machine).
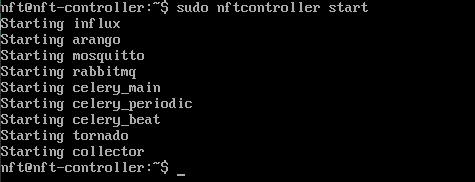
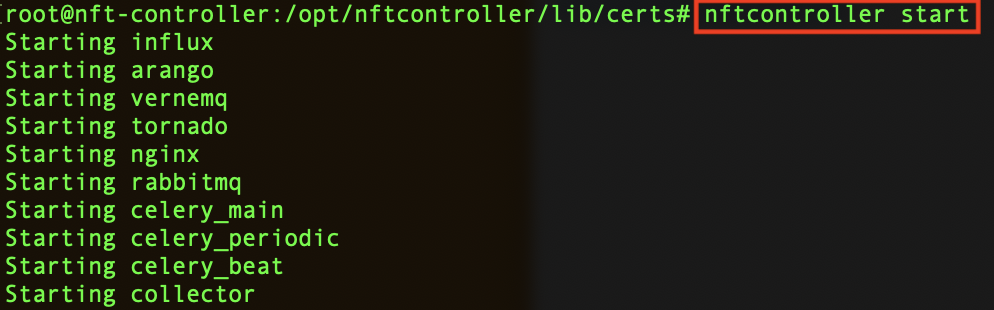
Step 9. Launch the External Infinity Controller:
sudo nftcontroller start
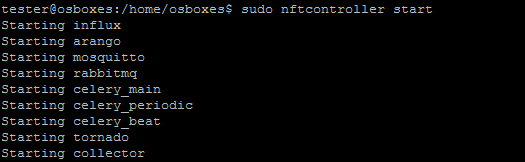
The controller should start in a couple of minutes.
Step 10. Access the External Infinity Controller via the web interface:
Step 1. Stop the Infinity Controller:
sudo nftcontroller stop
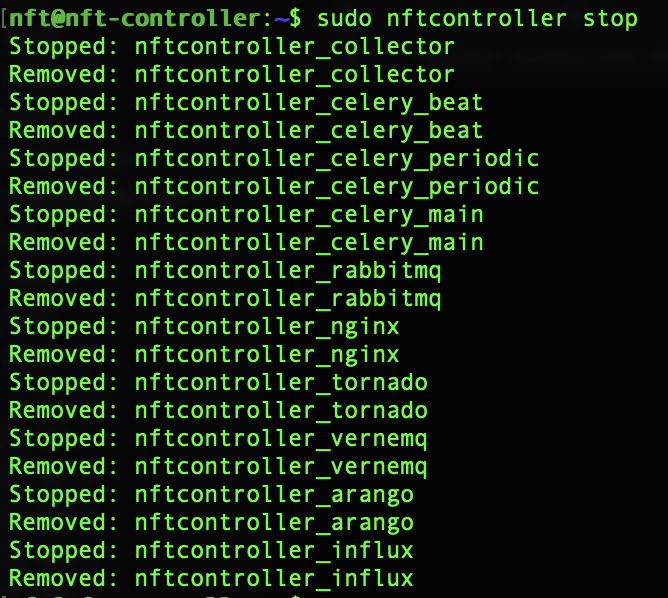
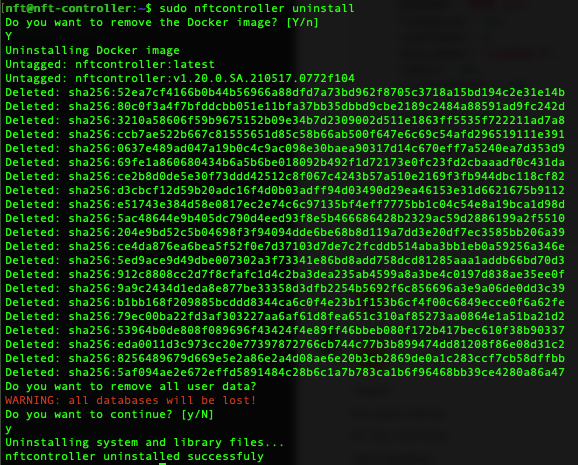
Step 5. Uninstall the External Infinity Controller:
sudo nftcontroller uninstall
Follow the steps to install Standalone Infinity Controller on Windows OS.
Step 1. Download latest NFT-Controller VM image from the LigoWave web site:
Step 2. Download and install the latest VirtualBox software from here.
Step 3. Launch VirtualBox:
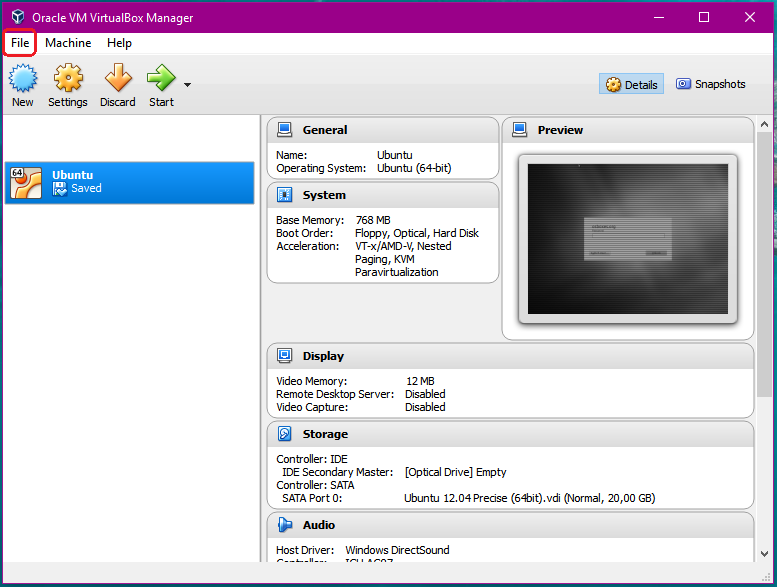
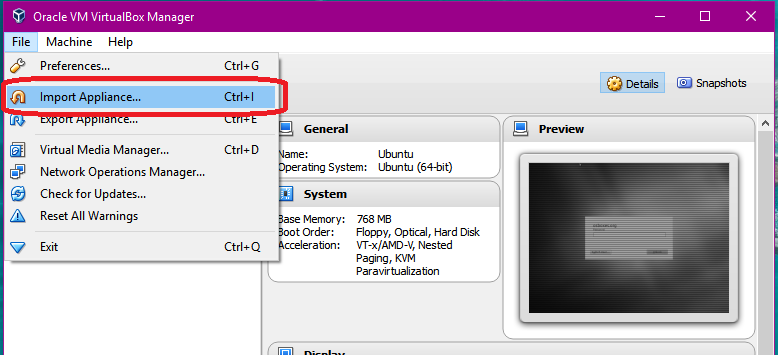
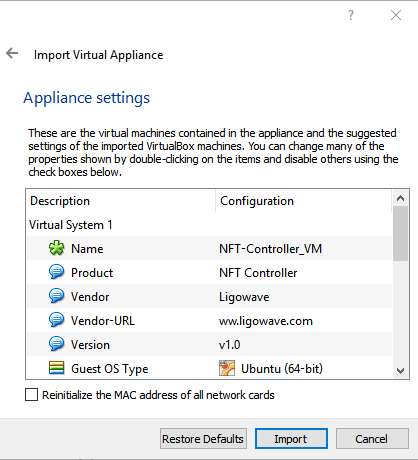
Step 3.1. Use the Import Appliance option (under File > Import Appliance) to import the NFT-Controller virtual machine (VM).
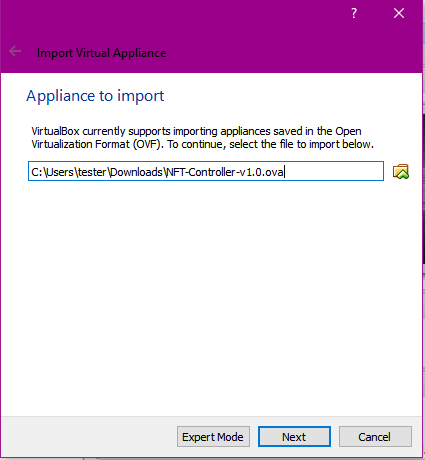
Step 3.2. Select the downloaded VM image and click Next:
Step 3.3. Click Import:
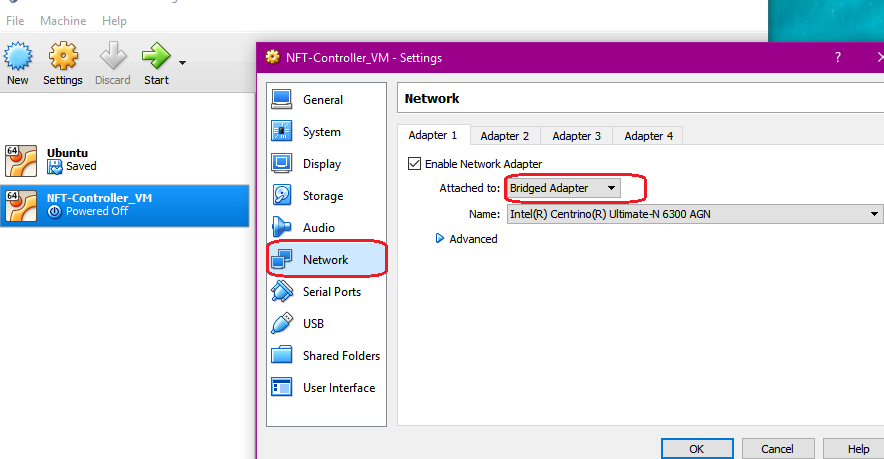
Step 4. Start the NFT Controller virtual machine. The virtual machine’s network is set to Bridge mode. VM will retrieve an IP address from the local DHCP server.
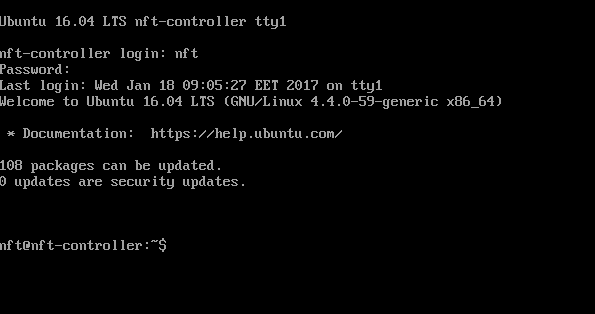
Step 5. Log in to the virtual machine. The default credentials are username nft and password admin01.
Step 5.1. Check the virtual machine IP address:
ip a

Step 6. Install the External Infinity Controller:
sudo ./install.sh install
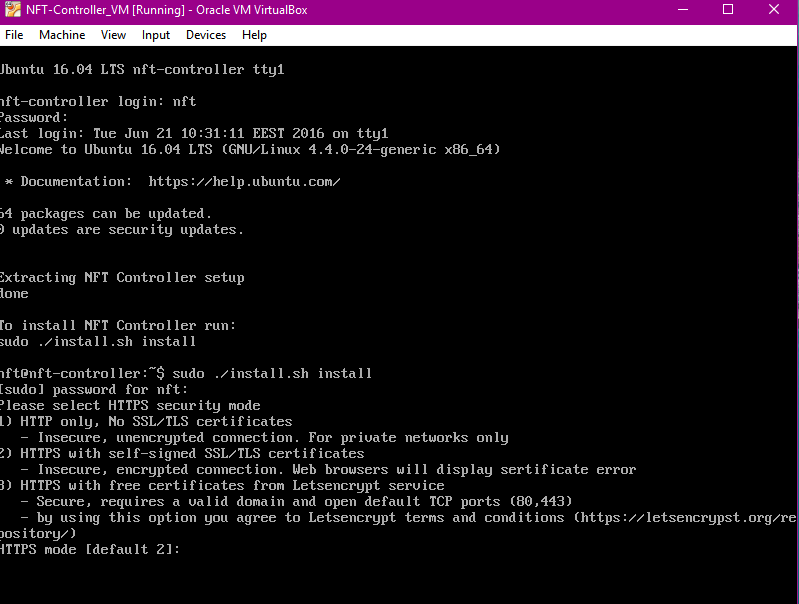
Step 7. Select the HTTPS security mode:
1) HTTP only, No SSL/TLS certificates: insecure, unencrypted connection. For private networks only.
2) HTTPS with self-signed SSL/TLS certificates (this is the default mode): insecure, encrypted connection. Web browsers will display certificate error.
3) HTTPS with free certificates from Letsencrypt service: secure, requires a valid domain and open default TCP ports (80,443) (by using this option, you agree to Letsencrypt terms and conditions).
Step 8. Enter the TCP port number for the web interface.
Step 9. Enter the domain or the IP address of the server.
Step 10. Launch the External Infinity Controller:
sudo nftcontroller start
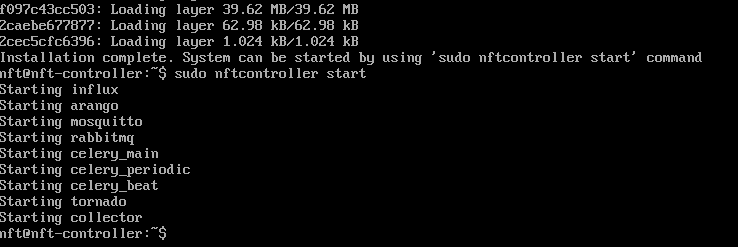
The controller should start in a couple of minutes.
Step 11. Access the External Infinity Controller via the web interface to complete the setup process.
Step 1. Use SSH to log on to the Linux server or the virtual machine where the Infinity Controller is running.
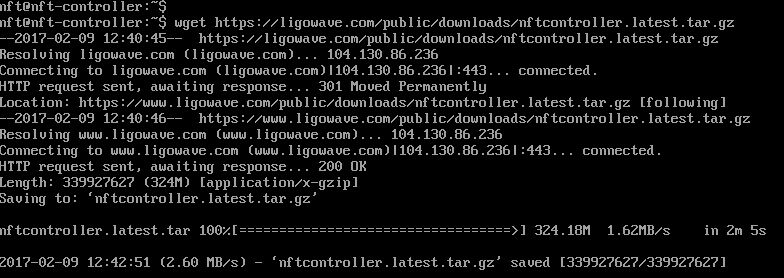
Step 2. Retrieve the External Infinity Controller package from Ligowave’s website:
wget https://www.ligowave.com/public/downloads/nftcontroller.latest.tar.gz
Step 3. Extract the External Infinity Controller:
tar -xvf nftcontroller.latest.tar.gz
Step 3.1. Create Infinity Controller backup files before upgrade:
If possible, always back up the database or the entire Controller system before an Infinity Controller upgrade:
How to create a backup of Infinity Controller
Step 4.
sudo ./install.sh upgrade
WARNING: the multi-organization feature is not supported in the newer version.
Canceling setup...
Contact support regarding upgrade at [email protected].
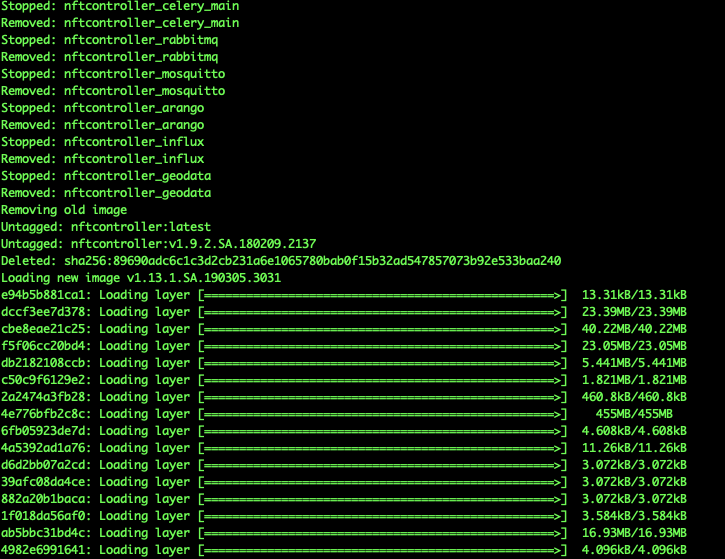
Step 5. Start upgrading the Controller:
sudo ./install.sh upgrade
Step 6. When the upgrade is complete, launch the External Infinity Controller:
sudo nftcontroller start

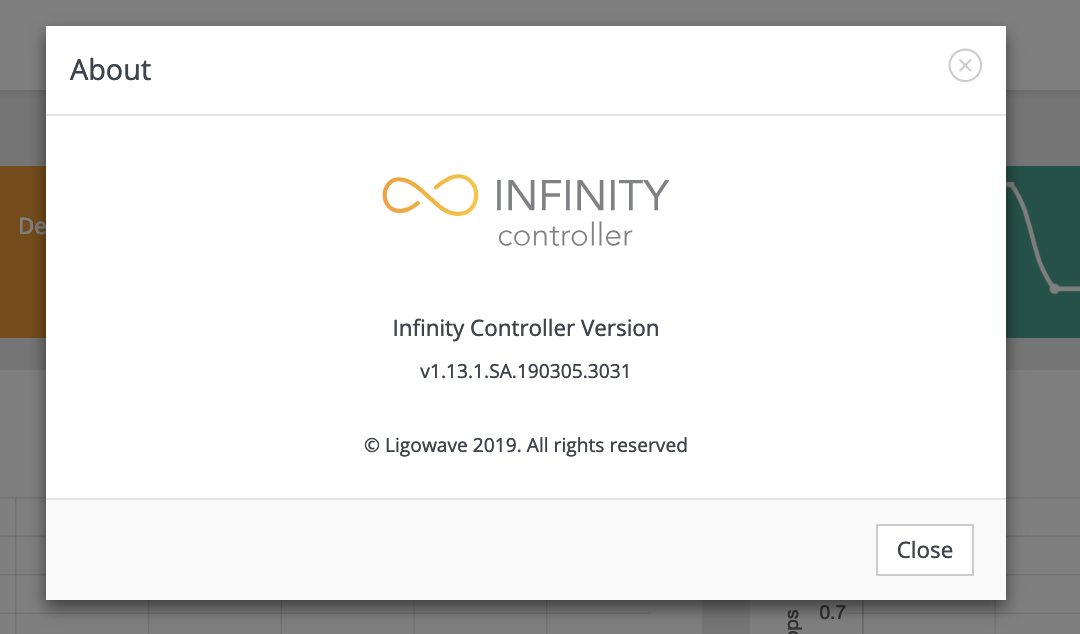
Step 7. Log on to the Infinity Controller server and verify the running version:
Step 1. Use SSH to log on to the Linux server or the virtual machine where the Infinity Controller is running:
Default username: nft and password: admin01
Step 2. Check the interface name that will be used for Infinity Controller access:
ifconfig

Step 3. Use the Vim text editor to edit the Network Interface configuration file:
sudo vim /etc/network/interfaces

Step 4. Delete the lines with the dynamic IP configuration:
auto eth0 iface eth0 inet dhcp
Step 5. Add new lines with the static IP on interface (“enp0s3”):
auto enp0s3 iface enp0s3 inet static address 192.168.100.180 netmask 255.255.255.0 gateway 192.168.101.1 dns-nameservers 4.4.4.4 dns-nameservers 8.8.8.8
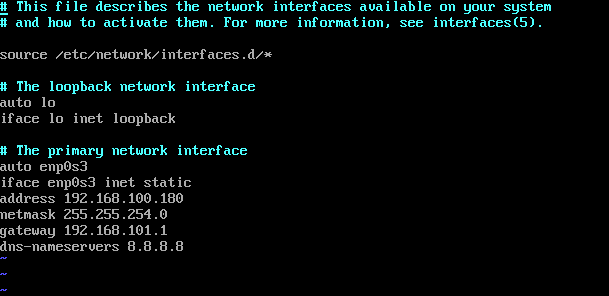
Step 6. Restart the network on your system:
sudo /etc/init.d/network restart
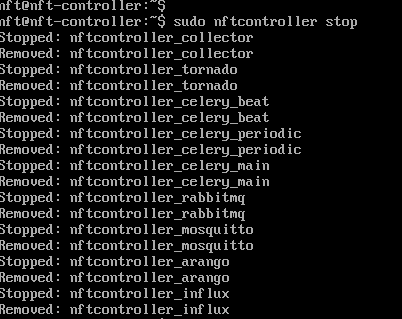
Step 7. Stop running the Infinity Controller:
sudo nftcontroller stop
Step 8. Reset the certificate that will be assigned to the new Controller IP :
sudo nftcontroller reset-crt

Step 9. Click y to reset the old certificates.
Step 10. Enter the TCP port number for the web interface.
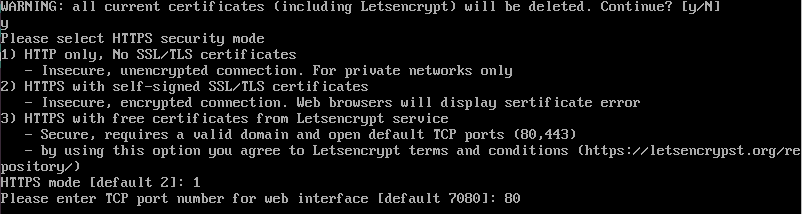
Step 11. Select the HTTPS security mode:
1) HTTP only, No SSL/TLS certificates: insecure, unencrypted connection. For private networks only.
2) HTTPS with self-signed SSL/TLS certificates (this is the default mode): insecure, encrypted connection. Web browsers will display certificate error.
3) HTTPS with free certificates from Letsencrypt service: secure, requires a valid domain and open default TCP ports (80,443) (by using this option you agree to Letsencrypt terms and conditions).
Step 12. Enter the domain or IP address of the server.

Step 13. Start the External Infinity Controller:
sudo nftcontroller start
Step 14. The Controller should start in a couple of minutes.
There are two options for creating a backup of the Infinity Controller: [1] back up the Controller database only and [2] back up the entire controller system:
sudo nftcontroller help
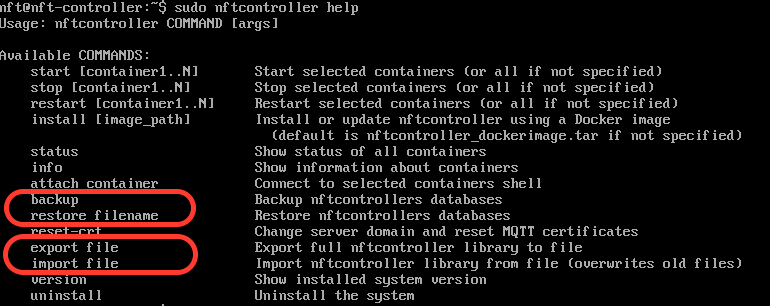
Backing up the Controller database only does not require to stop the Controller:
sudo nftcontroller backup
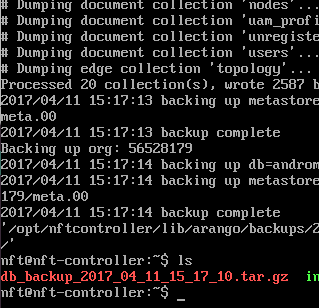
To restore the database from backup:
sudo nftcontroller restore db_backup_2017_04_11_15_17_10.tar.gz
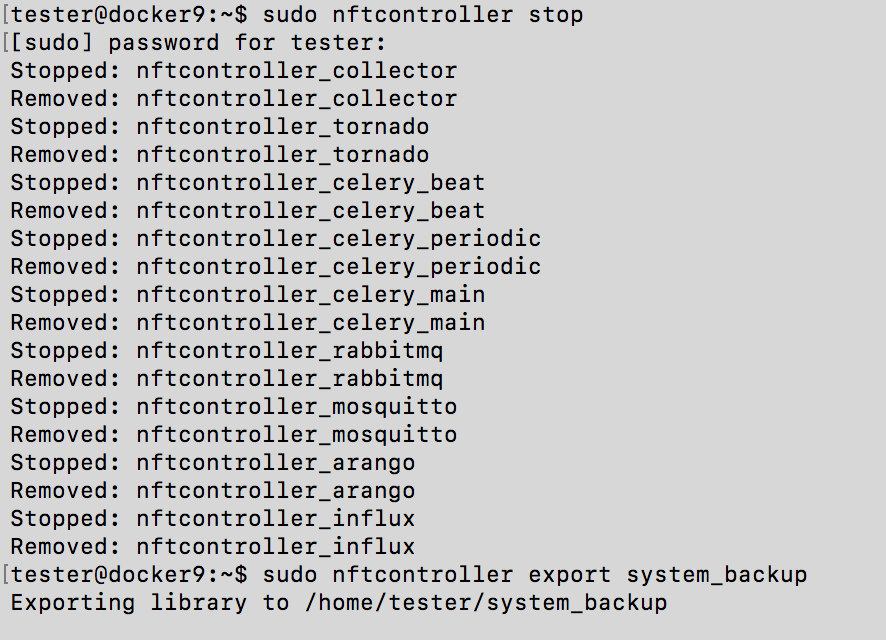
Backing up the entire Controller system requires to stop the NFT Controller:
sudo nftcontroller stop sudo nftcontroller export system_backup
To restore the database from backup:
sudo nftcontroller stop sudo nftcontroller import system_backup

Easy Mesh Scenario Description
Terminology:
- Mesh AP – an AP that has a wired connection to the network and which provides wireless access to end users as well to Node APs.
- Node AP – an AP that is connected wirelessly to another node AP or to a Mesh AP and which provides wireless access to end users and can serve as a backhaul connection to other Node APs.
- Backhaul – a wireless connection between APs.
- Access – a wireless connection to end users.This feature is supported by the External NFT controller only. Any NFT AP (including LigoDLB with NFT firmware) can be used in this type of network. A single-radio AP creates a backhaul and an access at the same time. A dual-radio AP uses 5GHz for both backhaul and access, while a 2.4GHz radio is for access only.
The main idea is to extend Wi-Fi coverage without using wires and to do that in an automated way without manual configuration.
The network allows to have several mesh APs. It is recommended to connect no more than 3 mesh nodes into a single chain.
The NFT controller has a new network type called Easy Mesh. When the device is assigned to that network, it starts to act as an auto-repeater: if the AP has a wired connection, it will create two VAPs for access and backhaul; however, if the device has no wired connection, it will create an additional virtual station interface and will look for an access point with the “Backhaul” SSID. Every device should be activated this way from the controller to work under an Easy Mesh scenario. The NFT controller creates two open SSIDs by default, but the name and security settings can be changed.UAM is not allowed.
The main steps for creating an Easy Mesh network:
1. Create a new Easy Mesh network:
2. Change the SSID name (if necessary) and turn on encryption (highly recommend).
3. Register all devices onto the Easy Mesh network. Wait several minutes until all of the devices assume the AP type.
4. Leave at least one AP with a LAN connection. The rest of the APs can be placed in locations that will not have a LAN (Ethernet) connection. After several minutes, the APs without a LAN connection will become repeaters and will appear as Nodes in the controller.
5. The network should now be ready for use.
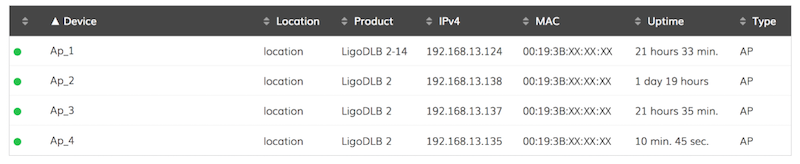
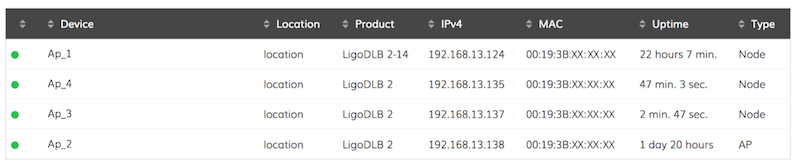
Moreover, users can see how Node APs are connected to the Mesh AP in the “Wireless clients” tab:

In the above example, two Node APs are connected on AP_2, while one Node AP is connected on AP_4.
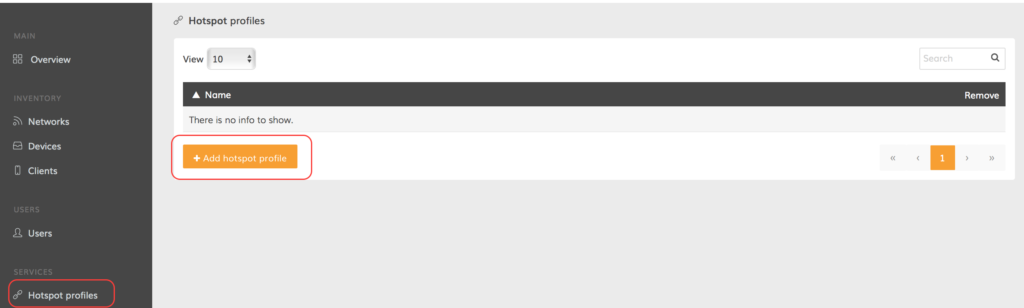
Step 1. Create a new hotspot profile in the Hotspot profiles section:
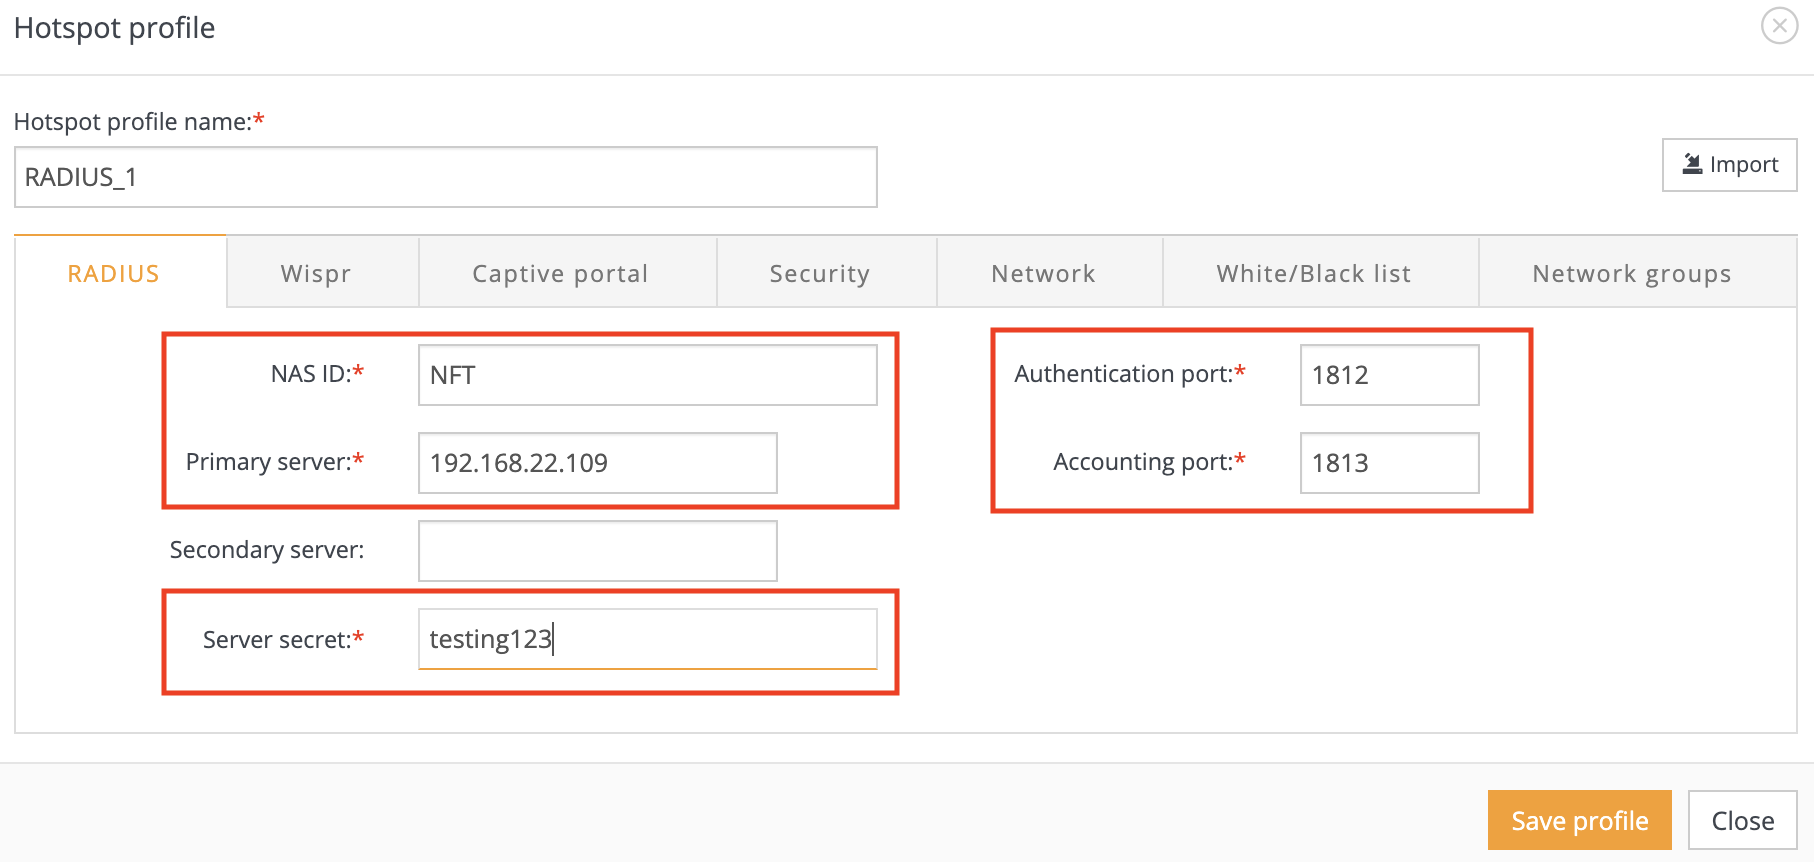
Step 2. Assign a name to the HotSpot profile and enter correct “RADIUS” server parameters:
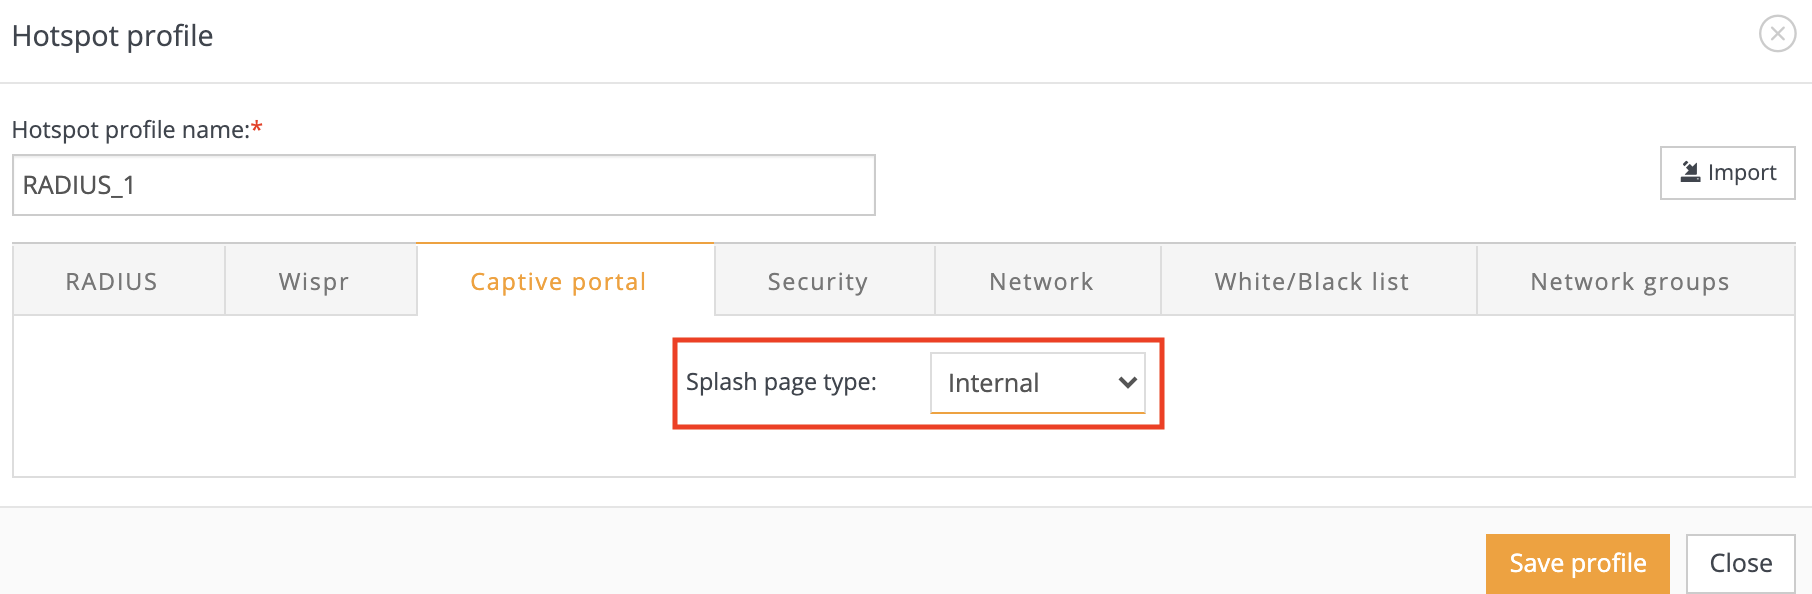
Step 3. Set the required “Captive portal” mode. There are few options, you can use “External” page (user will be redirected to your own customised Splash page) or “Internal” (user will be redirected to internal Splash page, running on the device). During this example we will use “Internal” Spalsh page type:
Step 4. Configure the Network for end devices. Once authorised phones, tablets etc.. are going to get IP from this subnet:

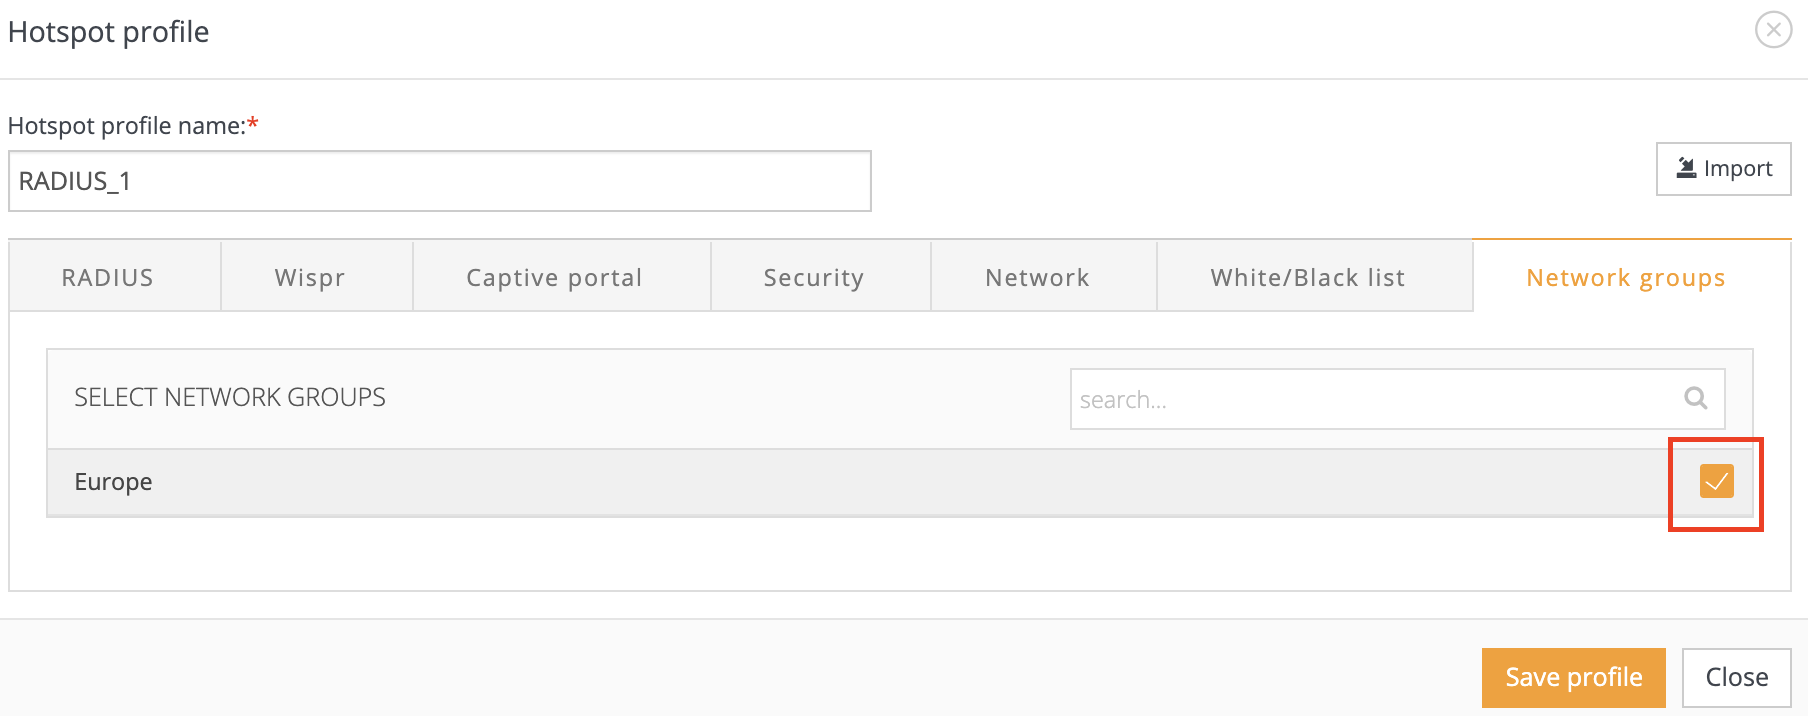
Step 5. HotSpot profile configuration is almost completed. Last step is to assign your profile to the required Network Group:
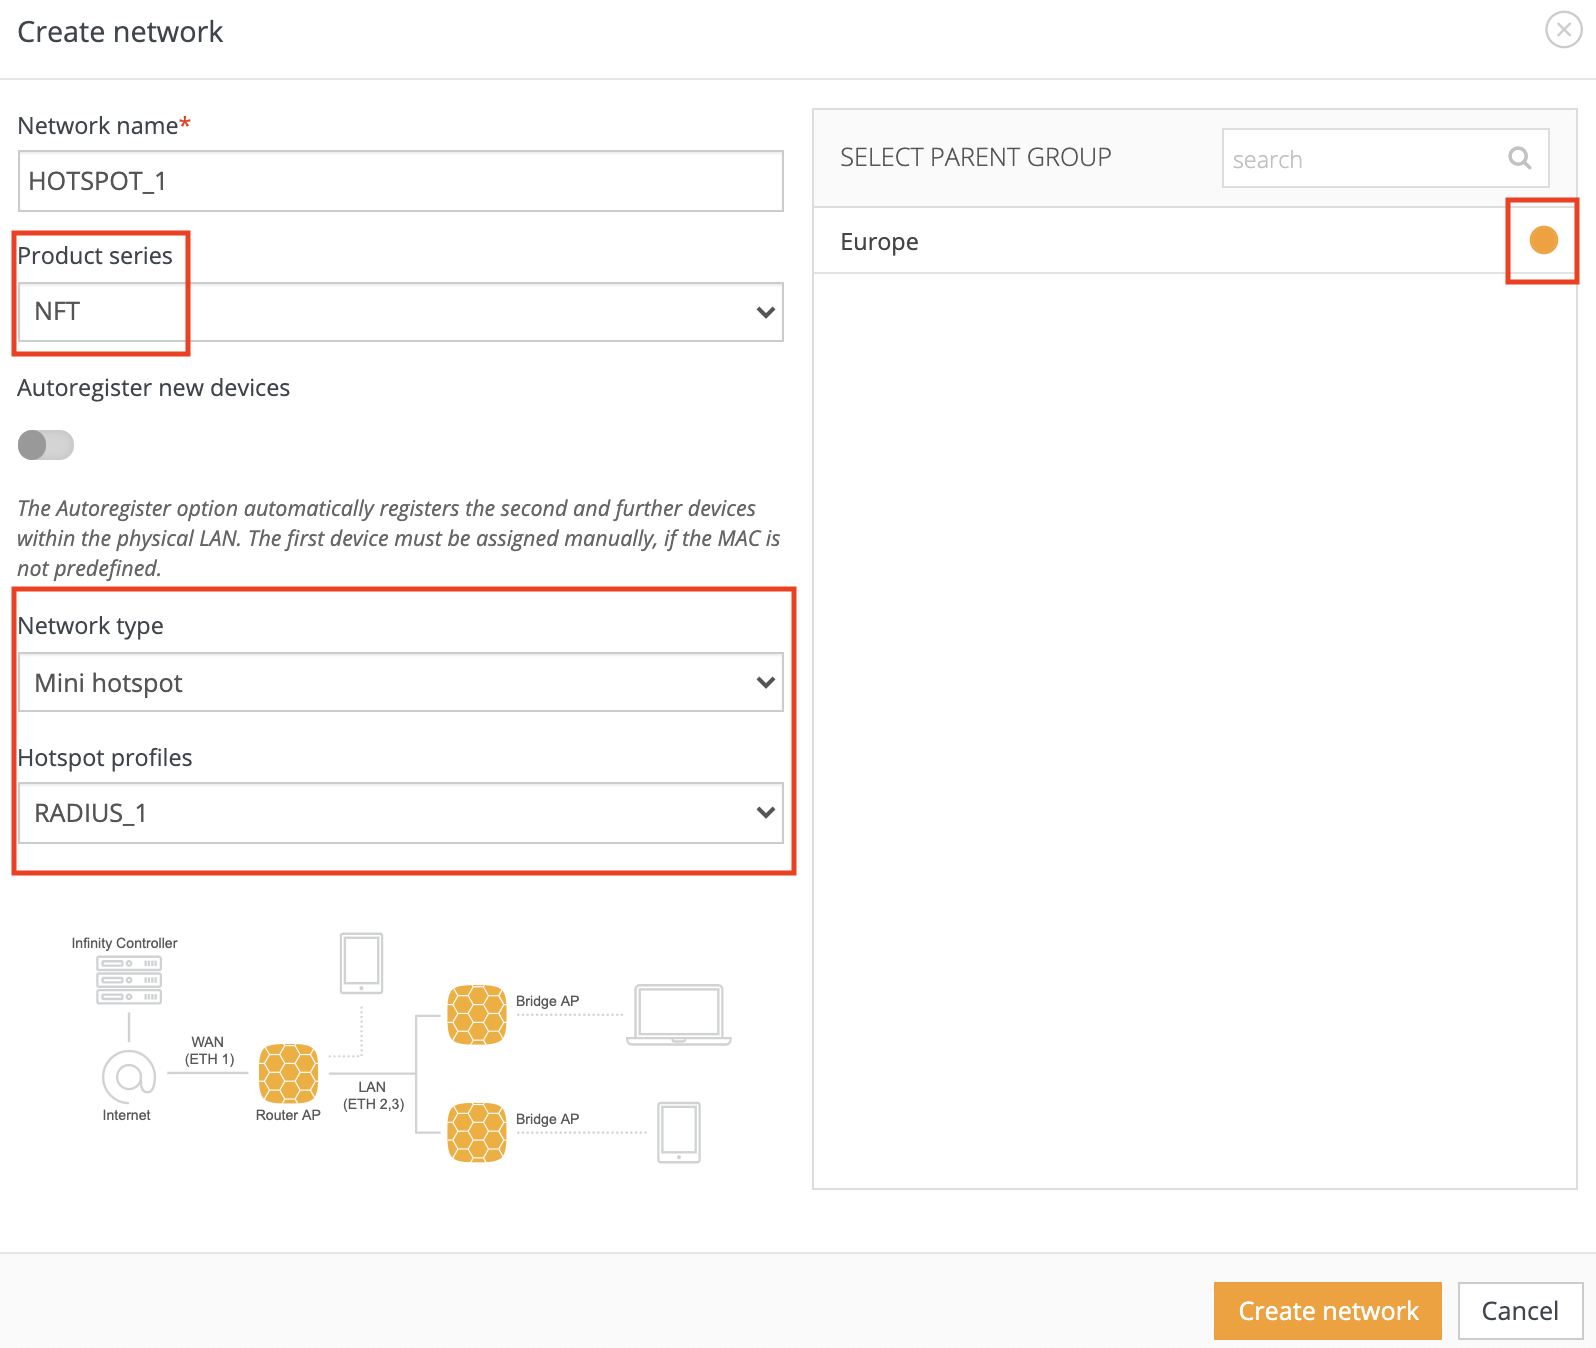
Step 6. Now we have to create “Mini-HotSpot” network with correct “HotSpot” profile:
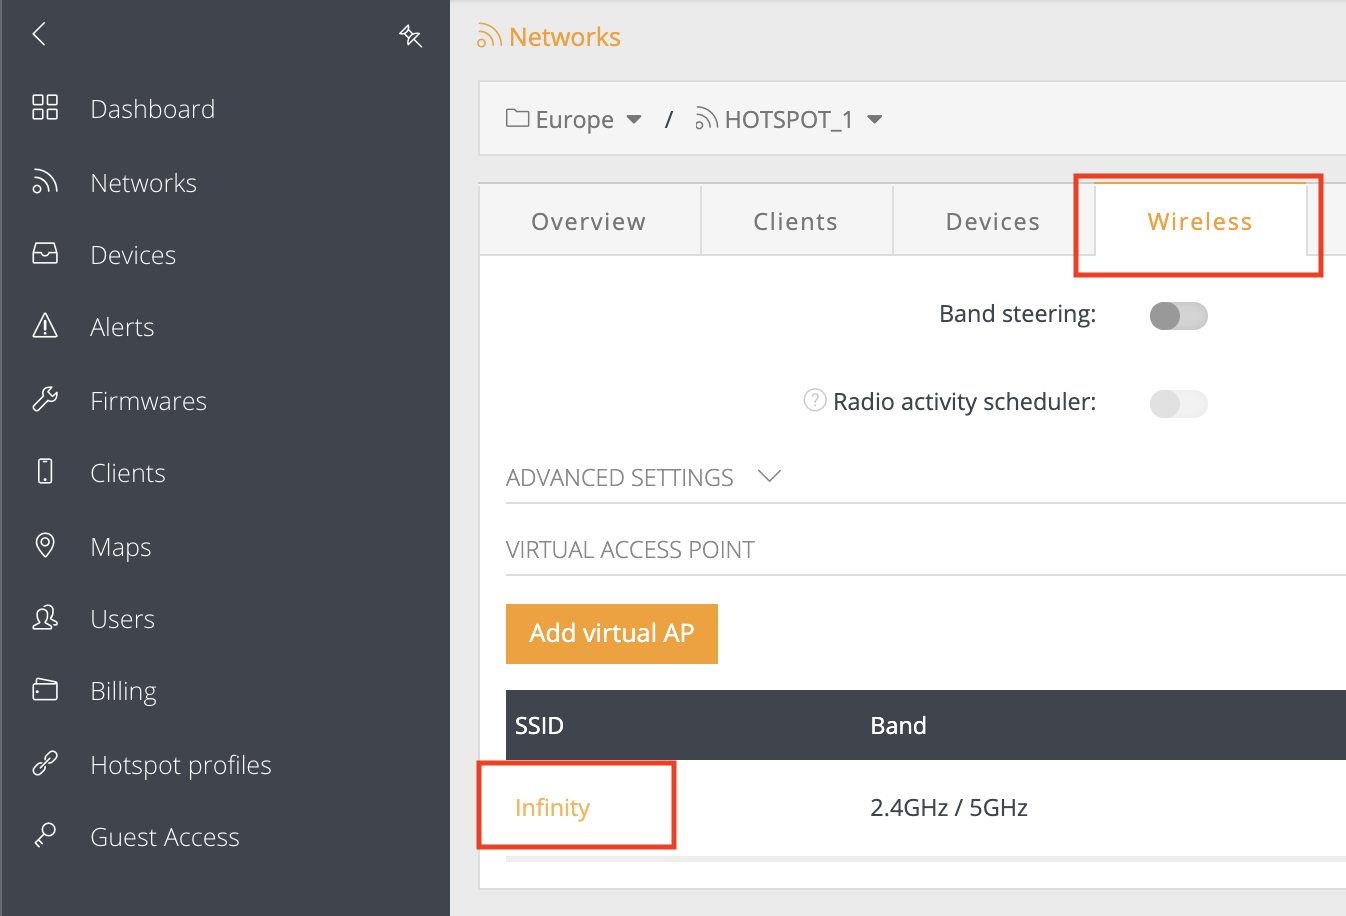
Step 7. Once new “Mini-HotSpot” network is created, navigate to the “Wireless” section and click on the “SSID” to modify wireless parameters:
Step 8. Configure required SSID, check the Hotspot profile name and set the same network (for end users) that was used in step 4 (Important!):
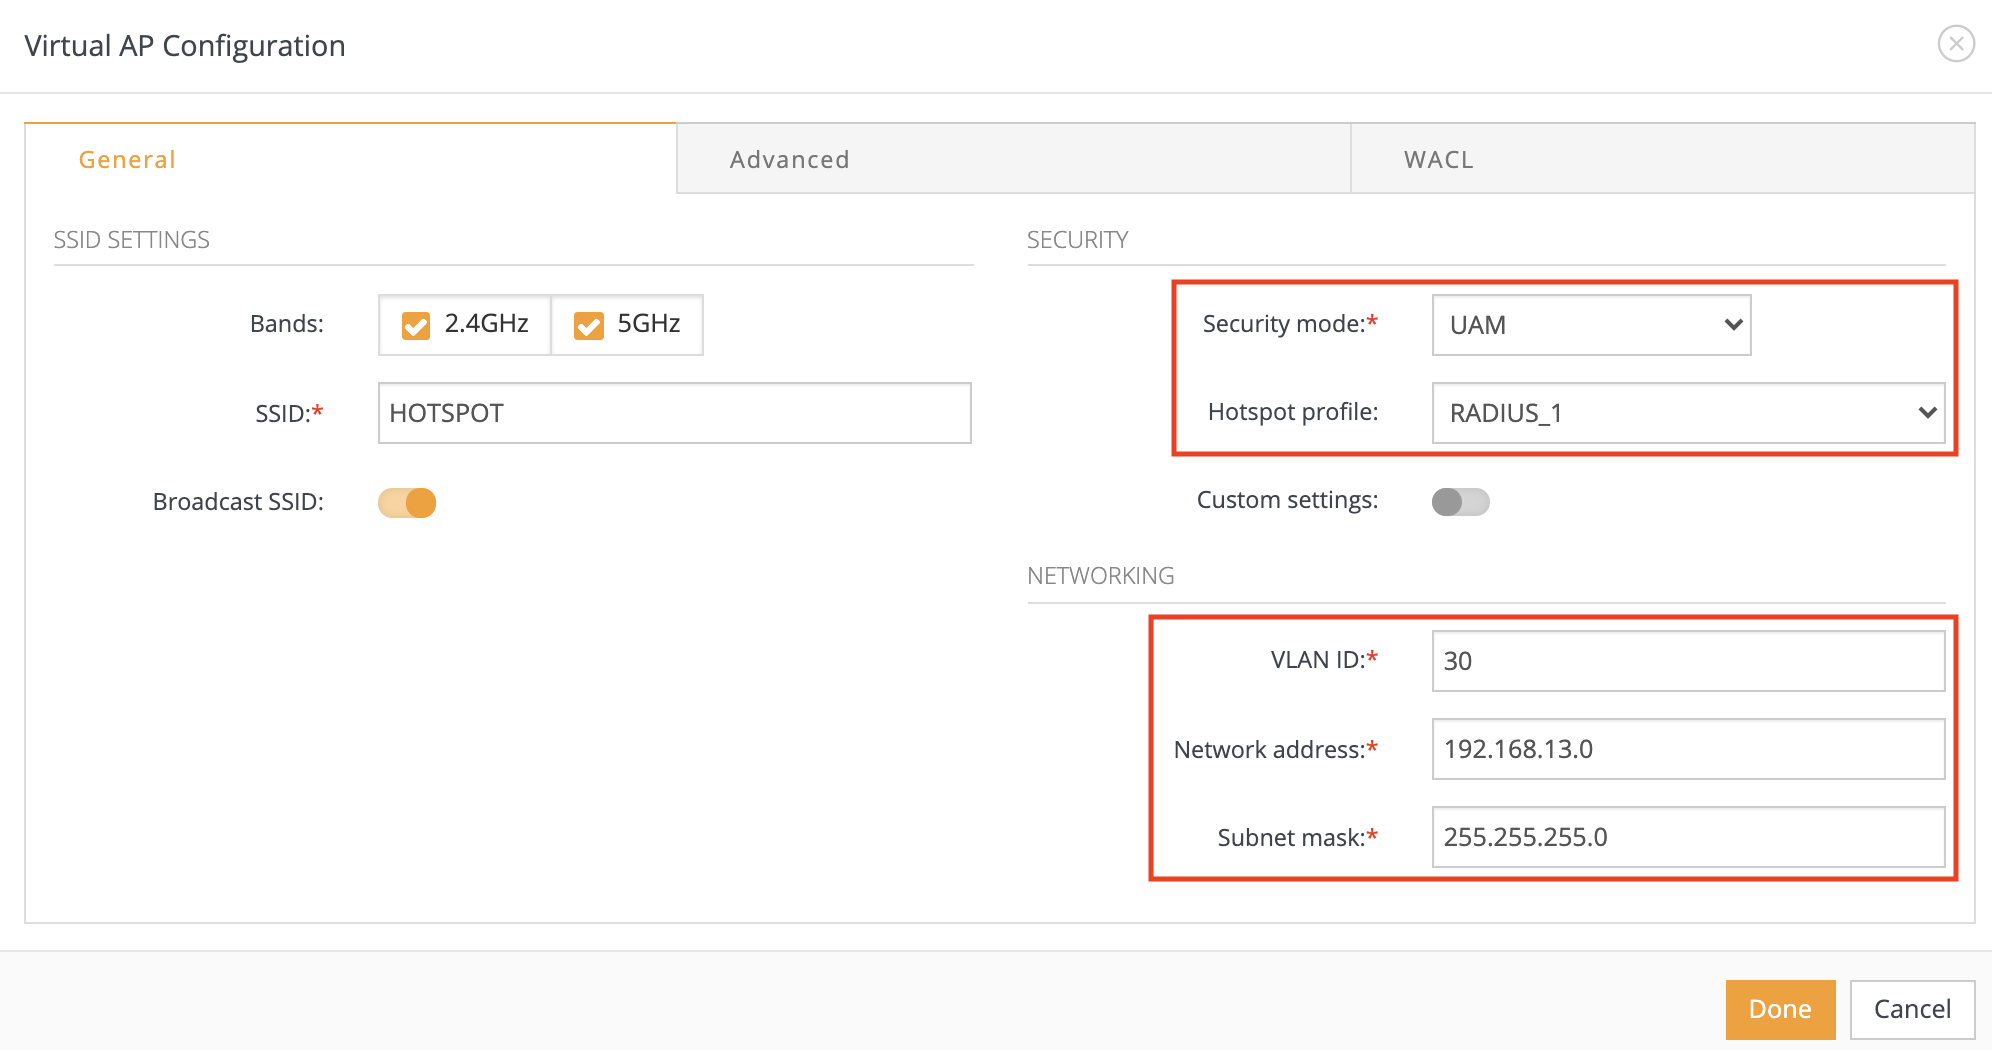
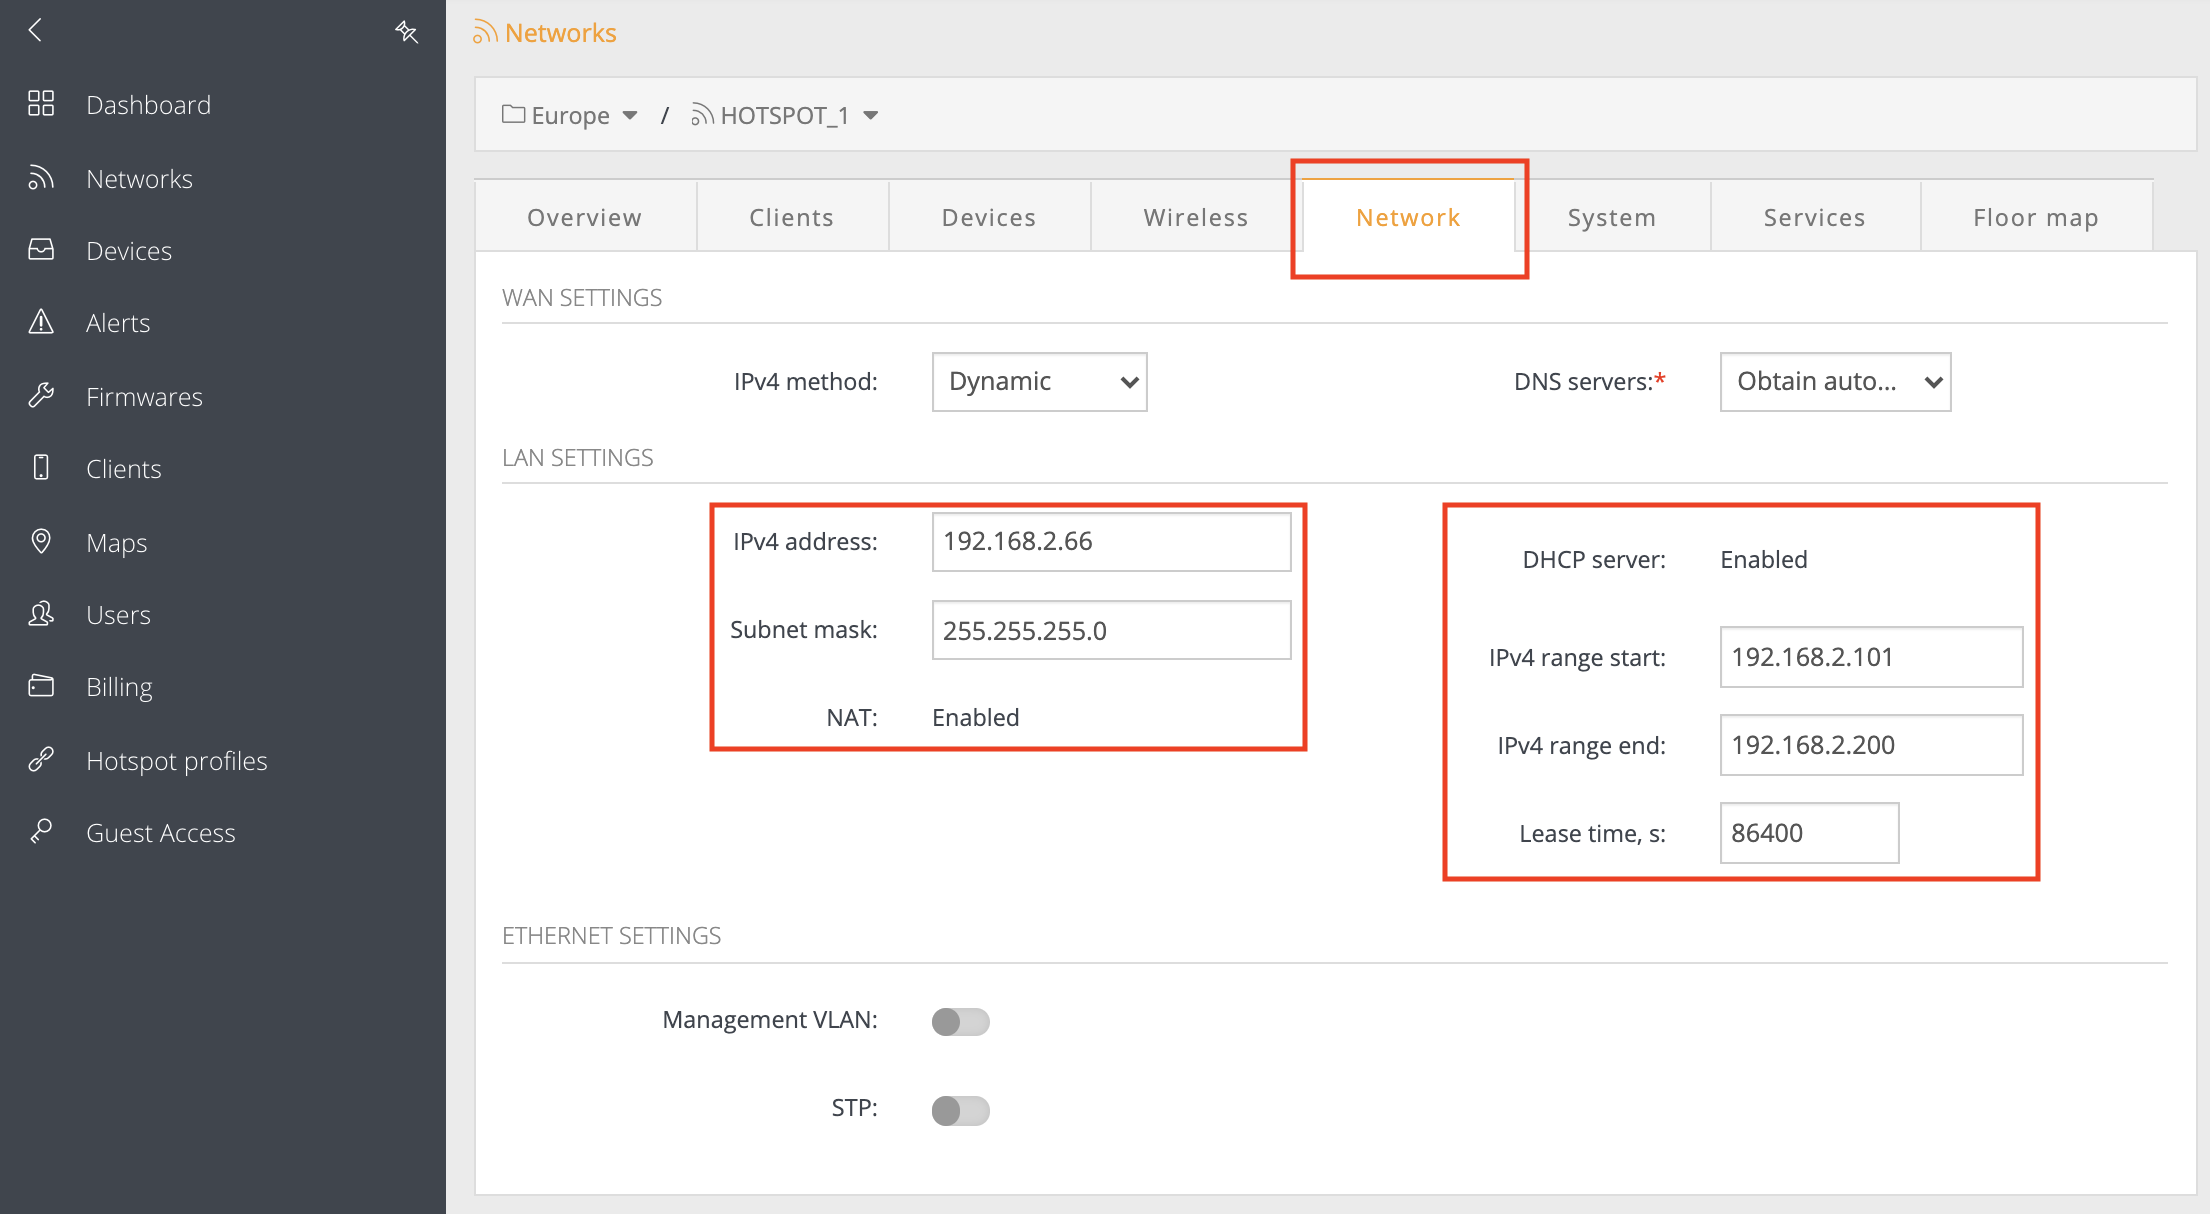
Step 9. Last step is to check the LAN network settings. Navigate to the “Network” tab and make sure that LAN IP address is from the different subnet than configured in Step 8 and Step 4:
Step 10. That’s it! “Mini-HotSpot” network is ready to use. Now assign a device to the network and scan for the SSID defined in Step 8:
Good luck and do not hesitate to reach us via [email protected] if there will be any further questions.
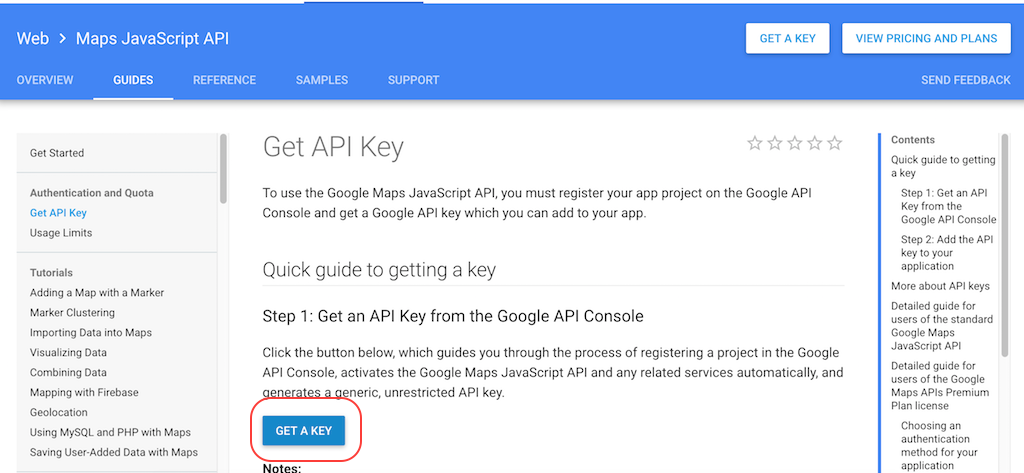
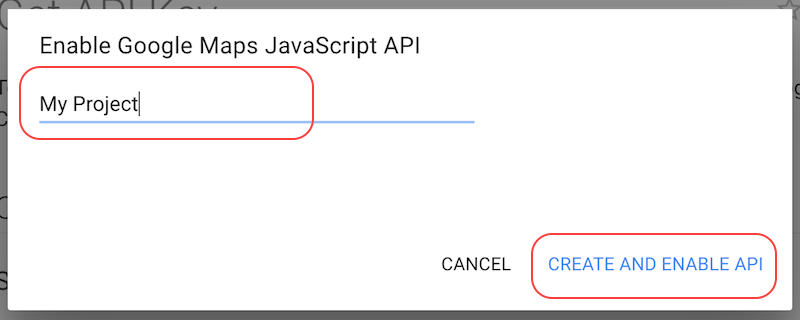
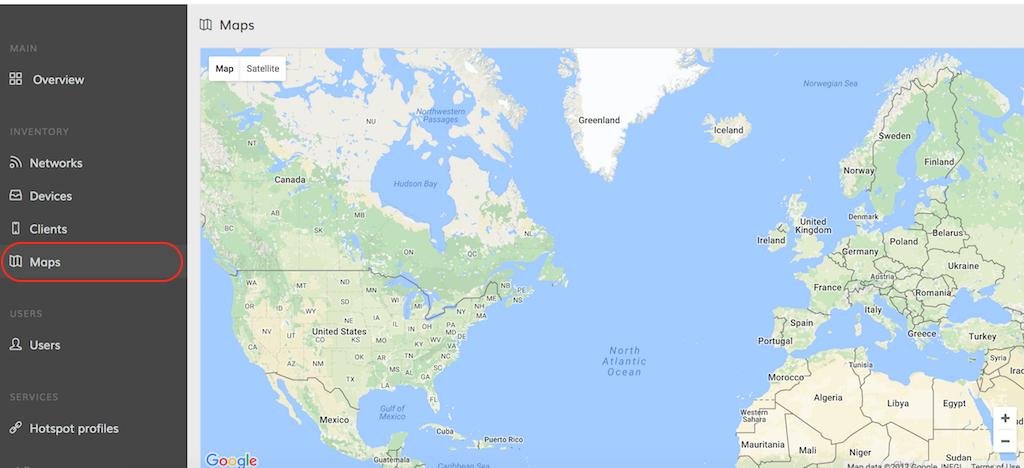
Step 1. Go here to retrieve the Google API key.
Step 2. Create a new project to enable Google Maps JavaScript API:
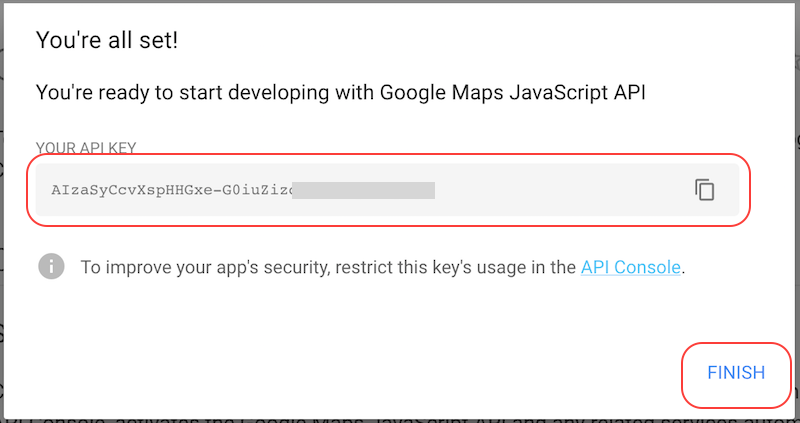
Step 3. Copy the generated API key and click Finish:
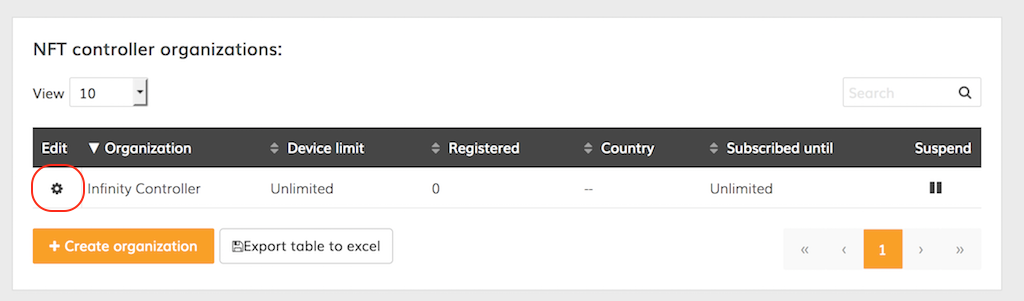
Step 4. Log on to the Infinity Controller and click the icon under the Edit column of the main organization:
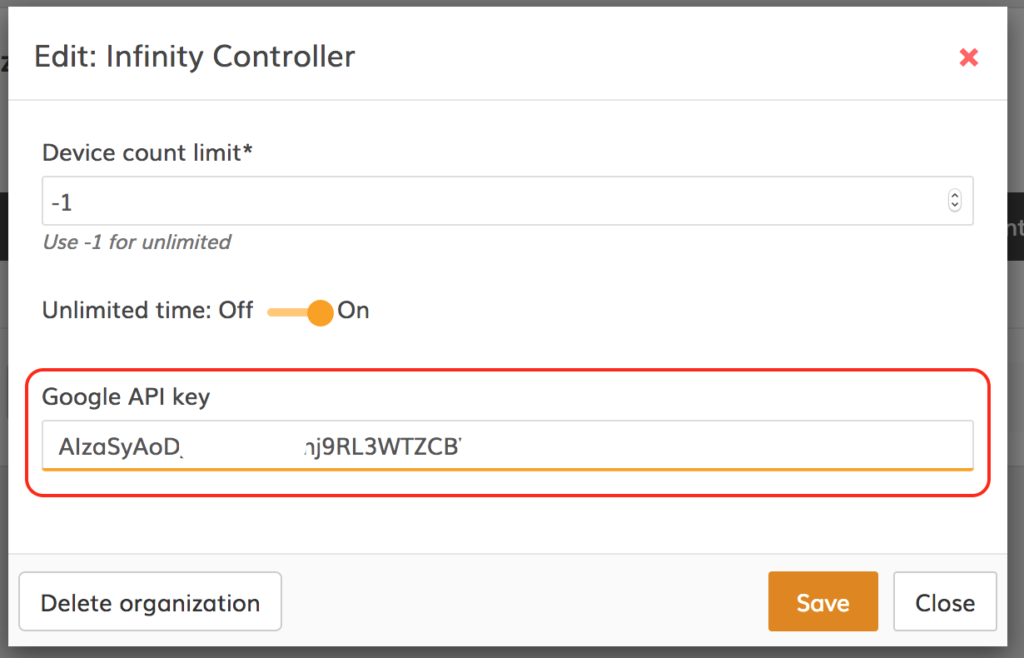
Step 5. Enter the Google API key:
Step 6. The map should now be ready for use:
Step 1. Install Infinity Controller with self-signed SSL/TLS certificate (option 2 in the selection):
- Define the TCP port number for web interface
- Enter the domain name from your SSL certificate
Note If Controller is already installed with different HTTPS security mode, please reset the certificate (nftcontroller reset-crt)
Step 2. Start Infinity Controller to generate certificates (nftcontroller start):
Step 3. SSL certificates are stored in the /opt/nftcontroller/lib/certs directory:
![]()
Step 4. Replace server.crt and server.key with your custom files. The example bellow:
-
cp /etc/letsencrypt/live/YOUR-DOMAIN-NAME.COM/privkey.pem /opt/nftcontroller/lib/certs/server.key
-
cp /etc/letsencrypt/live/YOUR-DOMAIN-NAME.COM/cert.pem /opt/nftcontroller/lib/certs/server.crt
Step 5. Restart Infinity Controller (nftcontroller restart)
Good luck! Do not hesitate to reach us via [email protected] if there will be any further questions.
Infinity Controller Virtual Image (for Virtual Box, VMware)
https://www.ligowave.com/public/downloads/NFT-Controller_VM.ova
Infinity Controller for Linux (Debian/Ubuntu/CentOS)
https://www.ligowave.com/public/downloads/nftcontroller.latest.tar.gz