Version 2.12.2 (Cloud)
(October, 2024)
New
- LigoPTMP series introduced to the Cloud controller platform
- “Alerts” functionality added to the NFT series
Improvements
- Peer graphs renamed for LigoPTP series
- Added missing LigoPTP remote peer statistics
- Billing API keys changed
- “Traffic control” feature expanded for LigoPTP & LigoPTMP series
Fixes
- LigoDLB 6GHz product line was configured as LigoDLB 6GHz series
Version 2.12.0 (Cloud)
(September, 2024)
New
- NFT Blizzard Lite introduced to the Cloud controller platform
- “Regdb” networks with old values got corrupted
Improvements
- Channel selection for Indonesia (ID) were updated
- “ONVIF discovery” table remains not changed by the Controller
Fixes
- “QoS” label was not correct
- Broken types on Rx/Tx stats messages were fixed
Version 2.11.0 (Cloud)
(August, 2024)
New
- “Interference mitigation” feature added to the LigoDLB an/ac & LigoVision managed networks
- “Indoor” filtering option added to the channel selection
Improvements
- Devices API changed to API/v2
- “Firmware management” moved to the admin panel
Fixes
- Page location was changed when opening Customer information in Billing
Version 2.10.0 (Cloud)
(July, 2024)
New
- “Country” information added to the users data
Improvements
- Changes in Organisation ID description
- Organisation API changed to API/v2
Fixes
- Alerts were not visible in global user view
- “Netwrok monitor” user didn’t show any networks
- Firmware upgrade from local file were not working
- Unregistered devices topic was empty in the database
- Users were allowed to log in to the suspended organisation
- Time representation in Controller graphs were updated
Version 2.9.0 (Cloud)
(June, 2024)
New
- Added “Ethernet interface” configuration (status/speed/duplex/auto-negotiation/)
- QoS policy setting introduced to DLB/VISION/PTP series
Improvements
- Alerts added to the LigoDLB ac and LigoVision series
Fixes
- “Collecting troubleshoot” file failed in device and network level
- “Link test” process wasn’t starting correctly
- LigoSU wireless operating protocol were not displayed
Version 2.8.0 (Cloud)
(May, 2024)
New
- NFT BLizzard 2ac-N-20 Lite introduced to the Cloud controller platform
- LigoDLB DISH 5-23ac introduced to the Cloud controller platform
- LigoVision 5-20ac & igoVision 5-90ac introduced to the Cloud controller platform
- MFP (Management Frame Protection) added to the LigoDLB ac and LigoVision series
Improvements
- ER/GB/IE/IR/GN country codes were updated
- Automatic location detection added to the LigoDLB an/ac and LigoVision series
- Sentry library updated in backend
Fixes
- “Spectrum analyser” failed after quick restart
Version 2.7.0 (Cloud)
(February, 2024)
Fixes
- Station overwrote default gateway value with default gateway configured on Access Point
Version 2.6.0 (Cloud)
(December, 2023)
New
- LigoVision 5-15ac introduced to the Cloud controller platform
Improvements
- Changes in coordinates are represented in device GUI
Fixes
- Same fallback IP address was set after global configuration change
- Device did not appear under “Unregistered devices” after moving to another network
- Traffic control did not work on first VAP for NFT series
Version 2.5.0 (Cloud)
(July, 2023)
New
- Remote RSSI level represented in the signal graph
Fixes
- “Export clients to CSV” created empty file
Version 2.4.0 (Cloud)
(April, 2023)
Fixes
- Password reset stops working after 3 attempts
- Adding mandatory Date Header to emails
- Updated country list
Improvements
- Error messages added to include reason why password recovery failed
- Remove United Kingdom from EU zone
Version 2.2.0 (Cloud)
(March, 2022)
Fixes
- GuestAccess Splash page customisation was not saving changes
- Controller was not accepting devices with empty object in WACL list
Version 2.0.5 (Cloud)
(November, 2021)
Improvements
- Added more logs to the Guest Access service
- Guest Access service database upgraded to MongoDB v4.4
- Device name search is case sensitive
Fixes
- Device switched to the test mode after Networking section changes in Mini-HotSpot scenario
- Billing profile can not be saved if location string is longer than 50 characters
- Floor-map images can not be deleted or updated
- White/Black list in HotSpot profile was undefined
- Controller was not accepting devices with empty object in white/black list
- Device was not changing mode to “BridgeAP” in Mini-HotSpot network
- Full name in users table was empty
Version 2.0.0 (Cloud)
(June, 2021)
New
- Backend code fully changed to Golang
- Switched to MongoDB as the main Database system
- Optimised CPU and memory usage
- Optimised database structure and queries
Version 1.20.0 (Cloud)
(May, 2021)
New
- Add NAS-ID as required parameter when using one of the Enterprise security modes
- Add option to configure “Multicast” parameters for the LigoDLB Managed network
- Add “WACL” feature to the LigoDLB Managed network
- Add “Seamless roaming” feature to the NFT Bridge network
- Option to disable Access Point radio in LigoDLB Managed networks
Improvements
- Updated input field highlighting when field is not valid
Fixes
- Fix User deletion issues
- User roles not updated after user profile edit
- User profile information was not saved after update
Version 1.19.0 (Cloud)
(March, 2021)
New
- Add possibility to select “Wireless scenario” for specific Countries in LigoDLB Managed 5G networks
- Add option to configure “Multicast” parameters for the LigoDLB Managed network
- Add “WACL” feature to the LigoDLB Managed network
- Option to disable Access Point radio in LigoDLB Managed networks
Improvements
- EIRP recalculation and error handling
Fixes
- “Invalid network config” if friendly name is longer than 32 char
- Fixed collector service problem when MQTT broker is down
Version 1.18.0 (Cloud)
(October, 2020)
Improvements
- Changed chart style: no dots on the chart line by default
- Changed UID and GID to fixed values inside Docker container
Fixes
- “Invalid network config” if friendly name is longer than 32 char
- Fixed collector service problem with startup when MQTT broker is down
- Fixed collector service to correctly shutdown when MQTT broker goes offline
Version 1.17.1 (Cloud)
(May, 2019)
New
- User account shows login history information
Improvements
- Updated VerneMQ MQTT broker
- Additional command line script checking
Fixes
- GuestAccess default splash page does not show logo image
- Clients statistic charts had rotated labels
Version 1.17.0 (Cloud)
(July, 2019)
New:
- Added Guest Access V2 with more time control.
- Added Floor maps for NFT networks.
- Added Linktest for LigoDLB scenarios.
- Added support for 6GHz and 4GHz products.
Improvements:
- LigoDLB networks supports more than one device with AP mode.
- Changed way to add new devices (from the list or by MAC address) to the network.
- Added firmware version on the main Devices table.
Fixes:
- Fixed CSV export with data that includes special characters.
- Fixed Direct firmware upgrade: add check on hardware platform.
- Fixed styling issues on Internet Explorer.
- Fixed alert “Device removed from network” does not work.
- Fixed issue related with WPA2 security display on the device UI.
- Fixed issue when notification about new unregistered devices did not show without reloading the page.
Version 1.16.0 (Cloud)
(June, 2019)
New:
- Added Antenna Gain control for the NFT and DLB devices.
- Added possibility to upgrade the product file and the OEM configuration on devices.
- Added possibility to upload and update Firmware directly on the device for Network Manager.
- Added Bandwidth limitation per SSID for DLB.
- Added STP configuration on NFT and DLB networks.
- Added display of the Ethernet port status and speed on the DLB, NFT, PTP.
- Added possibility to kick the wireless client on NFT network.
- Added LigoDLB remote statistics.
Improvements:
- Active alerts now are marked as inactive after disabling alerts functionality.
- On device registration the custom Friendly name now is not overwritten with default network’s value.
- Improved some GUI issues on error messages.
Fixes:
- Fixed unified sections of the network tab on NFT networks.
- Corrected grammar error on warning message when device does not support Guest Access.
- Fixed issue when it was impossible to save the HotSpot profile with empty black/white list.
- Fixed issue when it was not possible to create HotSpot profile with internal splash page.
- Removed unnecessary parameters on HotSpot profile.
- Corrected sorting on the Guest Access tables.
Version 1.15.0 (Cloud)
(May, 2019)
New:
- Added “ATPC” option in LigoDLB configuration mode.
- Added remote management services: SSH, Telnet, HTTP for DLB and NFT products.
- Added device discovery services (Bonjour (mDNS), CDP/LLDP, SSDP) control settings for DLB and NFT products.
- Added SNMP v3 service support for DLB and NFT devices.
- Added Virtual AP isolation feature on NFT devices.
- Added Client isolation for DLB network.
- Added “System logging” service.
- Added DHCP option 82 for DLB devices.
- Added support for 6GHz DLB devices on the DLB Monitor network.
Improvements:
- Added possibility to cancel postponed FW upgrade.
- Added an explanation “FW upgrade is pending” in the tool-tip of the FW upgrade icon.
- Improved reseting statistical counters behaviour on clients modal – added auto refresh.
- Active alerts now is marked as inactive after disabling alerts functionality.
- Added validation on the SSID that max length must be 32 including the special characters.
- Removed not actual column from package management on Billing.
Fixes:
- Fixed issues with FW upgrade indication.
- Fixed issue when controller incorrect warns about outdated firmware on registering PTP device.
- Fixed issue with incorrect paging on Firmwares list.
- Fixed issue that was unavailable to register DLB device with Static IP.
- Fixed collector system cache issue.
- Fixed Alerts maintenance mode validation.
Version 1.14.2 (Cloud)
(April, 2019)
New:
- Added Guest Access feature. (Not Compatible with LigoDLB 5 11n series and NFT 2N)
- Added New user role – Guest Access Manager.
- Added Controller’s data CSV export:
Export All devices to CSV file;
Export Network devices to CSV file;
Export All networks to CSV file;
Export All alerts to CSV file;
Export Network alerts to CSV file;
Export Device alerts to CSV file;
Export All clients to CSV file;
Export Network clients to CSV file. - Added Refresh button on Alerts page.
Improvements:
- Redesigned “Download Troubleshoot file” operation.
- Updated wireless clients manufacturers list according to http://standards-oui.ieee.org/oui/oui.txt.
- Updated EIRP values for countries (Egypt and Chile).
- Reserved VLAN ID 4094 for Guest Access.
- Disabled Firmware auto-upgrade feature on DLB/PTP networks.
Fixes:
- Fixed sorting on HotSpot profiles.
- Fixed displayed info for Monitor User.
- Fixed password change per network issue.
- Fixed maximum zoom in Maps.
- Fixed list of required fields on UAM profile.
- Fixed problem with “Waiting for device” status after moving device on the PTP network.
- Fixed problem when LigoDLB lost configuration after registering device to network by the MAC address.
Version 1.13.0 (Cloud)
(February, 2019)
New:
- Added device alerts configuration and visualisation for DLB networks.
- Added device alerts suppression for specified time per device (Maintenance mode).
- Added configuration of IEEE mode for NFT networks.
- Added max data rates configuration for DLB networks.
- Added NTP service configuration for DLB networks.
- Added limit legacy data rates for NFT networks.
- Added scheduled reboot on all network devices.
- Show signal level for all radio chains.
- Added radio mode (SISO/MIMO) control per device added.
- Allow to download or upload Hotspot profile as file.
Improvements:
- Save LigoDLB device IPv4/IPv6 static configuration on registration to the Controller.
- Parameter name unification “Session time”.
- Implement ACL logic in collector service.
- WiFi Analytics service allows to use third party data collectors.
- Lots of other small UI/UX improvements (styles, notifications, icons, data loading, form validation etc.).
Fixes:
- Network Management VLAN button defect.
- Fixed issue with “Operating Frequency” display on Spectrum Analyzer.
- Incorrect display of connected router’s MAC on HotSpot network.
- In DLB network running Spectrum Analyzer on Station device becomes unreachable.
- Fixed HotSpot profile: corrected newtork group selection rule.
- DLB ac device set radio mode to SISO after controller config update.
- Access Point starts “Site survey loop” when registering to the controller.
- Corrected client graph time axis display in Network dashboard.
- Do not limit any VAPs with same VLAN ID.
- Incorrect auto firmware upgrade time in monitor view.
- OpenStreet maps max zoom does not show map.
- “DFS CAC active” status is missing.
- DLB show device name on Stations table.
- Fixed Hotspot network section DNS servers validation.
- Unable to move device with the status “Waiting for device”.
Version 1.12.0 (Cloud)
(November, 2018)
New:
- Added LigoDLB device configuration
- Added device LED control
Improvements:
- Hotspot profiles now have GUI with forms and validation.
- Make countries list sorted by country name instead of country code.
- Lots of small UI/UX improvements (styles, notifications, icons, data loading, form validations).
Fixes:
- Devices that have never been connected to the controller should be hidden in Firmware management list.
Version 1.11.7 (Cloud)
(September, 2018)
New:
- Started using Bing Maps instead of Google maps
Fixes:
- Fixed Root group renaming
Version 1.11.6 (Cloud)
(August, 2018)
Fixes:
- Fixed WPA enterprise without DAS creation
- Fixed Clients statistic graphs incorrect values
GUI Changes:
- Disabled option to create network in root group
Version 1.11.4 (Cloud)
(August, 2018)
Fixes:
- Fixed LigoDLB ECHO 5D registration
Version 1.11.3 (Cloud)
(August, 2018)
Fixes:
- Fixed new products registration to the network
- Fixed data cleanup process to allow recently deleted device registration
Version 1.11.2 (Cloud)
(August, 2018)
Fixes:
- Fixed networks information loading
Version 1.11.1 (Cloud)
(August, 2018)
Fixes:
- Fixed client periodic statistics which visible from wrong groups
- Fixed chart time line labels when switching to week period
- Fixed unregistered device selection when list is mixed branch
Improvements:
- Improved Cache data for charts
- Improved Auto channel selection
Version 1.11.0 (Cloud)
(July, 2018)
New:
- Added monitoring modes for LigoDLB and RapidFire networks.
- Implemented multi-channel option for the channel list configuration.
- Added wireless access list (WACL).
- Added option to upload UAM profile as file.
Fixes:
- Fixed VAT calculation rules for companies.
- Fixed missing channel width in device list.
- Fixed ‘HW reset button’ value in network and device.
- Fixed Maps, network info: sync info with counters on the network header.
- Fixed browser back button glitch after logon or logout.
- Fixed missing channel width in device list.
Improvements:
- Charts visual improvements.
- Refactored Alert messages using new library (toaster).
- Network list API endpoint optimizations to exclude not used data.
- Improved ugly channel visualisation when device has only one radio.
Version 1.10.0 (Cloud)
(April, 2018)
New:
- Added wireless clients statistics with total counters and history up to 50 last sessions.
- Added paid services.
- Added Nigeria country.
Fixes:
- Fixed WPA Enterprise VAP configuration on bridge network.
- Fixed Greece country code selection issue.
- UAM portal secret is not mandatory.
Improvements:
- Added various input fields validation error messages.
- Added channel width in network device table and device dialog.
- Added an error message when Telnet and SSH ports are the same.
Version 1.9.2
(February, 2018)
Fixes:
- Fixed network devices list for mesh and hotspot scenarios (extra column each).
Improvements:
- Channel info is shown in the network device list.
Version 1.9.1
(February, 2018)
Fixes:
- Fixed device went offline once registered in the new bridge network (wrong DNS configuration)
- Fixed can’t change configuration per device.
Version 1.9
(February, 2018)
New:
- New design and layout for Network configuration section.
- Added SNMP service control to network services section.
- Added possibility to set custom DNS servers at WAN section in “Mini hotspot” network scenario.
- Added channel selection inside individual device configuration dialog.
Fixes:
- Fixed notifications when virtual AP limits are reached.
- Fixed notifications when adding new devices by MAC address list to the network and there are already registered MAC addresses.
- Fixed radio scheduler time format to support time from 00:00 to 24:00.
- Fixed error message when country code does not support 5GHz.
- Fixed incorrect warning message when changing country code.
- Fixed problem when device receives reversed time zone value from controller.
Improvements:
- Performance improvements to load data faster.
- GUI layout improvements to better fit small screens.
- Changed dialog with notification message for unregistered devices.
Version 1.8
(November, 2017)
New:
- Added four layers support in the network section.
- Added client count column on main device table.
Fixes:
- Fixed Maps, network info: missing info what counters are displayed.
- Fixed new users creation, when some groups are empty.
- Fixed HotSpot network: corrected validation on Welcome URL.
- Fixed negative device amount in organization settings.
- Fixed cloud controller does not show IP address on device in Easy mesh network.
- Fixed it is not possible to enable 5GHz radio when it was disabled.
- Fixed “Hotspot profile updated” message is displayed, but nothing happens.
- Fixed double error message on wireless settings in Hotspot network.
- Fixed cannot update device configuration once Device name is set to automatic.
- Fixed issue when controller allows to save management and data VLAN with same ID.
- Fixed issue when automatically set device name starts from _2.
Improvements:
- Optimized and improved controller system performance.
- Improved drop-down’s length per device in graphs’ choice.
- Improved validation on Welcome url for Hotspot network.
- Improved client table on device: no gap between MAC and IP.
- Improved static ip address range validation.
- Improved validation of min/max values, which have manipulation via up/down ‘arrows’.
- It is not allowed to move device into the same network.
- Improved device sorting by uptime.
- Improved google maps responsiveness with 20+ devices per network.
Version 1.7
(July, 2017)
New:
- Google Maps added for visual devices representation.
Fixes:
- Group assignment to parent group issue fixed.
- Wireless client listing fixed for the Network section and the table (not all clients were shown).
- Second SSID with data VLAN fixed on bridge AP (mini-hotspot scenario).
- VLAN indication on UAM wireless profile fixed (mini-hotspot scenario).
- Incorrect indication of connected client number fixed (mini-hotspot scenario).
Improvements:
- Firmware version indicator added to the single device configuration section.
- Firmware version upload check added.
- “Cancel upgrade” button removed from when the firmware is already updating.
- Additional information/warning added for when deleting a Network with active device.
- Confirmation for resetting a device to its default factory settings added.
- 2.4GHz Spectrum Analyzer selection option removed from devices that do not support it.
- Added Automatic firmware selection added to drop-down menu for devices upgrade.
Version 1.6
(June, 2017)
New:
- New network type—Easy Mesh.
- Option to disable management VLAN wirelessly added.
- Indication, signifying devices are scheduled for a firmware upgrade, added.
- Option to add offline devices to the queue for firmware upgrade added.
- RADIUS failover server support added.
Fixes:
- NFT controller backup fixed (some system files were missing).
- Repeating refresh fixed on Closed device settings.
- Radio scheduler validation error fixed (even if the feature was disabled).
- Issues with information about offline devices missing fixed.
- Device button status fixed in the Devices menu.
- Device tool capability information fixed in the Channels tab.
- Device firmware upgrade validation fixed for when the device has a newer firmware version than the NFT controller system.
- System crash fixed for when devices are being upgraded with a firmware that is deleted from a system.
- UI elements visual look&feel fixed.
Improvements:
- Current operating channel added to Network Channel tab when “Autochannel selected by device” is enabled.
- Visualization improved for radio scheduler.
- Network search using Organization or Group ID improved.
- Device ‘Uptime’ changed to ‘Last Seen’ information while the device is down.
- Wireless clients tab column renamed from “MAC” to “Client MAC”.
- Wireless clients tab column renamed from “Uptime” to “Session time”
- Firmware upgrade notification messages improved.
- Sorting by device status added.
- Validation improved for when deleting the Mini hotspot profile.
Version 1.5.1
(April, 2017)
New:
- Network scenarios added: Office/Home LAN, Hotspot.
- VLAN configuration feature added for NFT 2ac/3ac products.
- Hotspot profile tab added for global UAM settings configuration.
- Mixed mode and WPA2 only selection added to the wireless network profiles.
- Hotspot welcome URL added.
- Option to override hotspot black/white lists added.
- Option to disable/enable the reset button added.
- Network group ID added.
Fixes:
- Validation of ‘Start upgrade’ time improved in the radio scheduler.
- Network and group statistics updates fixed on GUI.
- Configuration settings fixed for the NFT 3ac for when an 80MHz channel is selected.
- Super user limitation to change their own password fixed.
Improvements:
- The default 2.4GHz channel size is set to 20MHz.
- Requirement to set up two NTP servers removed.
- Access point info and wireless clients can be accessed from the Devices page.
Version 1.4.2
(January, 2017)
New:
- Option to create two-level groups added.
Fixes:
- Issues with the Spectrum Analyzed not turning off when changing radios fixed.
- Expanded group collapse once statistics are updated issue fixed.
- Time input field validation for “Auto firmware update time” and “Radio on/off schedule time” fixed.
- Fixed Last hour throughput value fixed in dashboard mini-diagram.
Improvements:
- User permission handling improved by allowing to assign permission for a group only, not network.
- Most active networks (by client count) display in dashboard improved.
v1.4.1
(January, 2017)
New:
- Unregistered device list added for network manager user type.
- Individual organization IDs added for Free Cloud users.
Improvements:
- Device discovery is now always enabled.
v1.4
(January, 2017)
New:
- Management VLAN configuration added.
- Traffic shaping per VAP added.
- Option to move the device to another network added.
- Option to use a native-based device auto-channel function instead of the controller-based one added.
- Daily automatic firmware upgrades added to schedule.
- Network config copying option added.
- System alert (SNMP traps) configuration added.
- Option to disable Ethernet LAN ports added.
- Device, network, and user count limits added to network groups.
- Radio scheduling added.
- Automatic firmware upgrade, if hidden features are available, added.
- Option to configure whether the uploaded firmware will be visible to all users added.
- Option to disable VAP for individual devices added.
Fixes:
- Mini- and normal chart inconsistencies in dashboard fixed.
- Issues with first data points always being zero charts fixed.
- Most active network table renewal issue fixed.
- Throughput measurement units fixed in dashboard.
- Wireless profile save issue fixed for when some fields are left empty.
- Network config saving issue fixed for when a county with no 80MHz (5G) bandwidth is selected.
- Tx-power config saving error fixed with countries that do not have a 5GHz frequency band.
- Fixed Issues with missing expansion button after a network search fixed.
Improvements:
- Cloud stability and performance improved by migrating all users to a single organization.
v1.3
(November, 2016)
New:
- Network search added to Device Registration page.
- Unregistered device count added to the Registration page.
- Pagination added for network list in the Registration page.
- Multiple device firmware upgrade option added.
- Network groups added.
- Network manager and network monitor user permissions added.
- Spectrum Analyzer added.
- Troubleshooting file download tool added to network and device.
- Reset to default settings option added.
- Device reboot tool added.
- Quick-access drop-down menu added to the Network page.
- Serial number and radio MAC added to device info modal.
- Option to postpone firmware upgrades added.
- Instant data renewal added to network table.
Fixes:
- 5GHz radio handling fixed for when a country code does not have a 5GHz frequency band.
- IE10 select option issue fixed.
- Modal handling fixed for when using the browser’s back button.
- Issues with being able to create multiple organizations by accident fixed.
- SSH and Telnet port configuration fixed.
- Date selection fixed in Firefox.
- Settings validation issues fixed in WPA-Enterprise configuration.
- Issues with devices showing up in the unregistered list incorrectly fixed.
Improvements:
- Auto-channel selection improved to always use the maximum available channel width.
- Device uptime value representation improved.
- Device Rx/Tx value representation improved.
- Dashboard improved with new graphs and counters.
- Device radio configuration improved to be in a single tab.
- Responsive design improved in most pages.
v1.2
(September, 2016)
New:
- Product name added to device inventory table.
- Option to override SSID on individual device added.
Fixes:
- ‘Leave organization’ button fixed on small resolutions.
- ‘Superadmin’ menu responsive design fixed.
- Channel width info fixed in channels table.
v1.1
(August, 2016)
New:
- Product name and device IP information added to Registration table.
- User self-registration wizard added.
- Landing page added for cloud version.
- New user type—owner—added.
- Tooltip added to organization name.
- Organization management and exporting to Excel options added.
- All client table added to dashboard.
- User password recovery via email added.
Fixes:
- Device modal animations fixed.
- Issues with device friendly name prefix update being too long fixed.
- Wireless profile frequency change issue fixed.
- Unsupported CT country code removed.
Improvements:
- Responsive design improved.
- Error message readability improved.
v1.0
(June, 2016)
Initial Release
Below, you can find a video tutorial on how to configure Guest Access on the LigoWave Cloud Controller:
Follow the steps provided below to create an Infinity Cloud Controller account and to create Guest access profile.
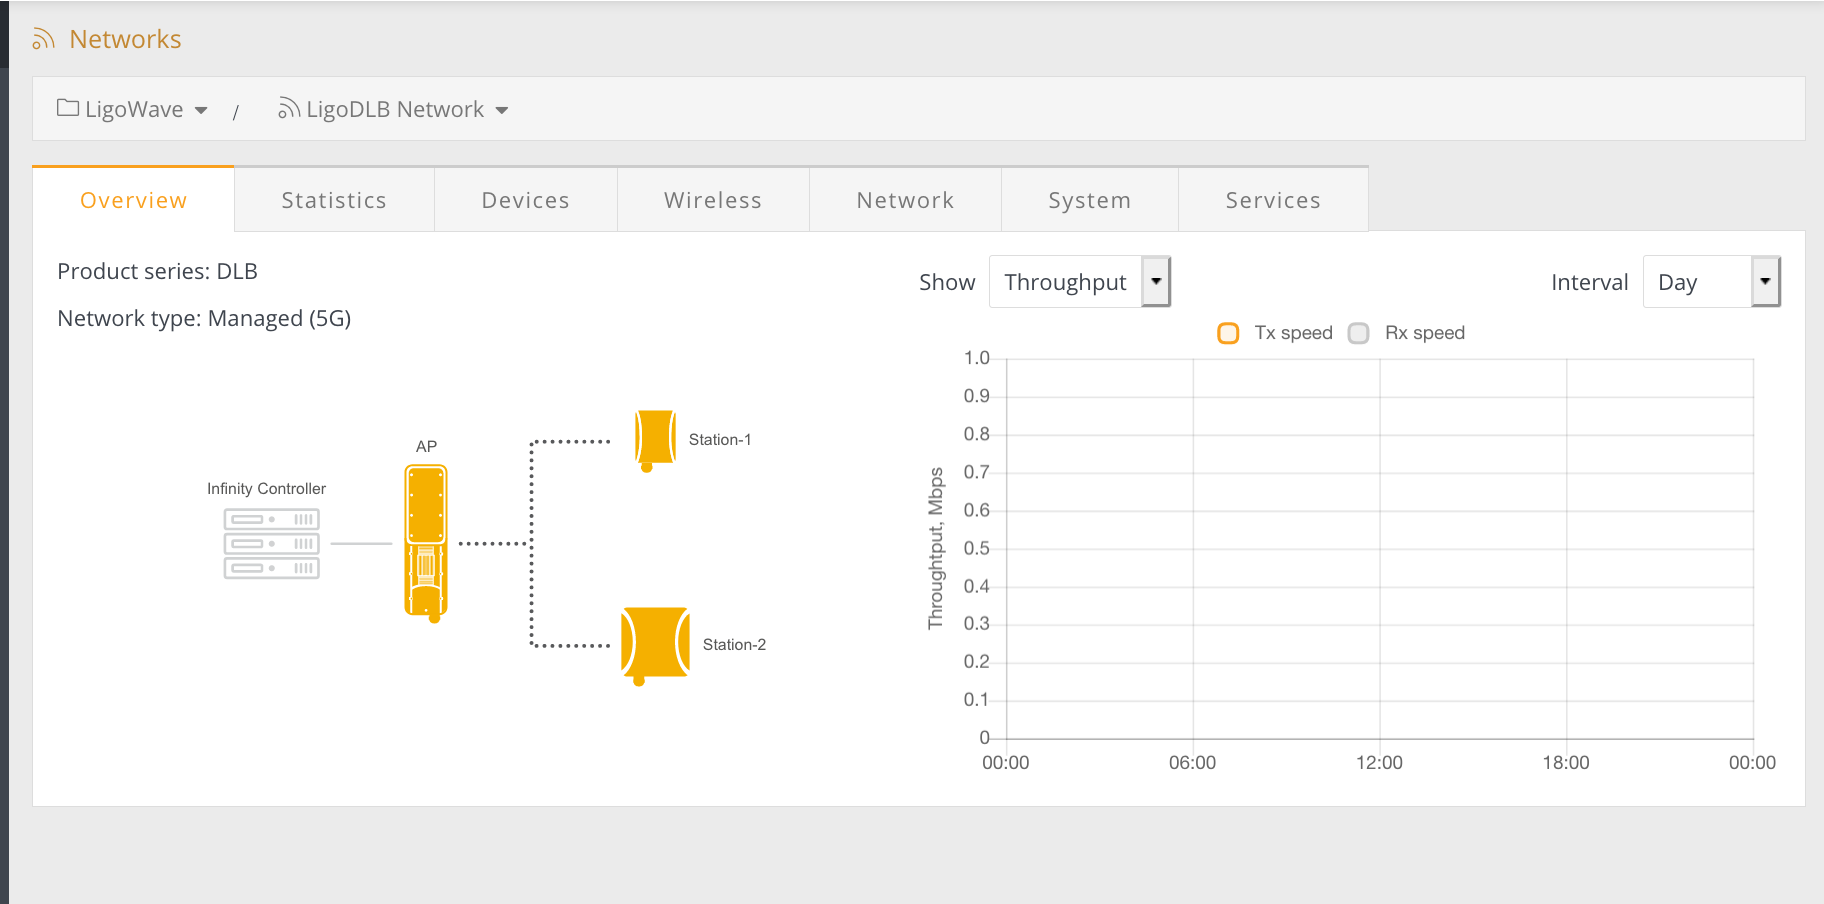
Step 1. The LigoWave Controller’s management interface:
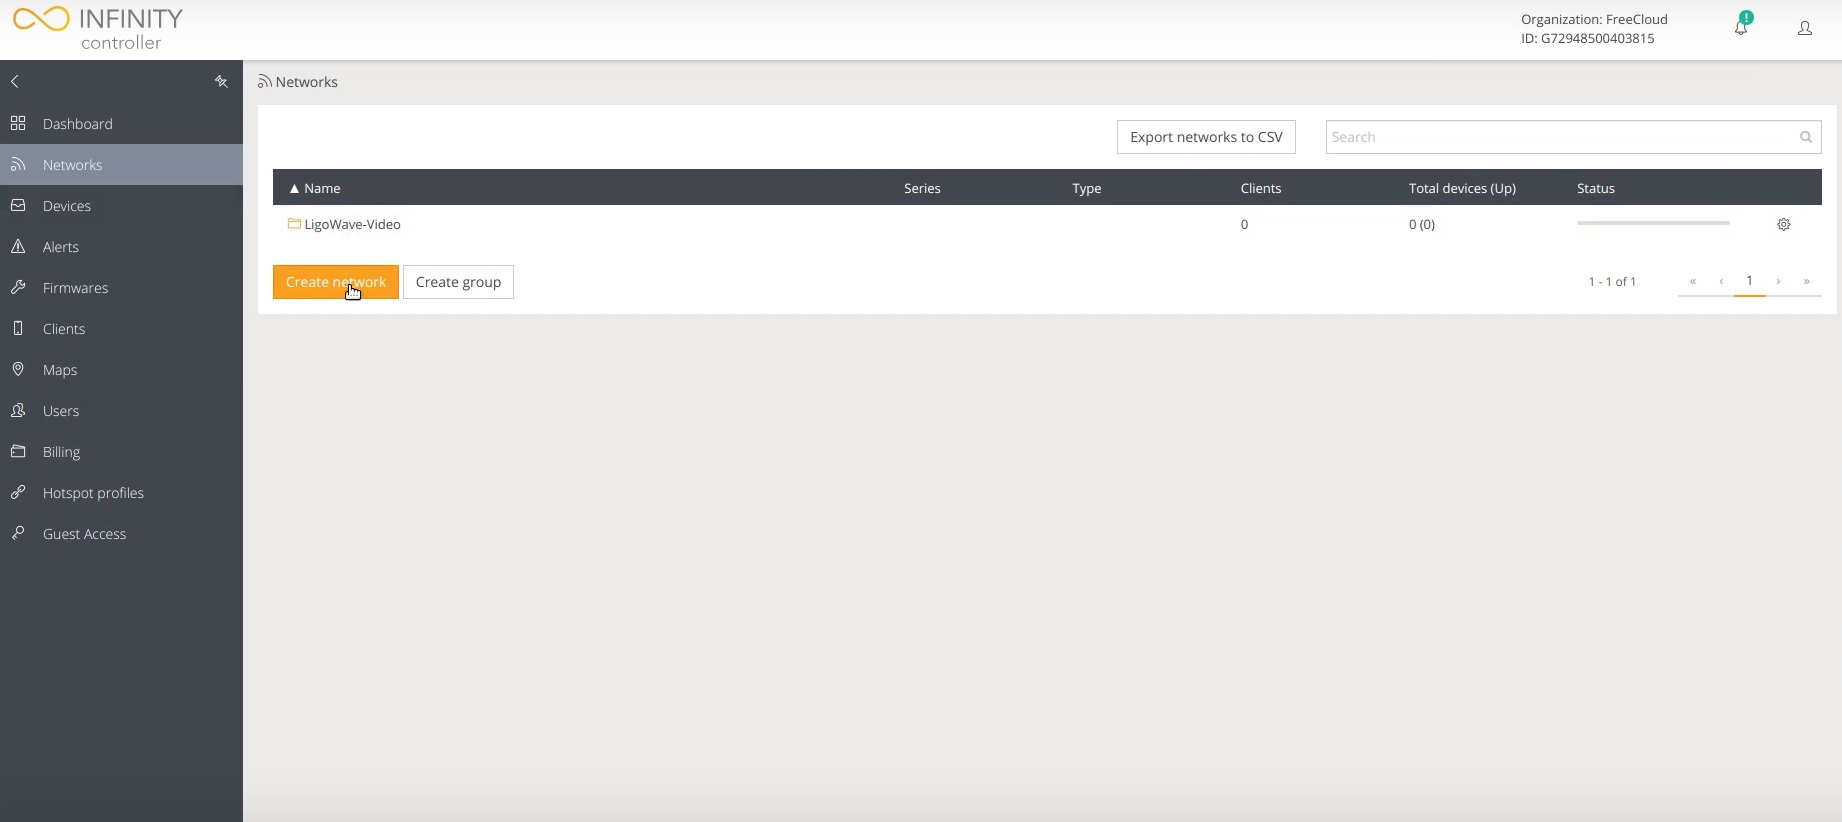
Step 2. Navigate to Networks in the side dashboard and press Create Network:
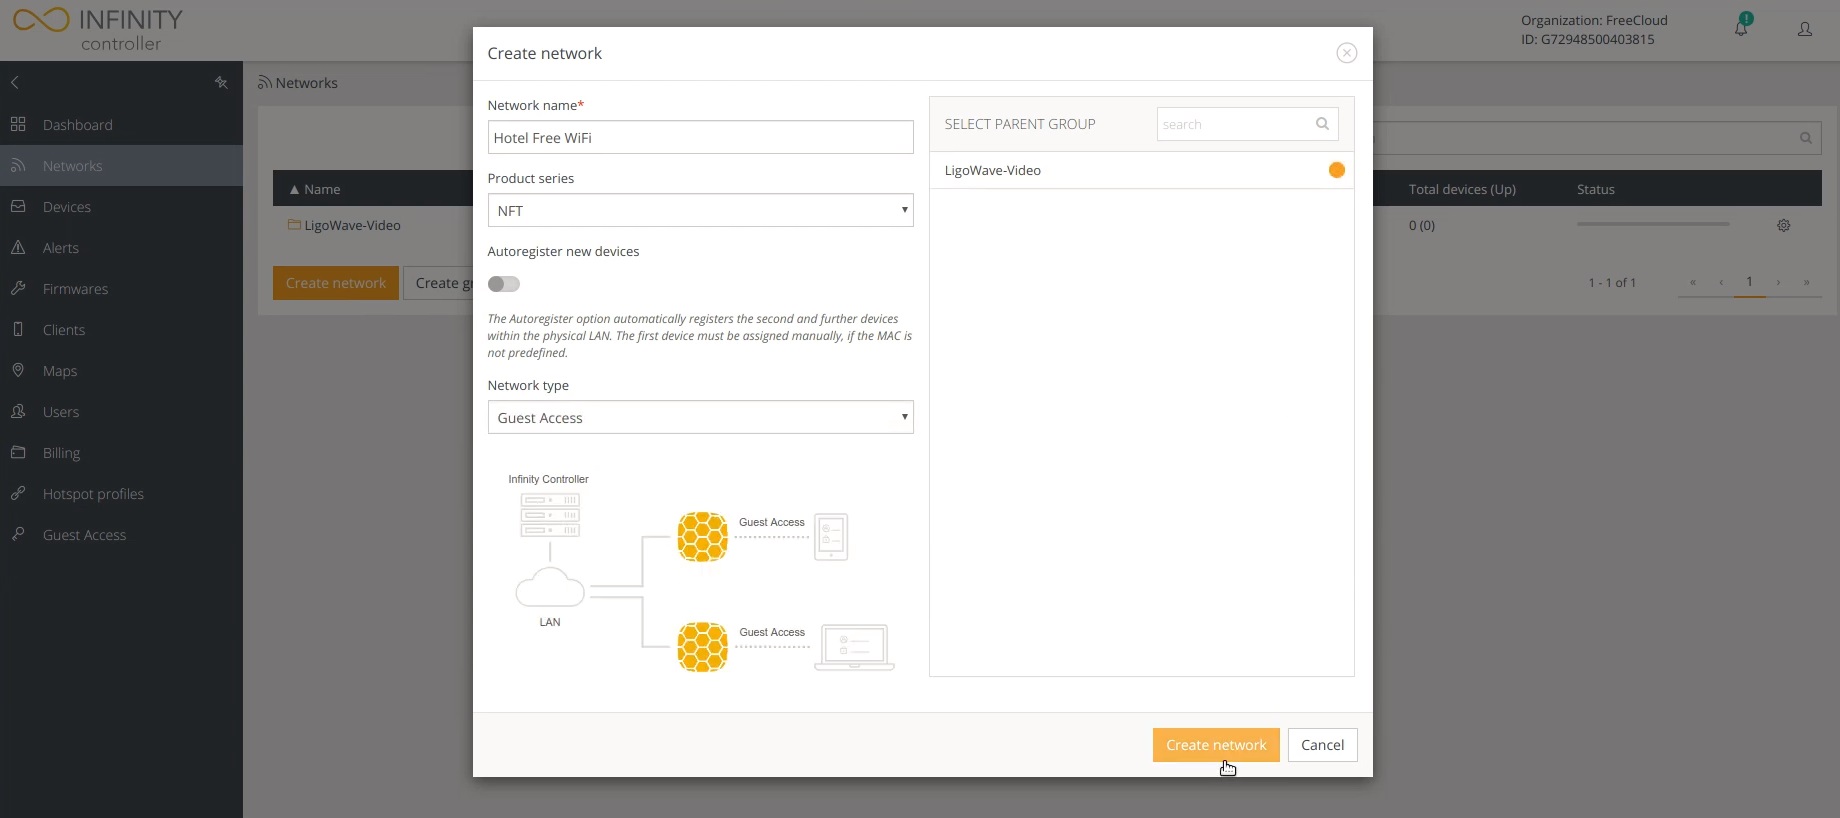
Step 3. Enter the Network name, select your Product series, pick the Guest Access network type and don’t forget to select the Parent group. Press create network:
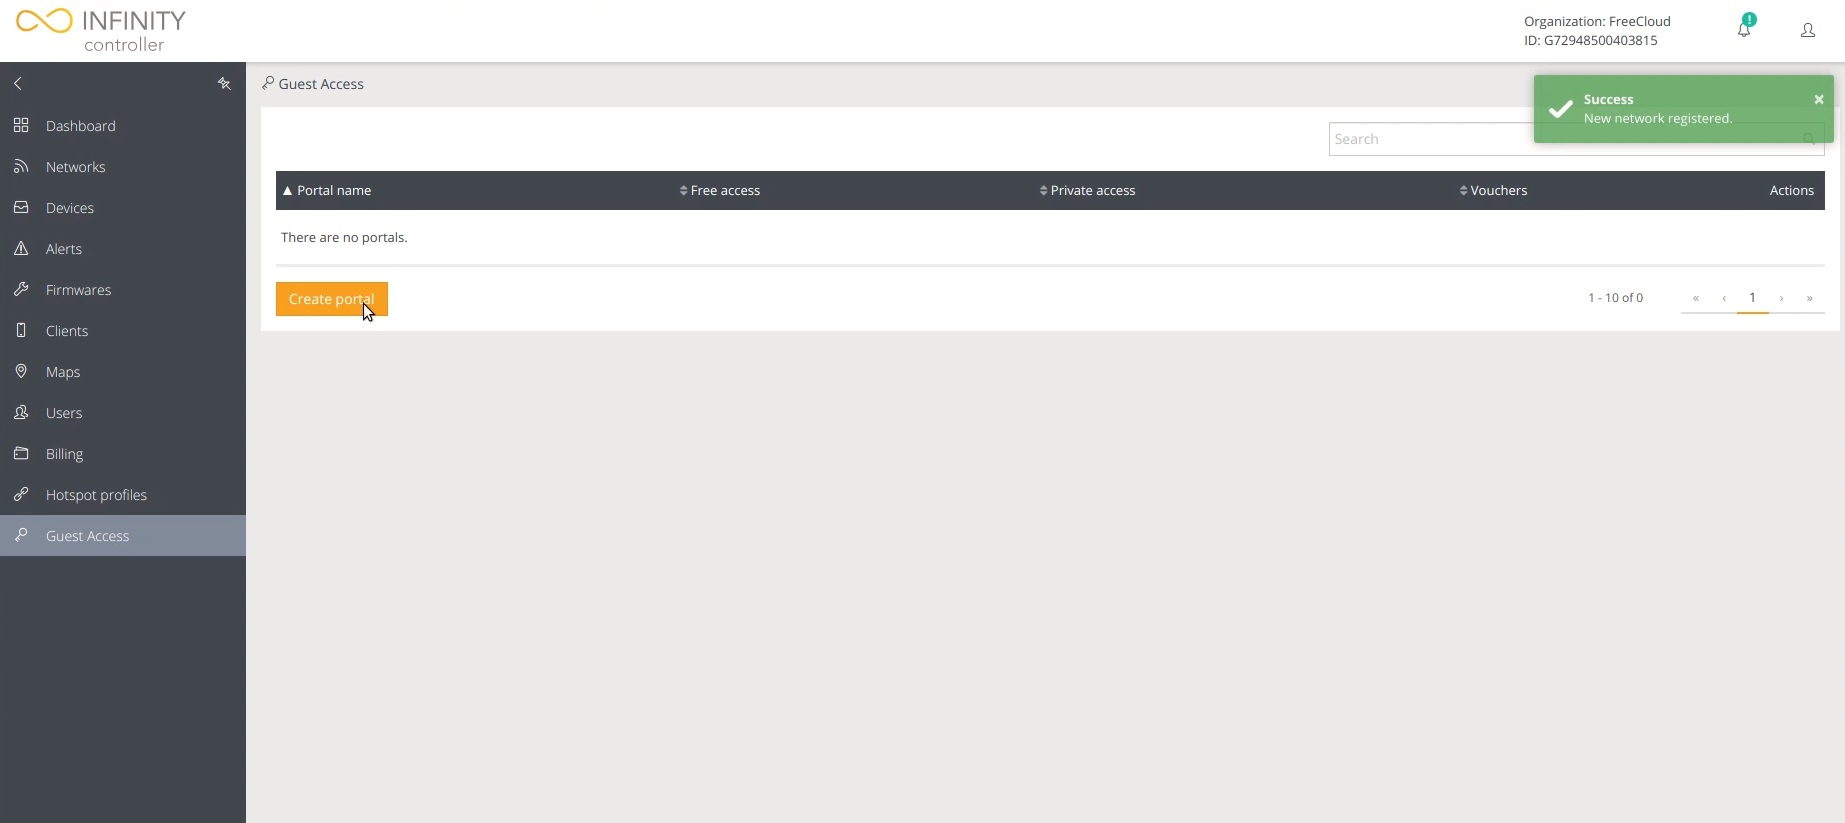
Step 4. Creating a Free Access scenario.
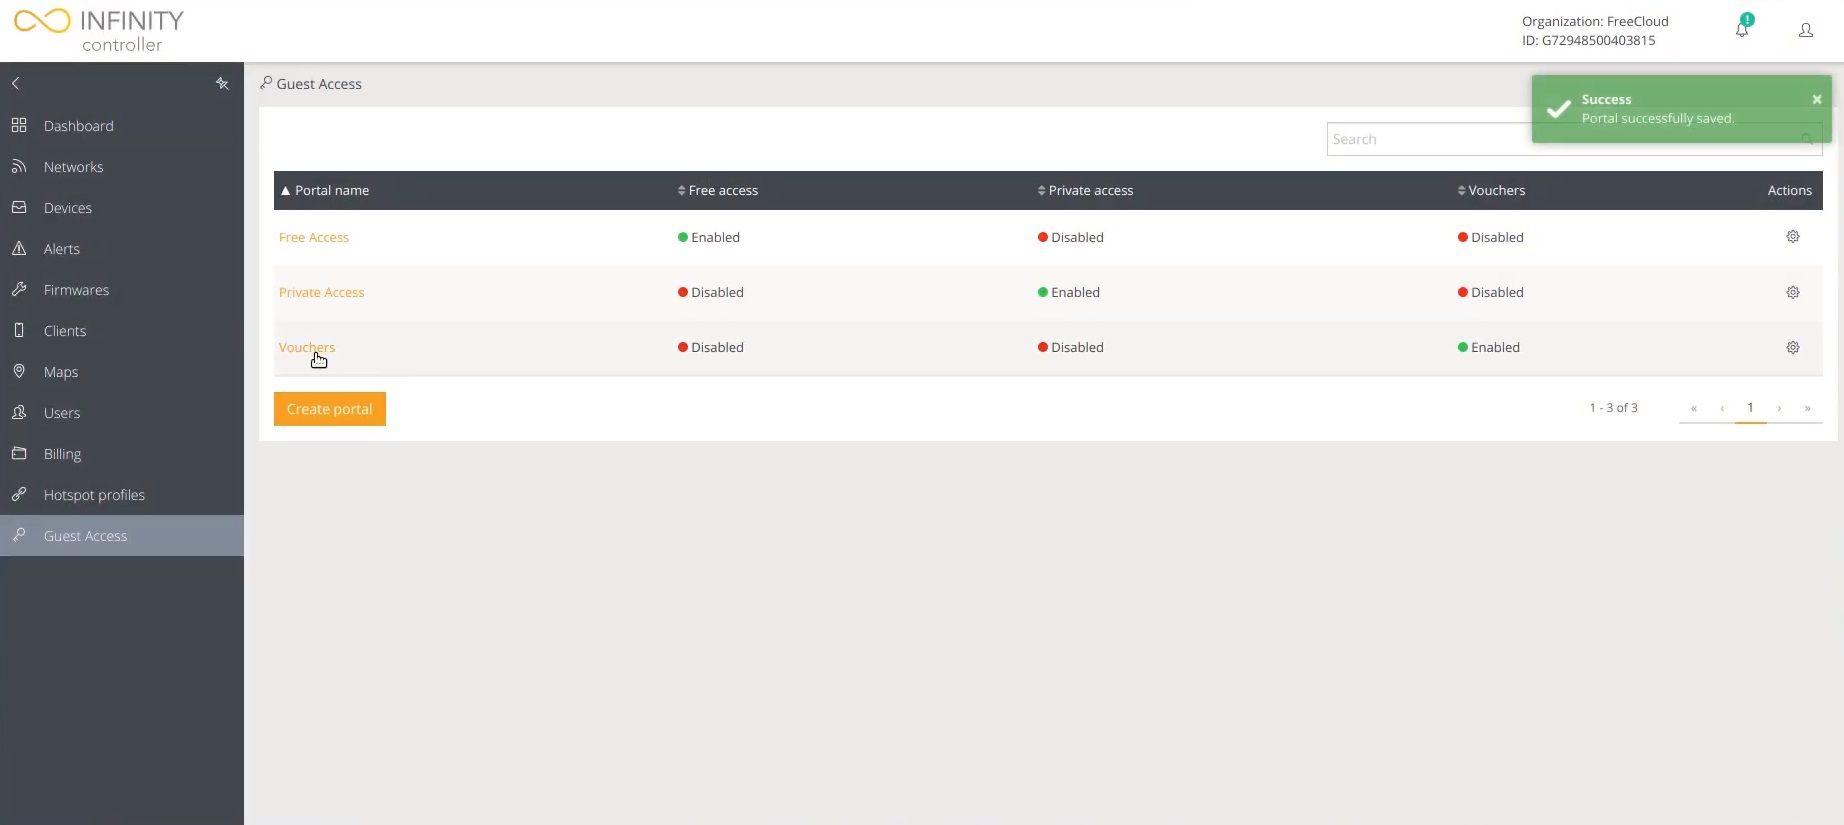
Navigate to the Guest Access section in the side dashboard and press the Create portal button:
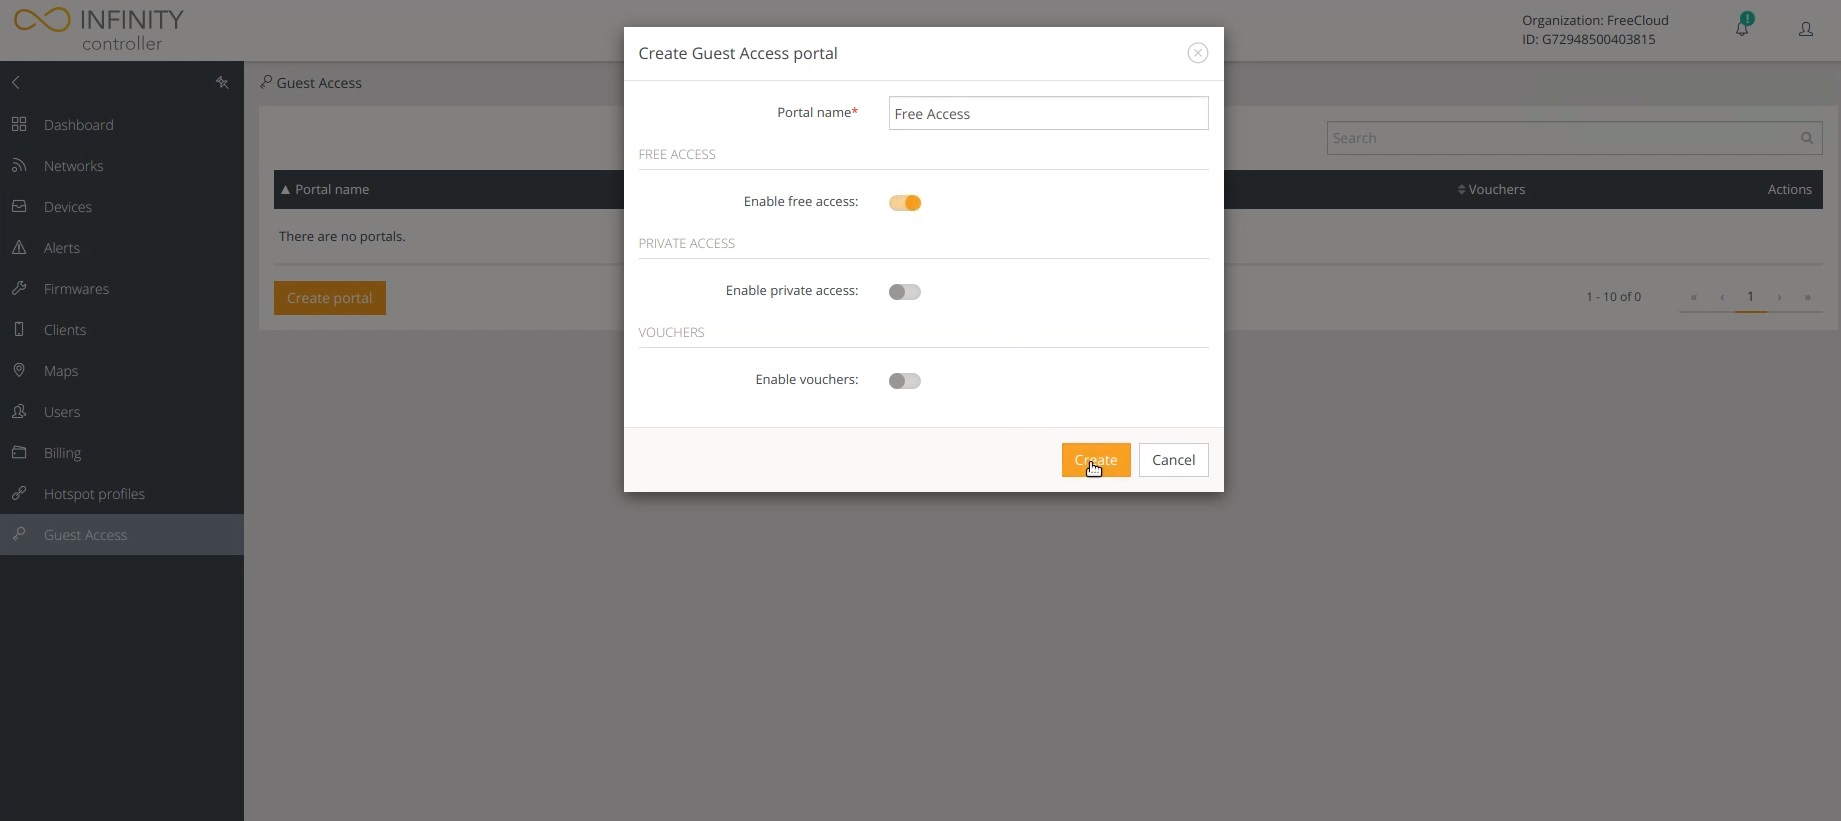
Step 5. Enter your portal name, enable Free Access, and press Create:
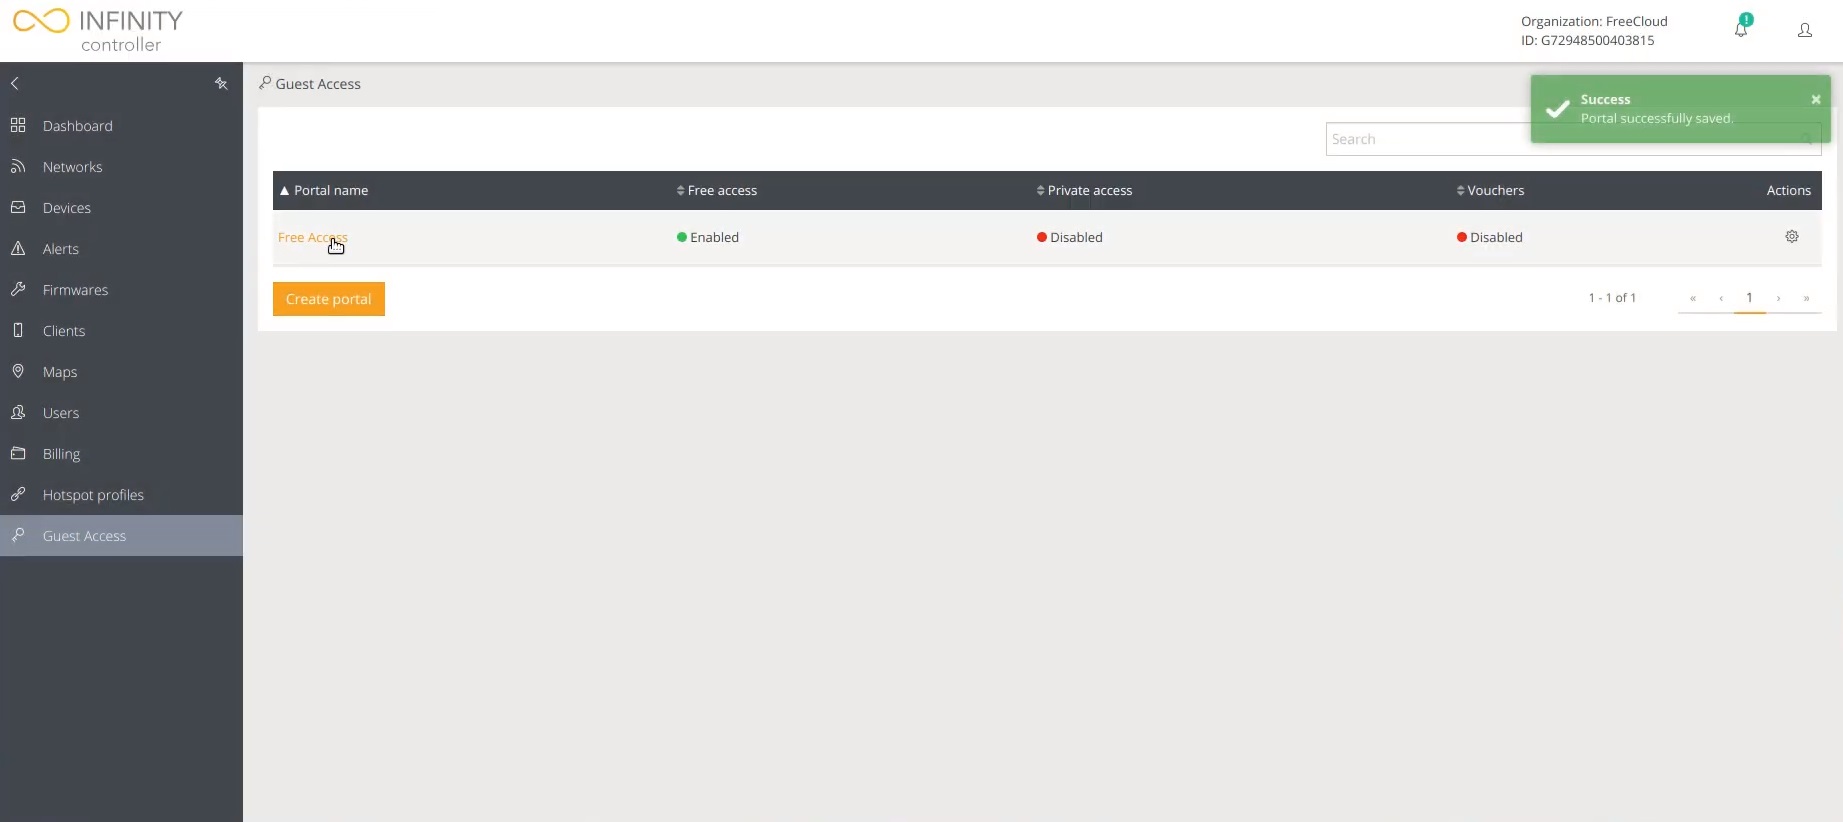
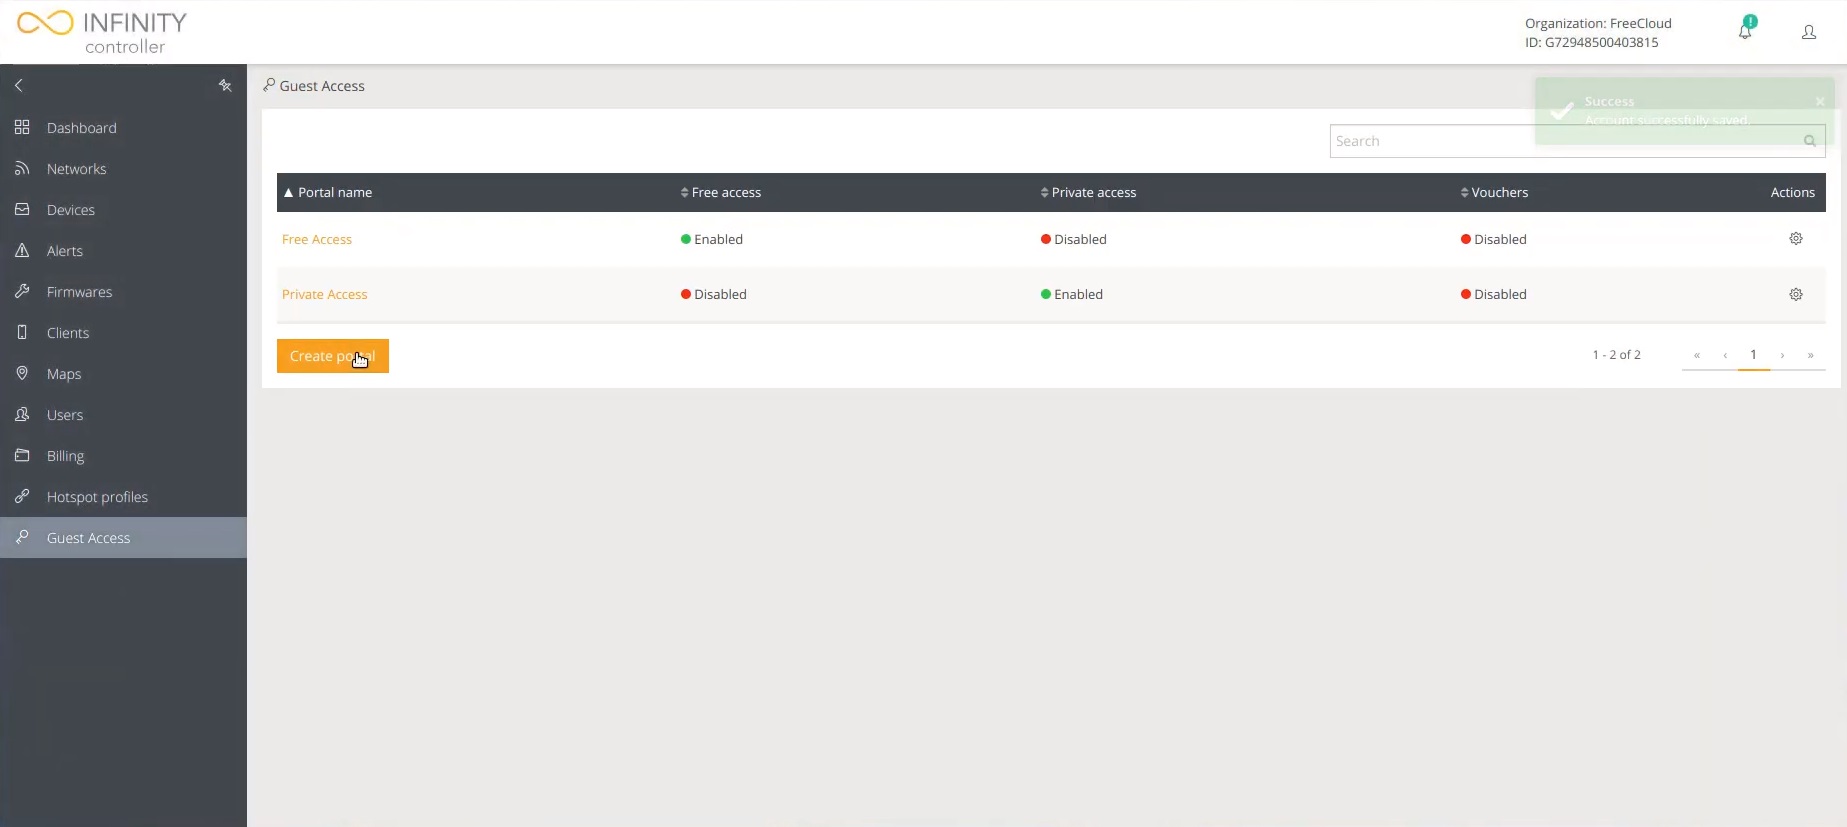
Step 6. After creating the Free Access portal, click on it.
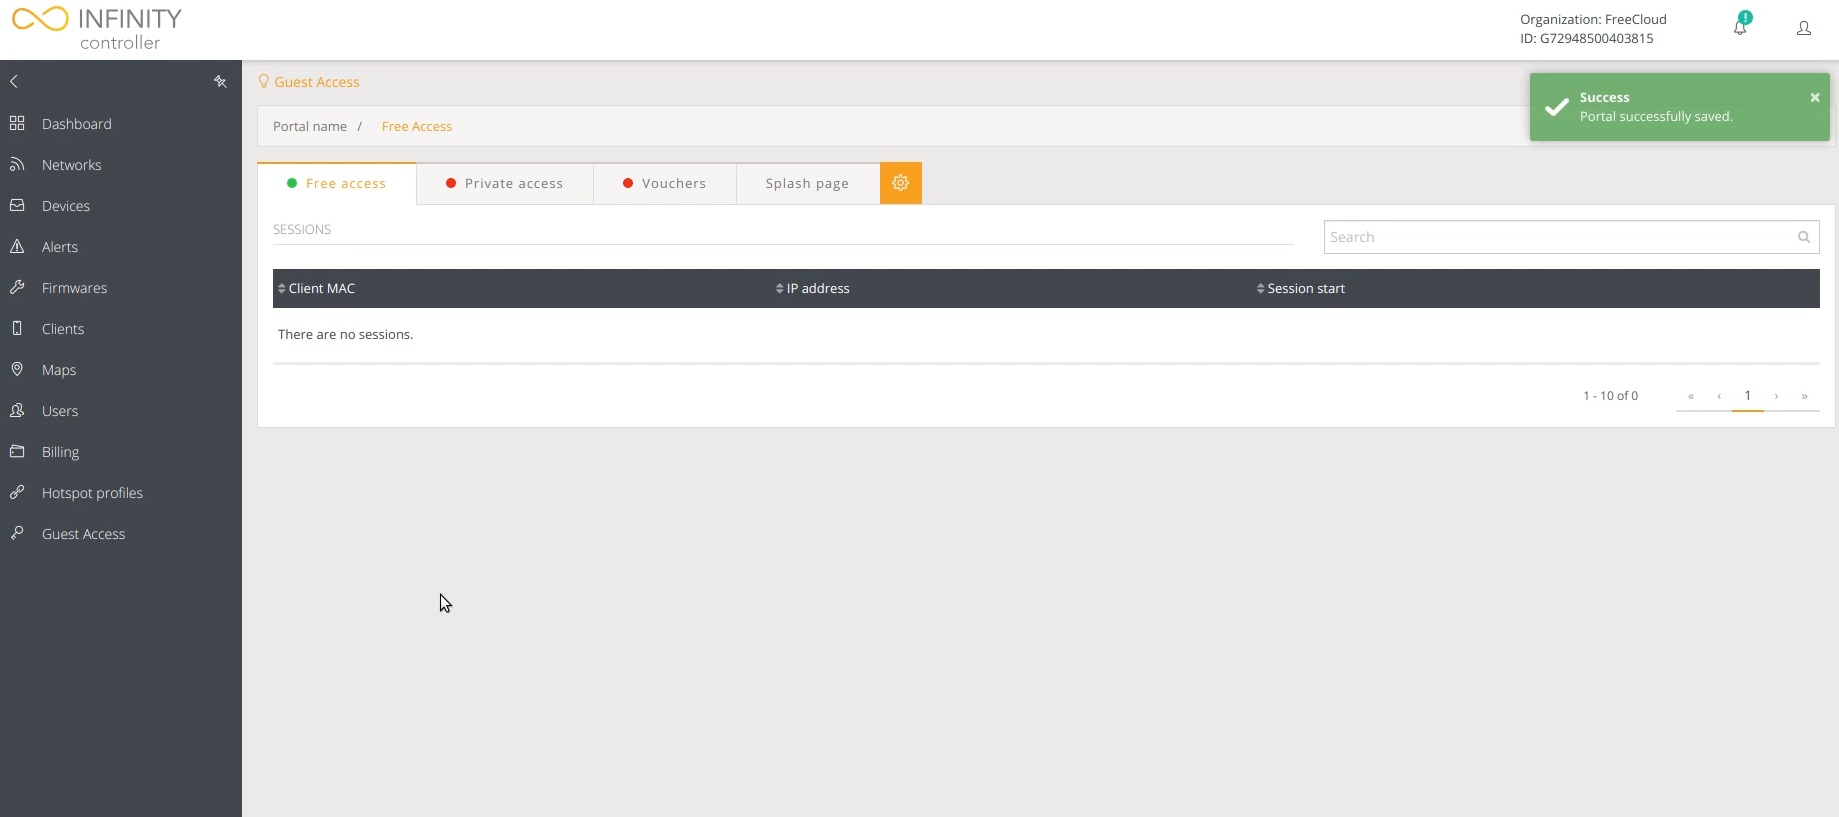
Step 7. In the Free Access tab, you can see the connected clients.
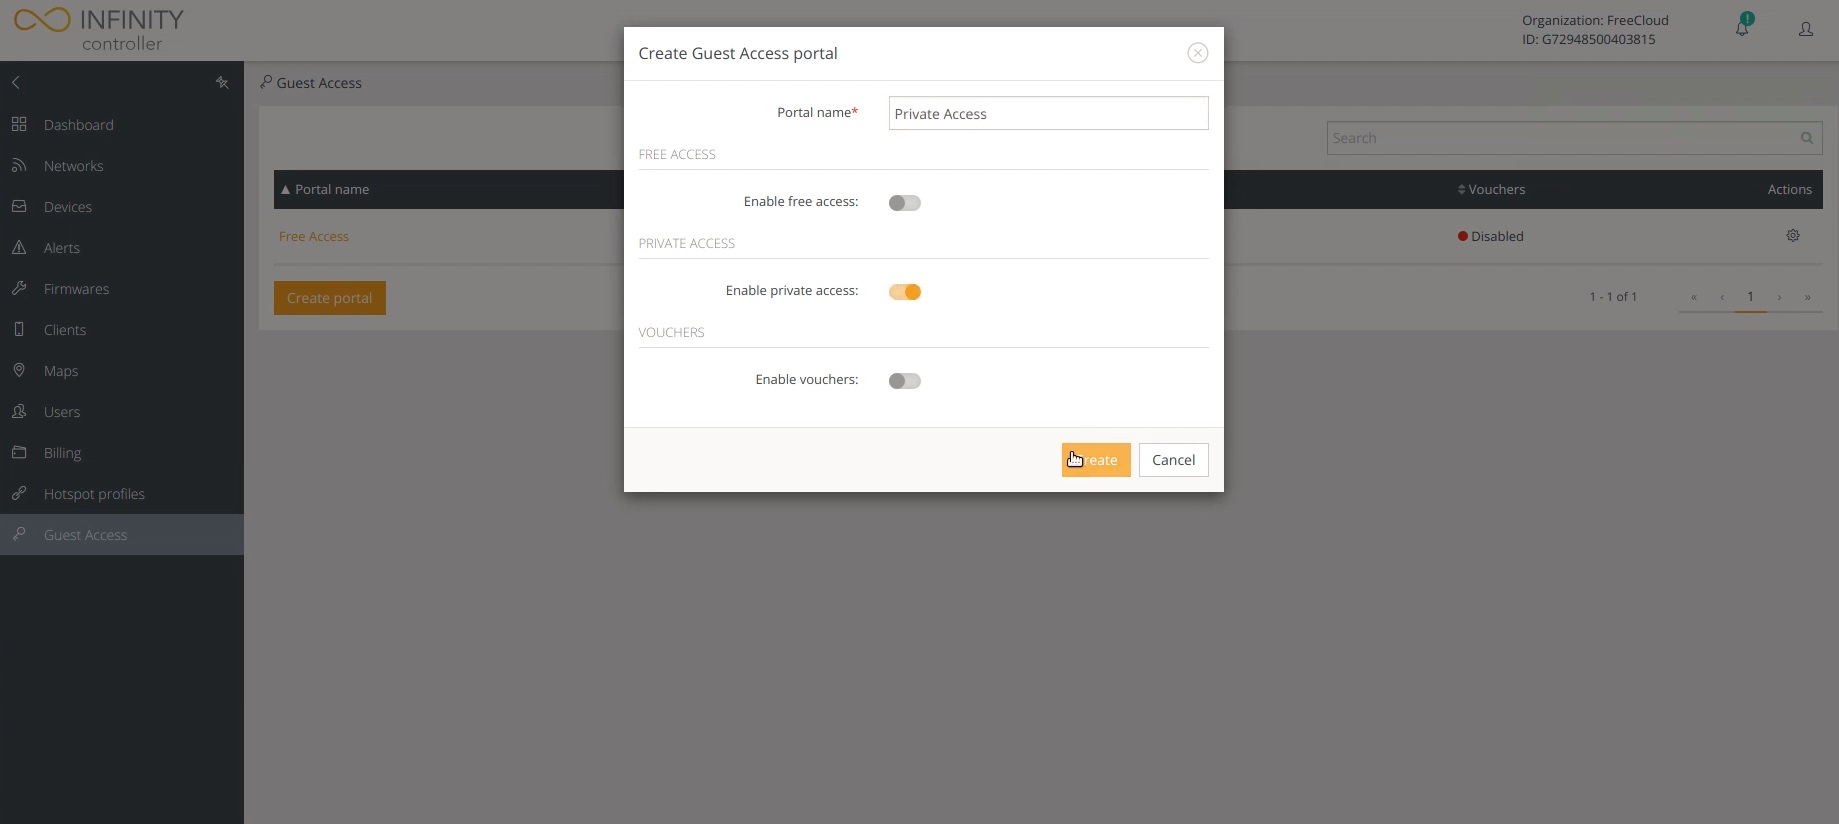
Step 8. Creating the Private Access scenario.
Navigate to the Guest Access in the side dashboard, enter your Portal name, enable Private access and press Create:
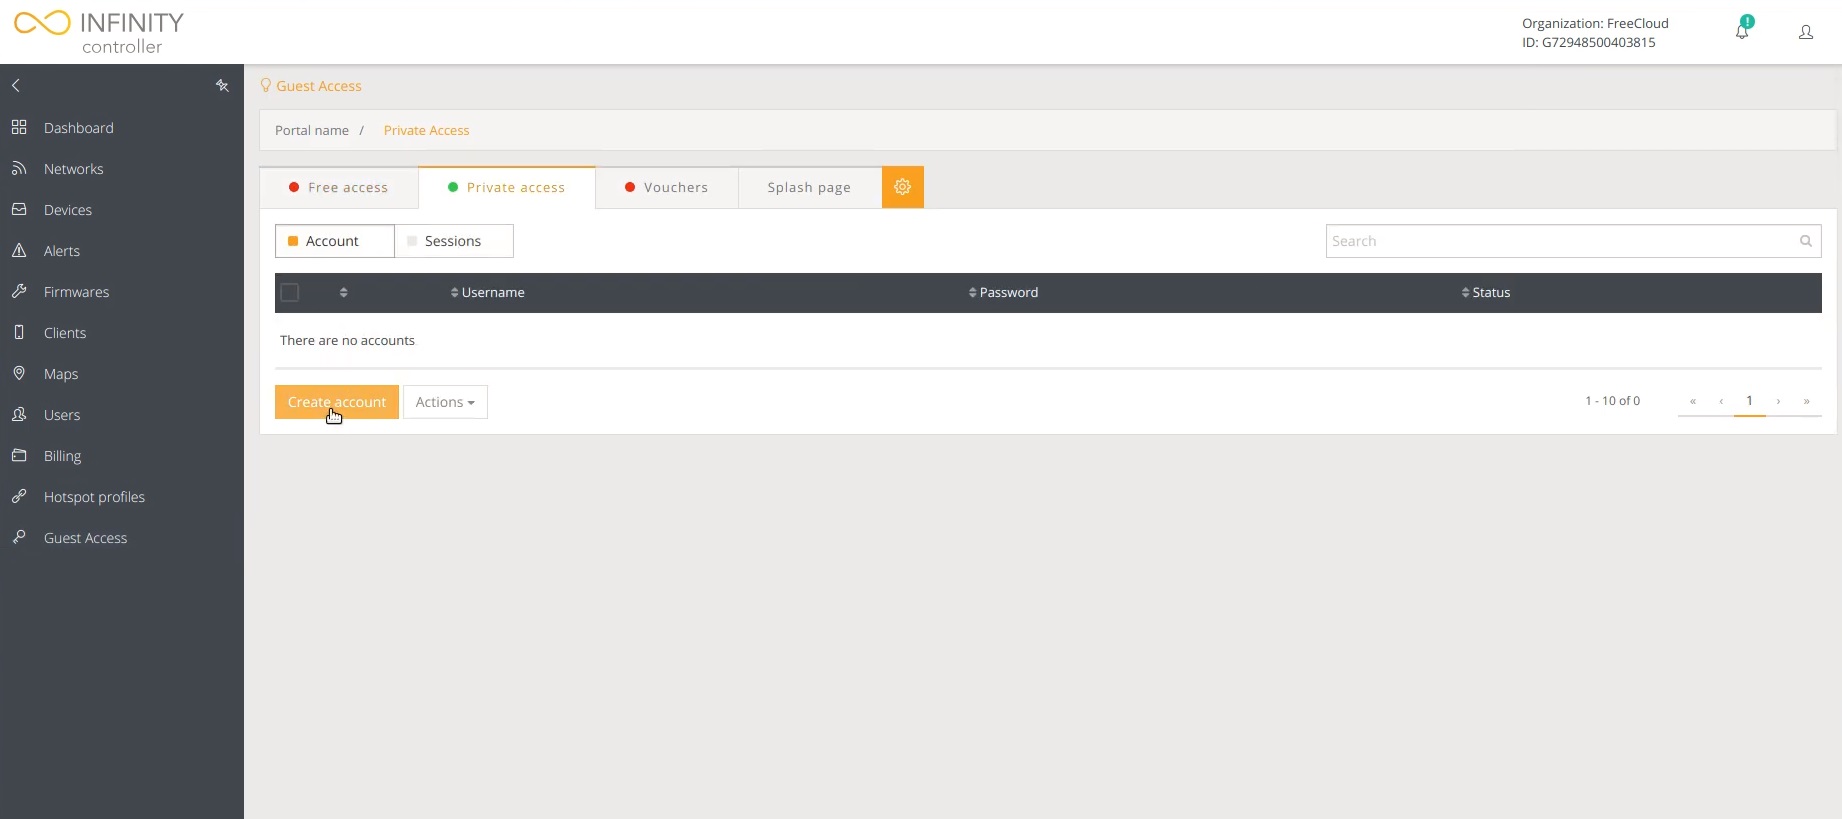
Step 9. After creating the Private Access portal, click on it:

Step 10. When you are in the Private Access portal section, navigate to the Private Access tab and press Create account:
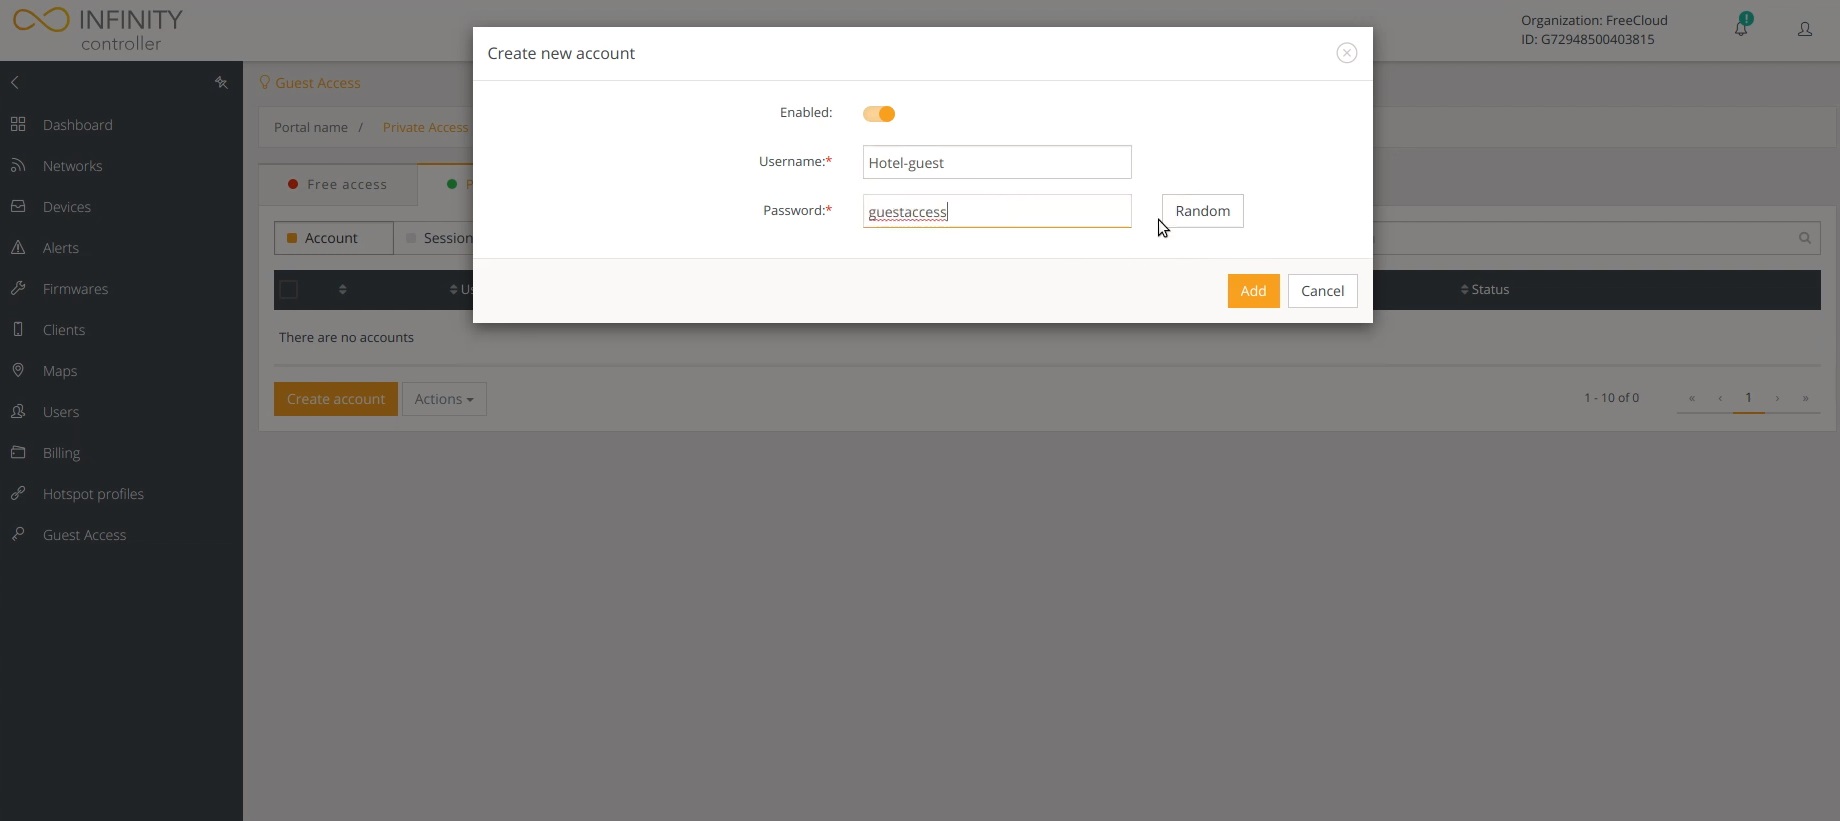
Step 11. Enter the client’s user name and password. Passwords can be generated by pressing the Random button. After filling out all of the required fields, press the Add button:
Step 12. Creating the Voucher scenario.
Navigate to Guest Access in the side dashboard and press Create portal:
Step 13. Enter your portal name, enable Vouchers, and press Create.

Step 14. After creating the Vouchers portal, click on it:
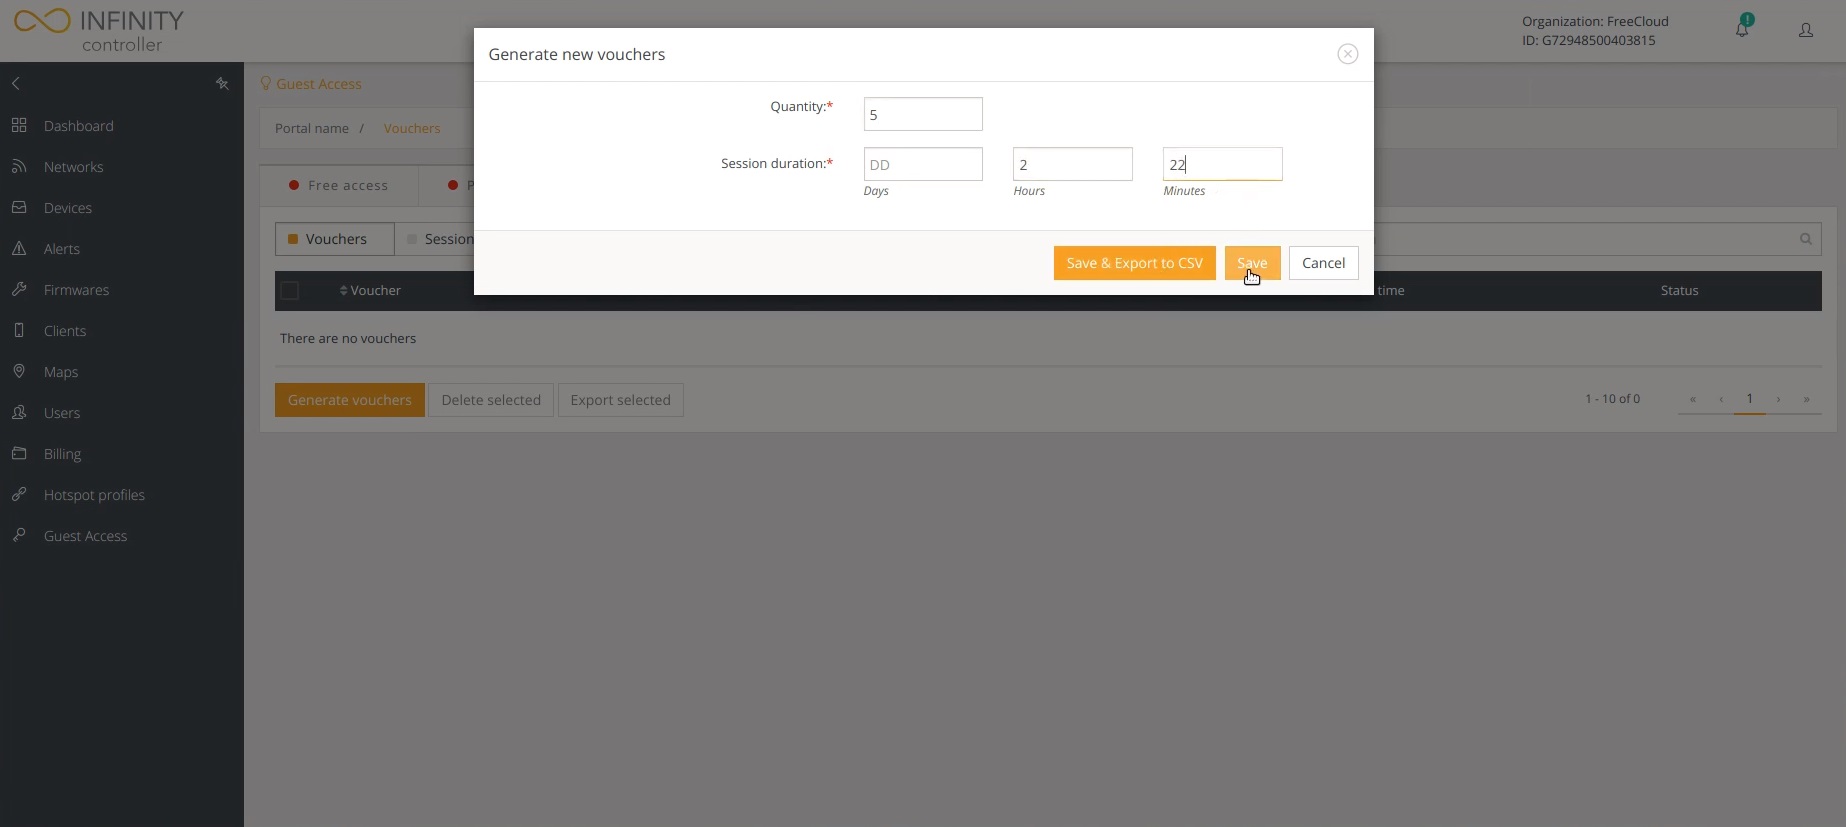
Step 15. When you are in the Vouchers portal section, navigate to the Vouchers tab and press Generate vouchers:

Step 16. In this window you can create as many vouchers as you want. To create vouchers, enter the quantity of vouchers you want to create, enter the session duration. In this scenario, the session duration is set to 2 hours and 22 minutes. After filling out the required fields, press the Save button:
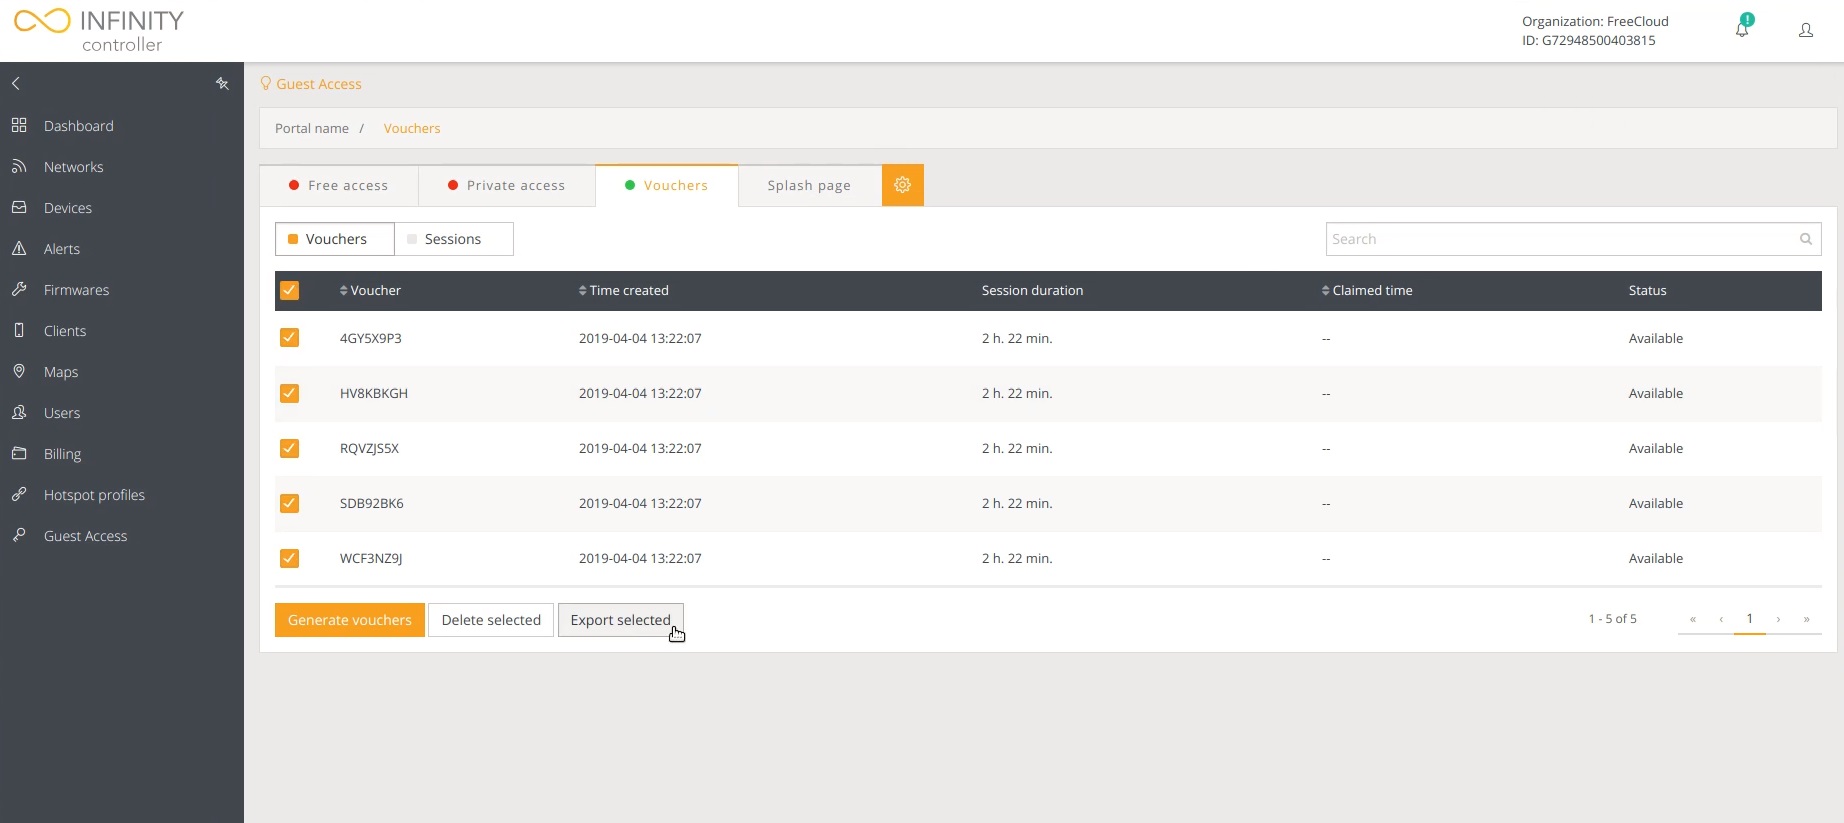
Step 17. The controller will generate voucher codes which you can give to your customers. Also, you can export codes to a CSV file by selecting the vouchers and clicking Export selected. In this tab, you can also see the voucher session duration, claimed time, and status if the voucher is available or claimed:
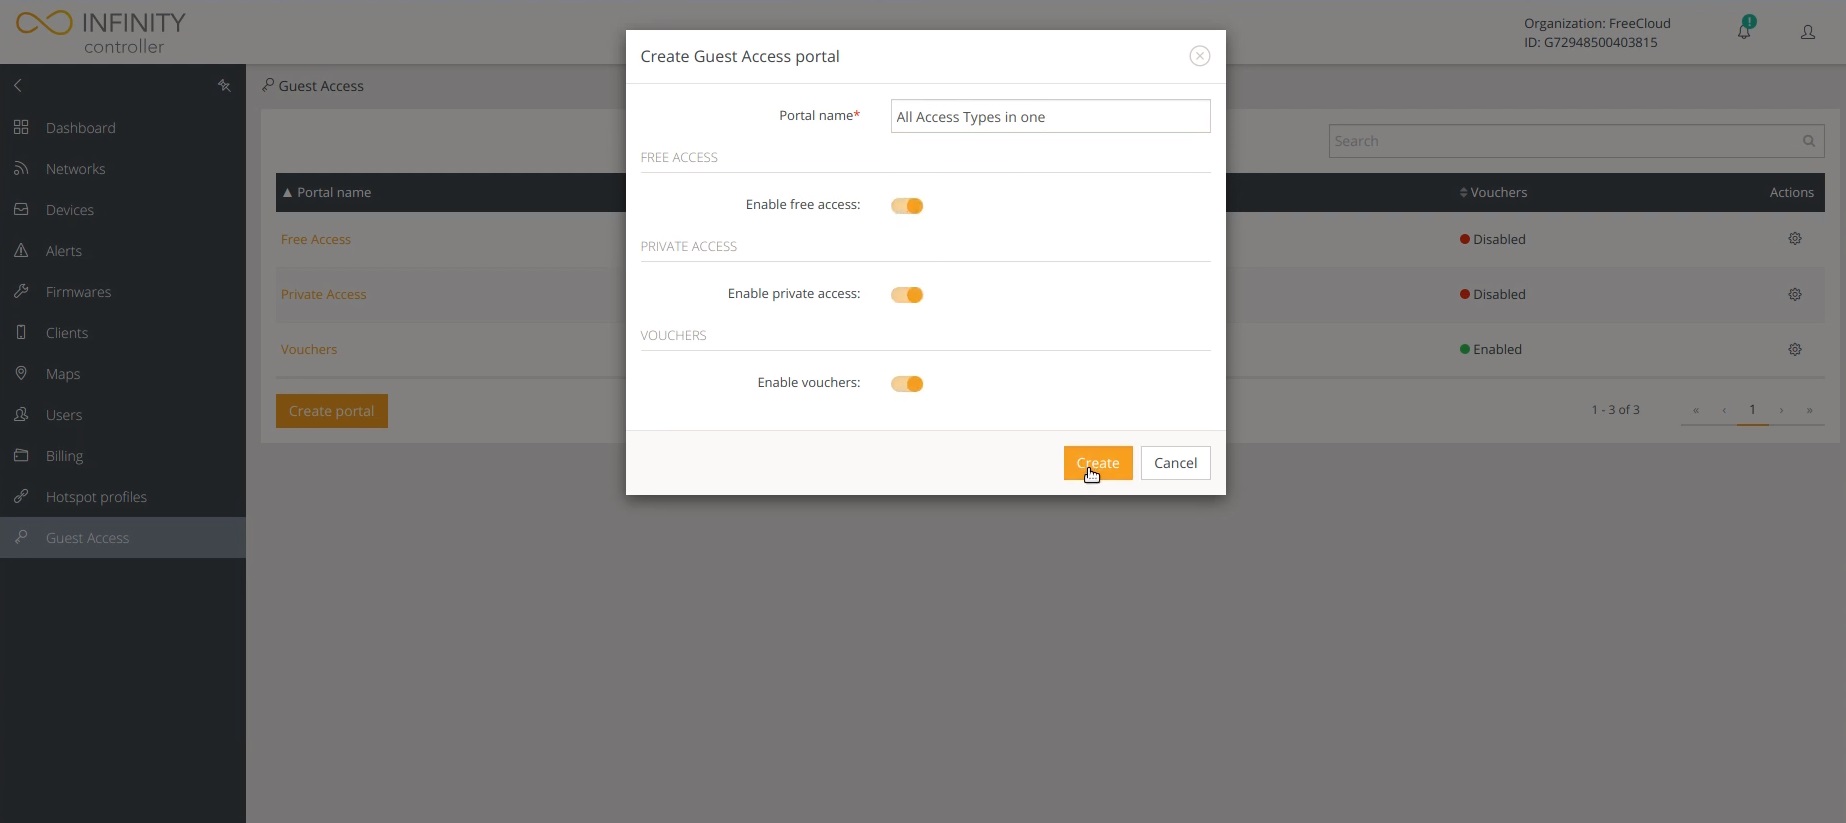
Step 18. You can have multiple access modes enabled in a single portal, if for example you want to offer Private Access accounts for a special client and vouchers for one-off visitors. To recreate the mentioned example, create a new portal, enter the portal name and enable your desired modes:
Step 19. The configuration of this portal is the same as of the other portals mentioned above.
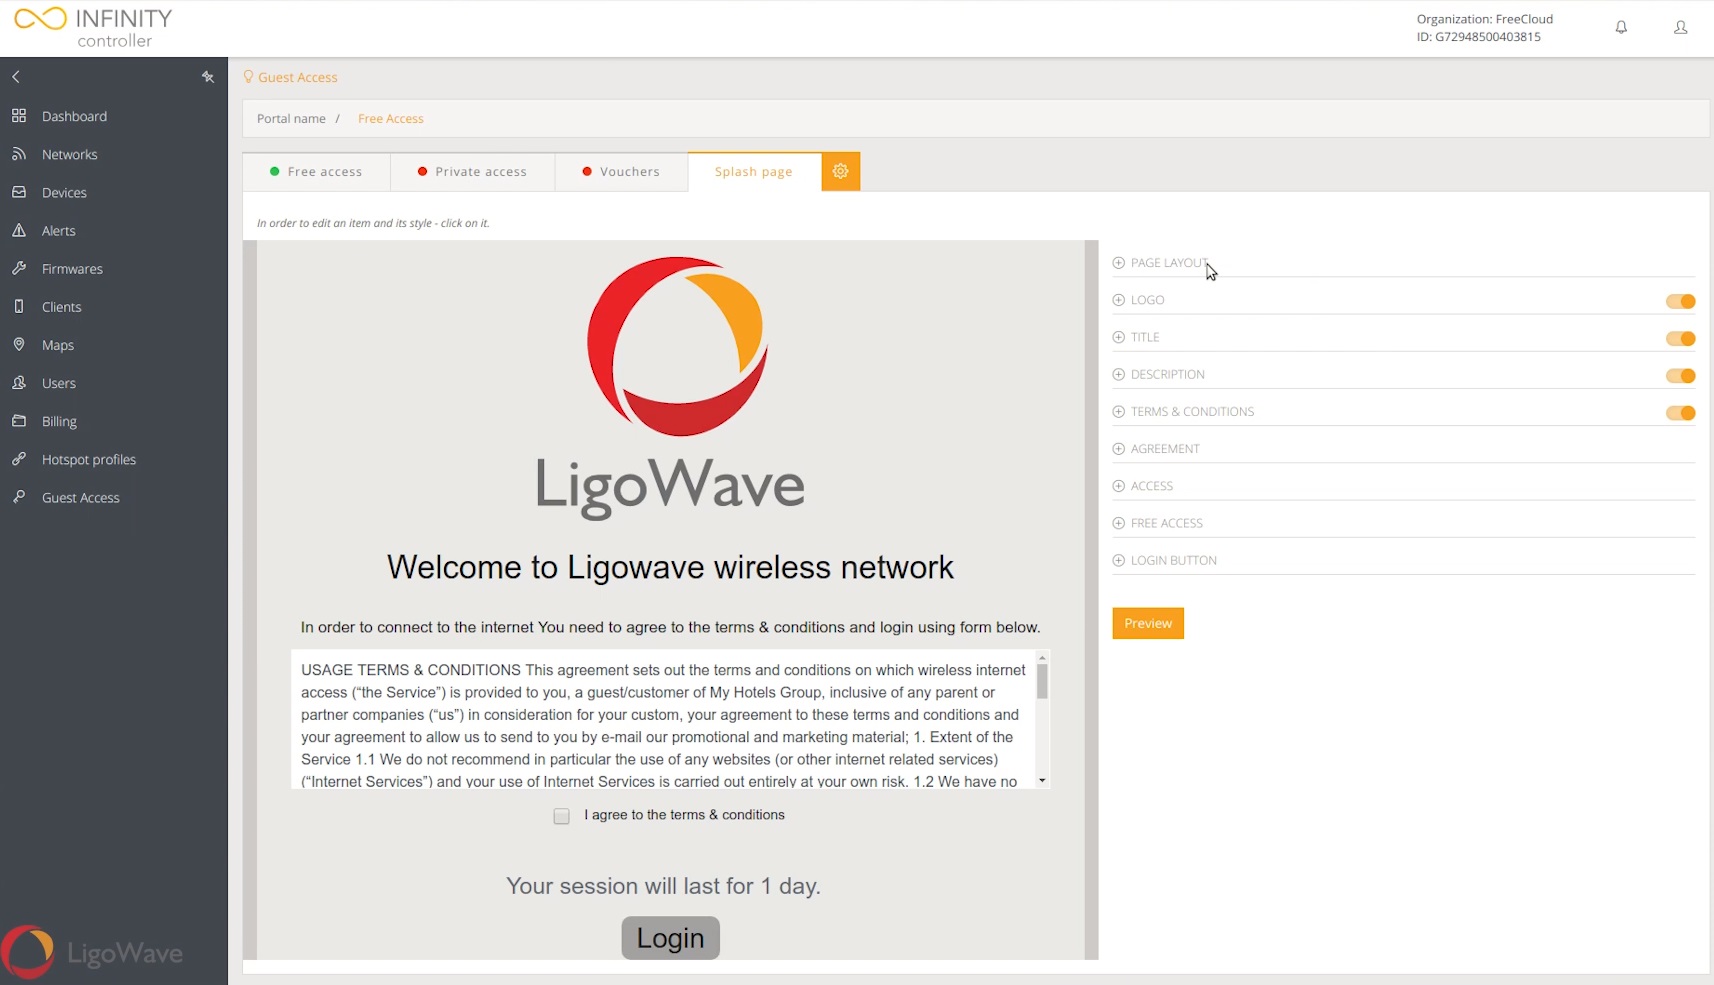
Step 20. Guess Access has a feature called Splash Page. To configure your splash page, navigate to Guest Access in the side dashboard. Enter to one of your created portals. In the portal there is a tab named Splash Page. In there you can modify the page layout, page logo, title, description, terms & conditions, agreements, access, free access, login button or you can use our default Splash Page.
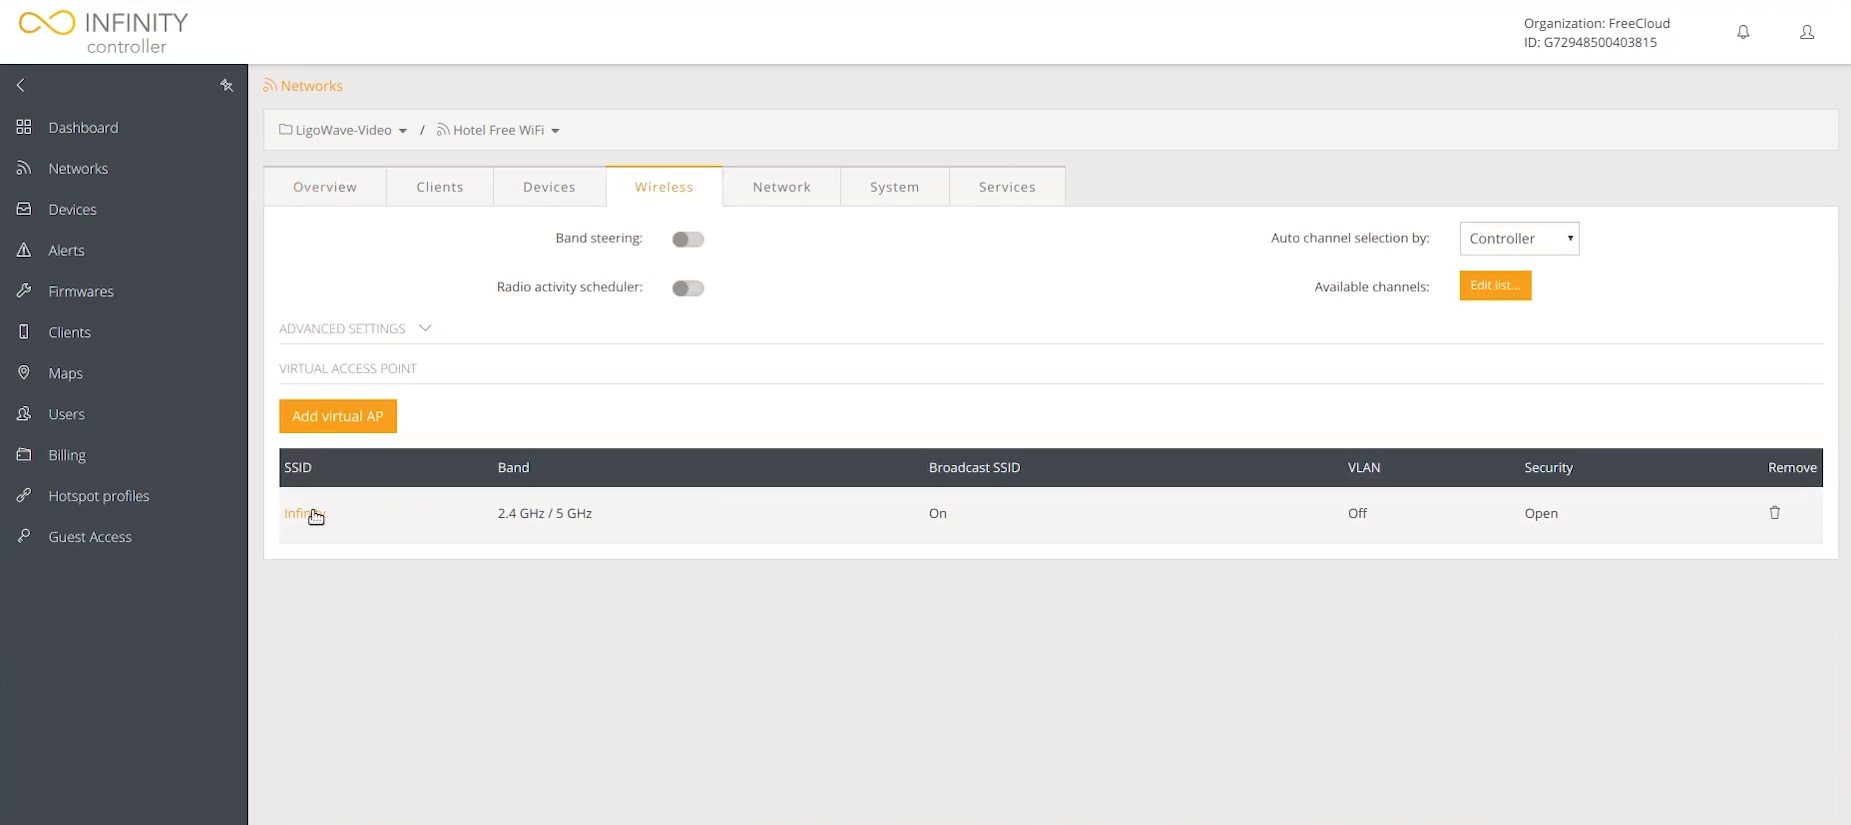
Step 21. To finish configuring Guest Access, navigate to Networks in the side dashboard and press on your created network.

Step 22. Once in the Networks section, navigate to the Wireless tab and select the SSID for which you want to enable Guest Access.
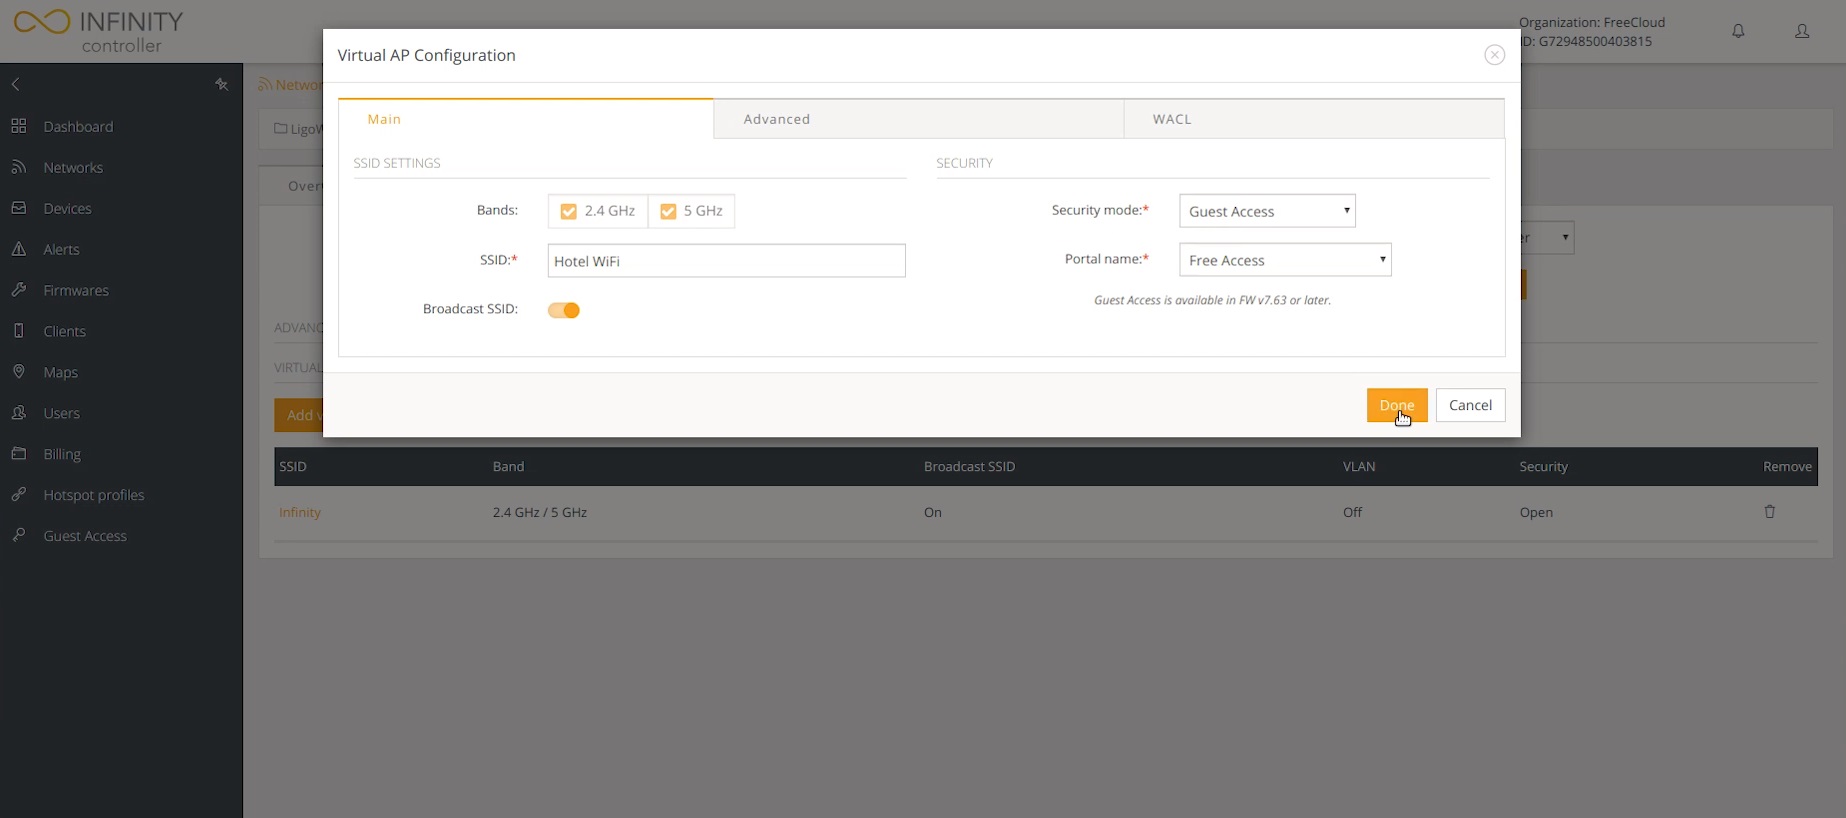
Step 23. When you are in the SSID configuration pop-up window, enter a user friendly SSID and select a security mode: Guest Access and one of the portals that you created before. Click Done.
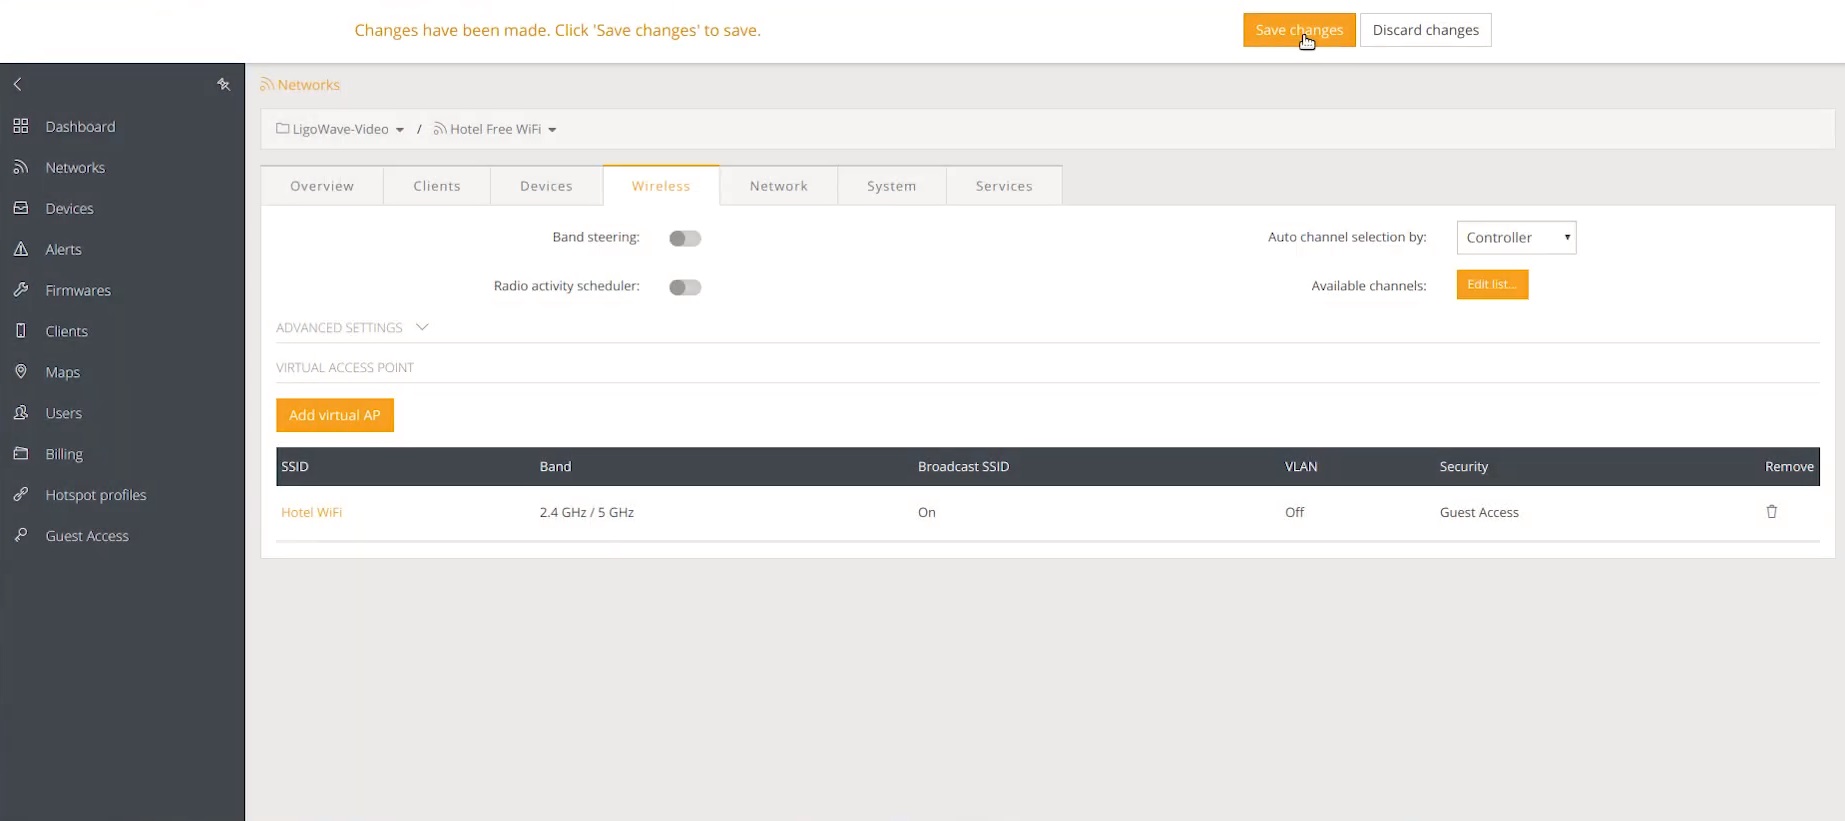
Step 24. Save changes.
Step 25. Testing Guest Access. Get a device that could connect to your newly-created SSID with guest access enabled.
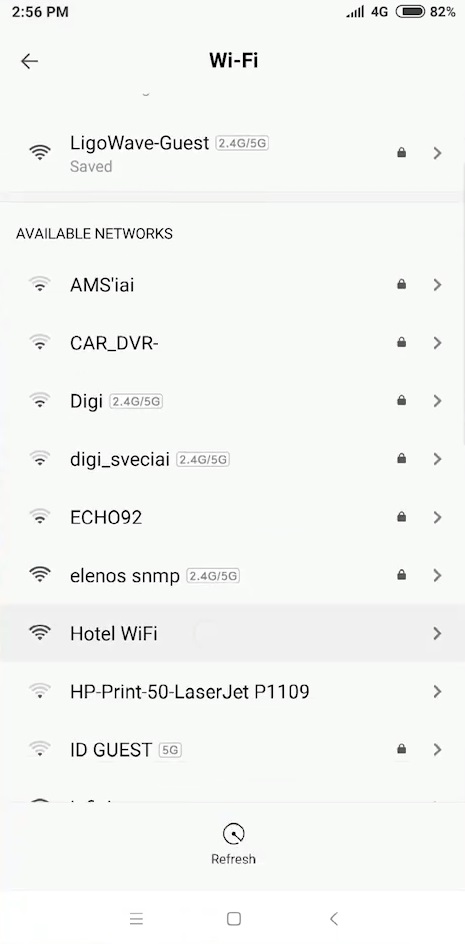
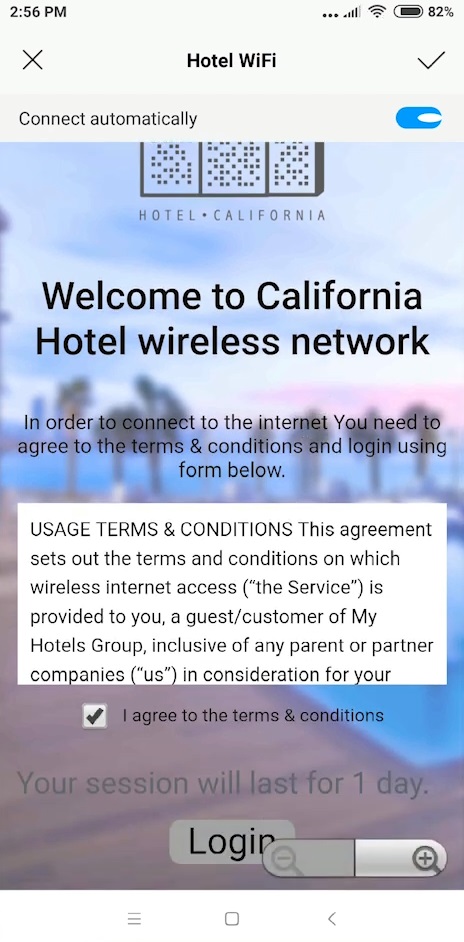
Step 26. Once you connect to the SSID, your created splash page should appear. Agree to terms & conditions and log in.
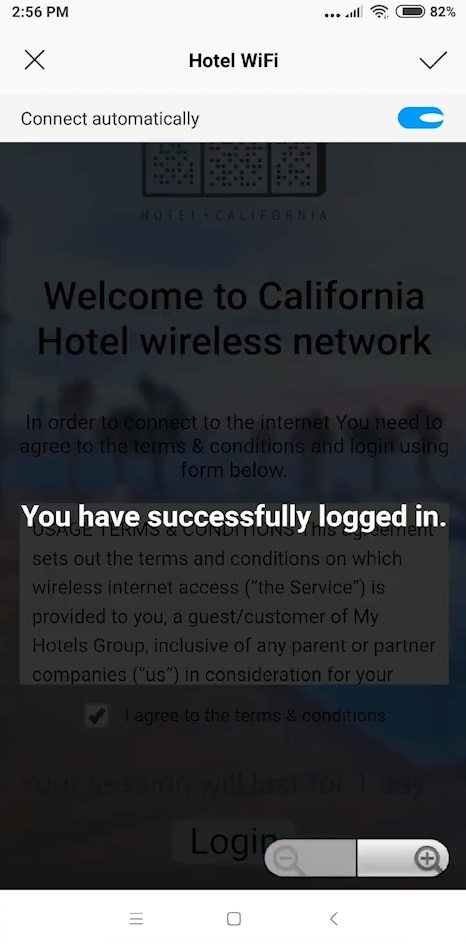
Step 27. A pop up message should appear that you have successfully logged in. After this, you can enjoy your Guest Access network.
The LigoWave Controller is a software platform for configuring and managing Wi-Fi networks based on LigoWave devices. A LigoWave Cloud Controller trial account is free and supports up to 10 LigoPTP RapidFire devices.
You can sign up for a free cloud account here.
Follow the steps provided below to create an LigoWave Cloud Controller account and to add LigoPTP RapidFire devices to it.
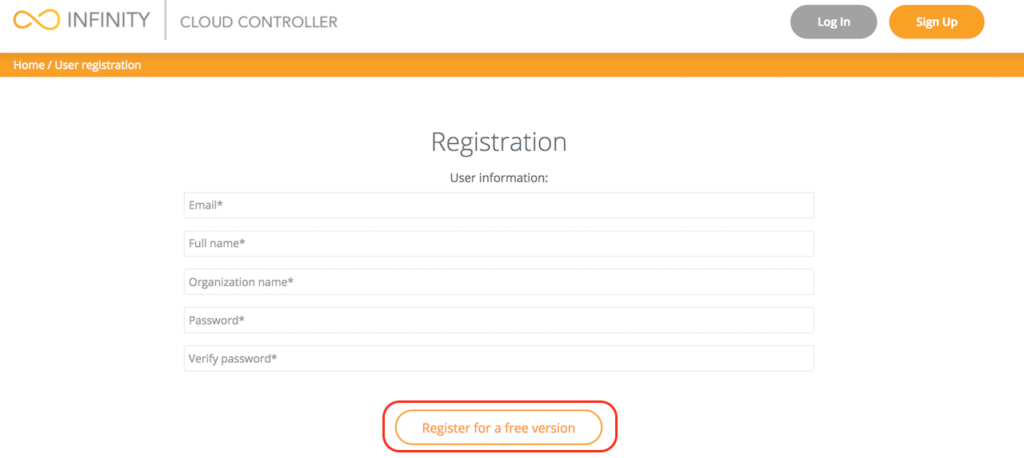
Step 1. Register a LigoWave Cloud Controller account here:
Step 2. Add user information and login credentials:
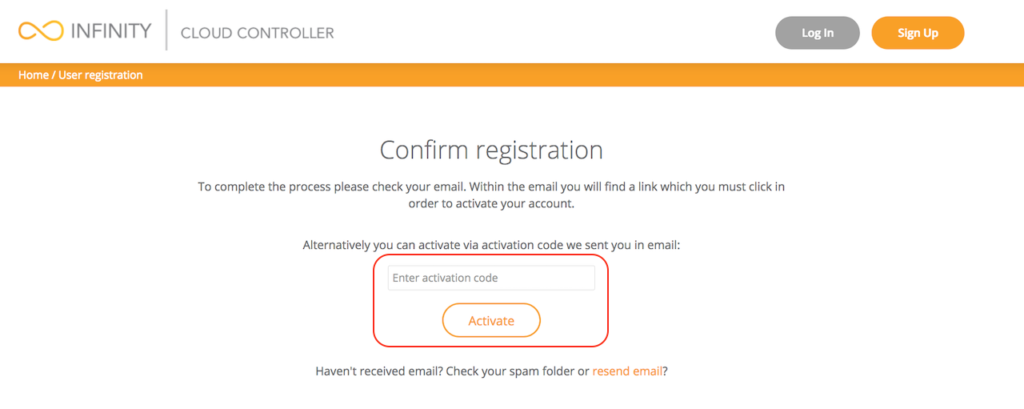
Step 3. Enter the activation code that is sent to your e-mail:
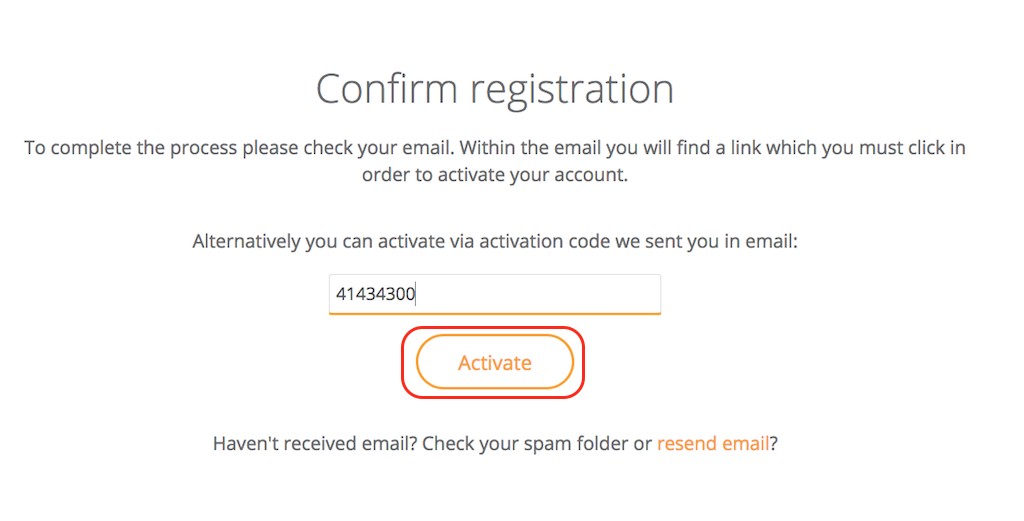
Step 4. Click to activate your account using the code:
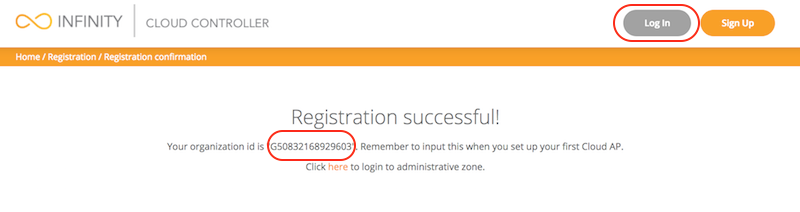
Step 5. When the registration process is complete, you will receive your unique organization ID:
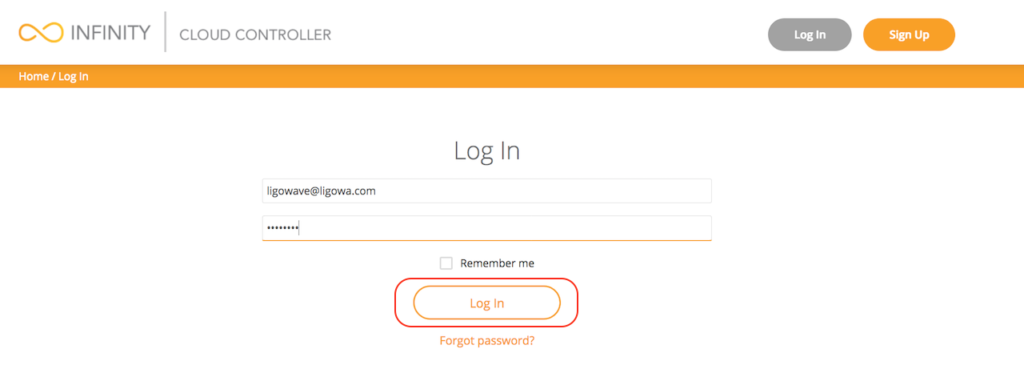
Step 6. Enter your credentials and click Log In to enter the LigoWave Cloud Controller:
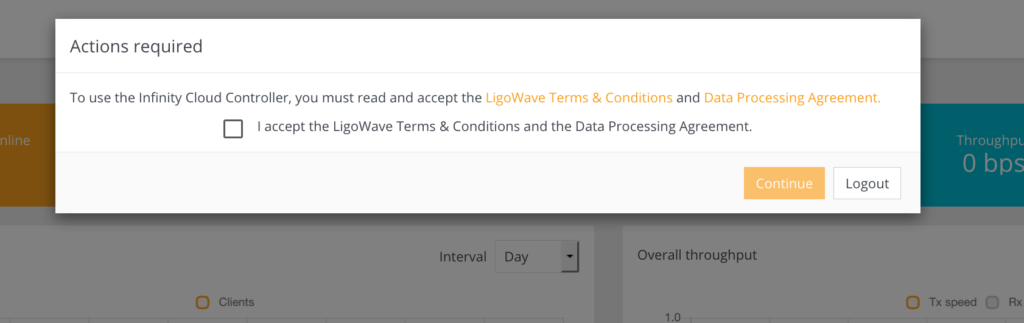
Step 7. Accept the LigoWave Terms & Conditions and Data Processing Agreement:
Step 8. The LigoWave Controller’s management interface:

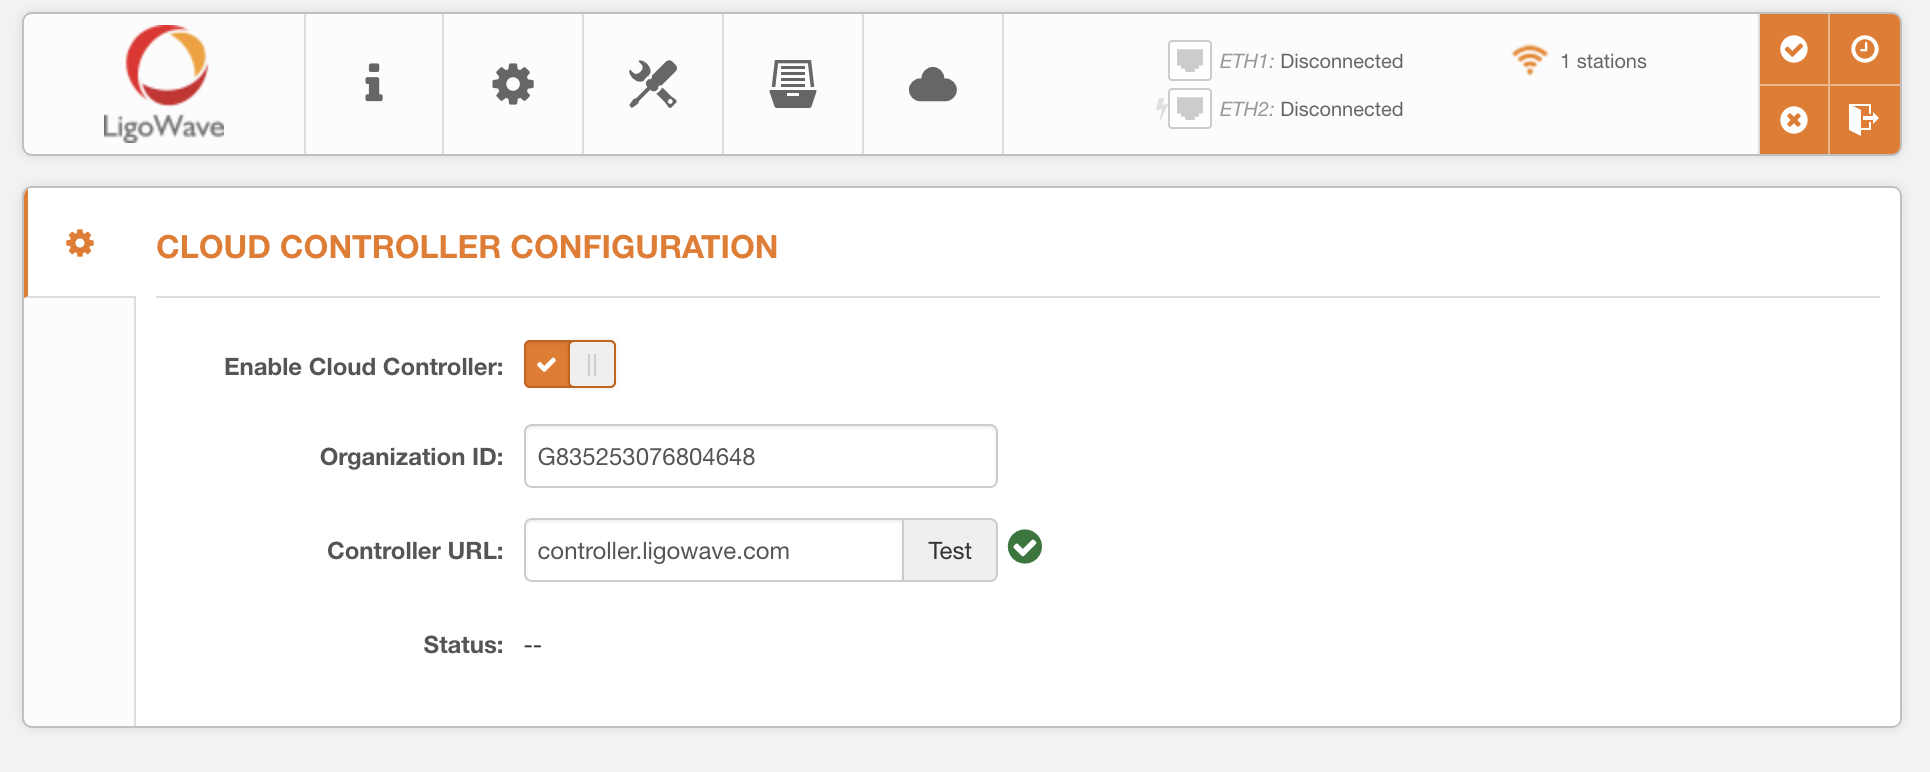
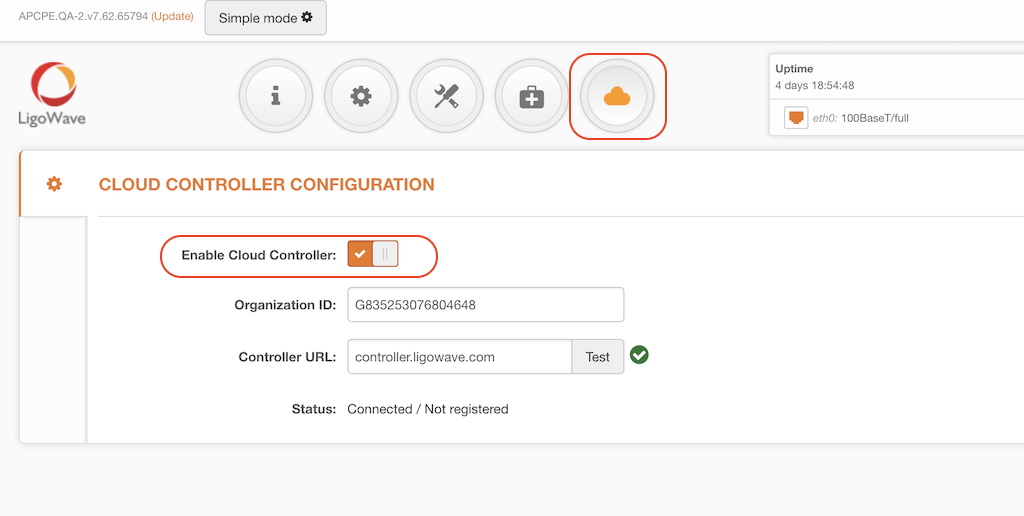
Step 9. Log on to the Master device and select Cloud Controller Configuration menu and assign the Organization ID and the Controller URL (controller.ligowave.com) of the particular LigoWave Controller:
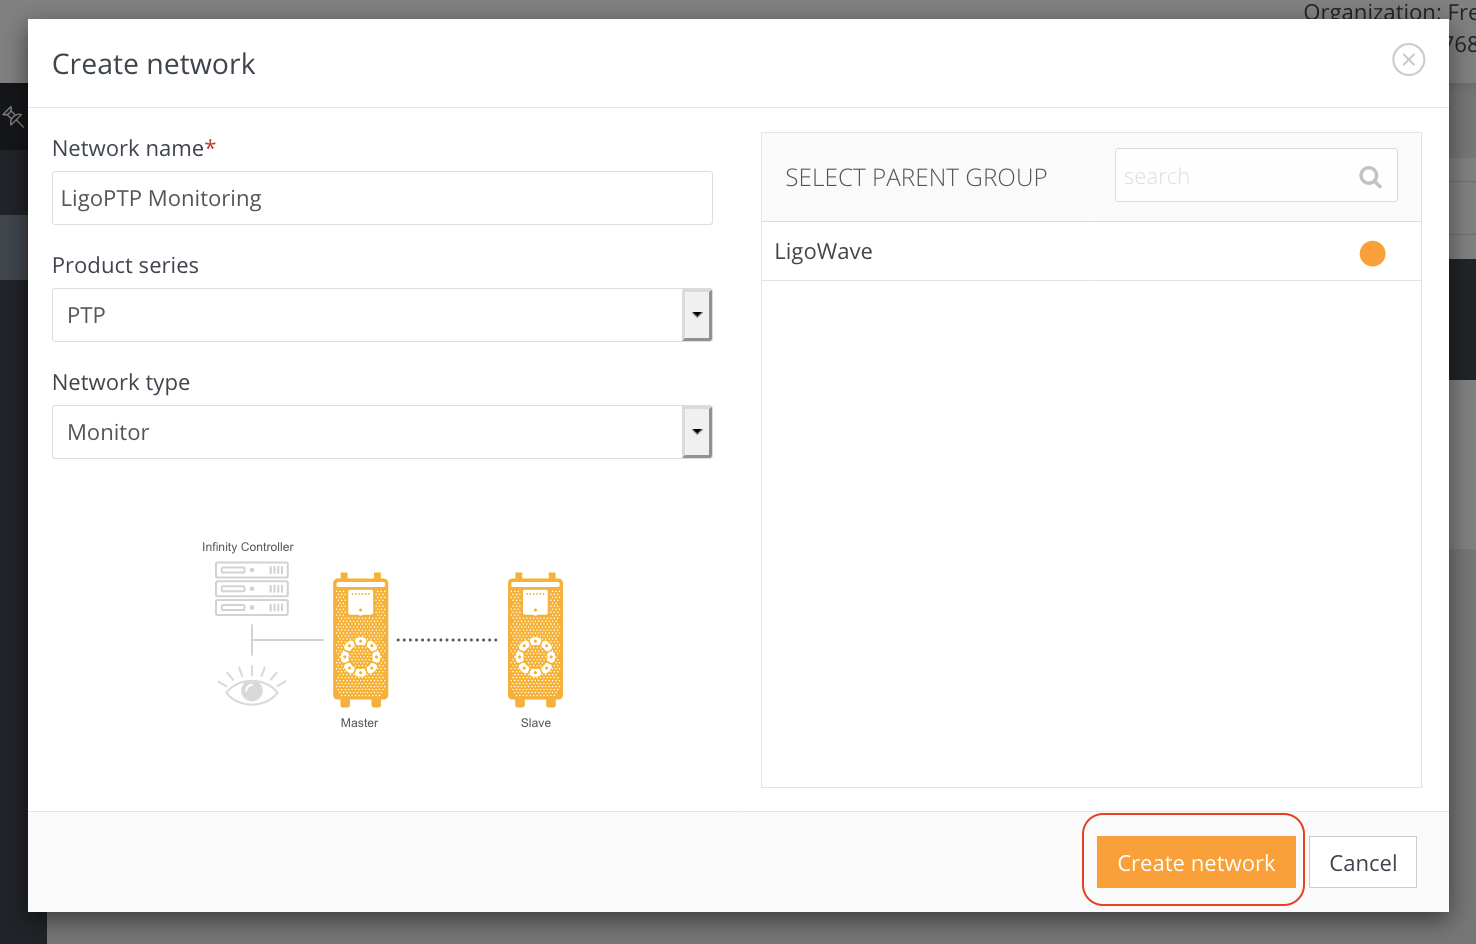
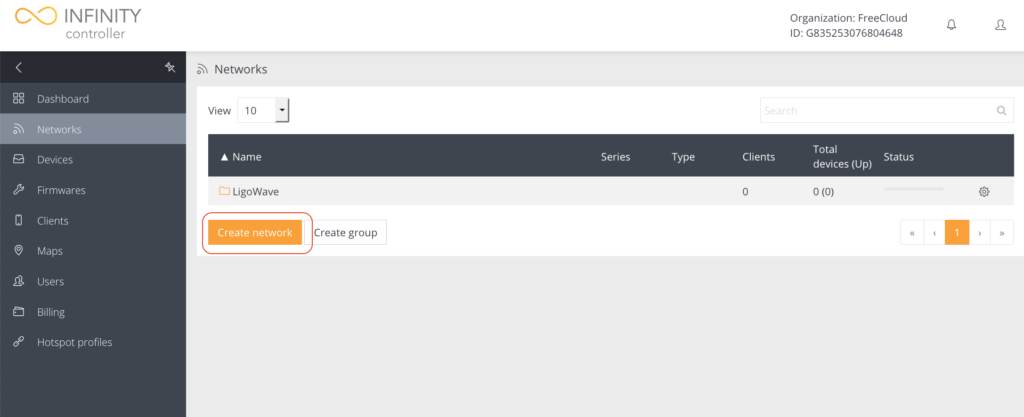
Step 10. On the Cloud Controller click Create network to add a new network to the parent group:

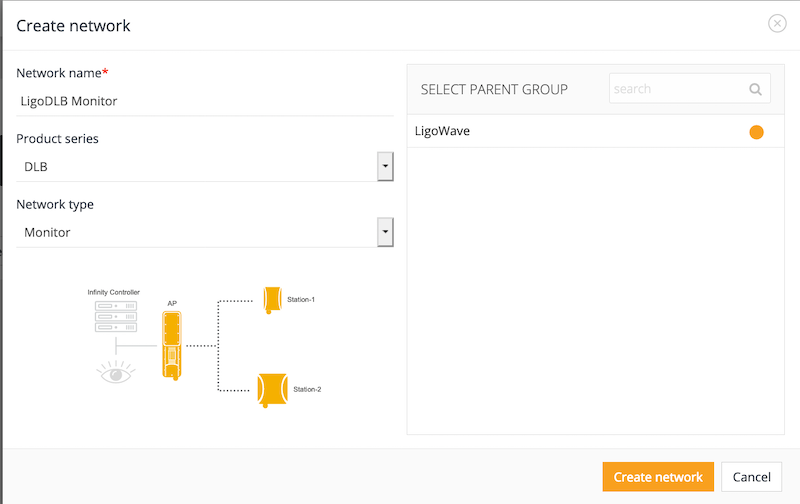
Step 11. Add a network name and select the LigoPTP product series. Select the Monitored network type. Monitor mode allows device monitoring only.
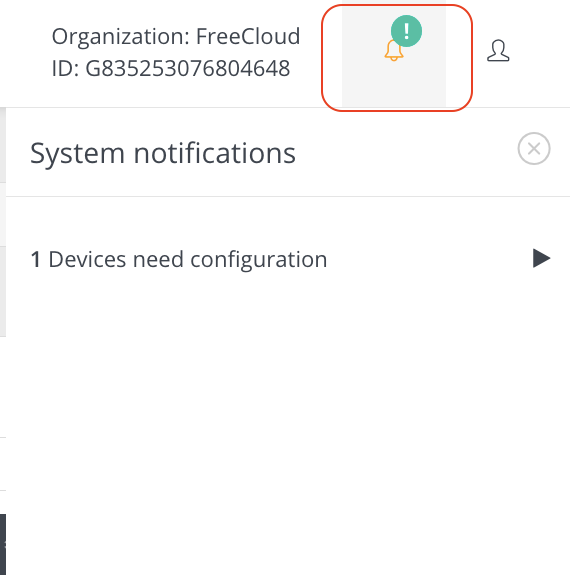
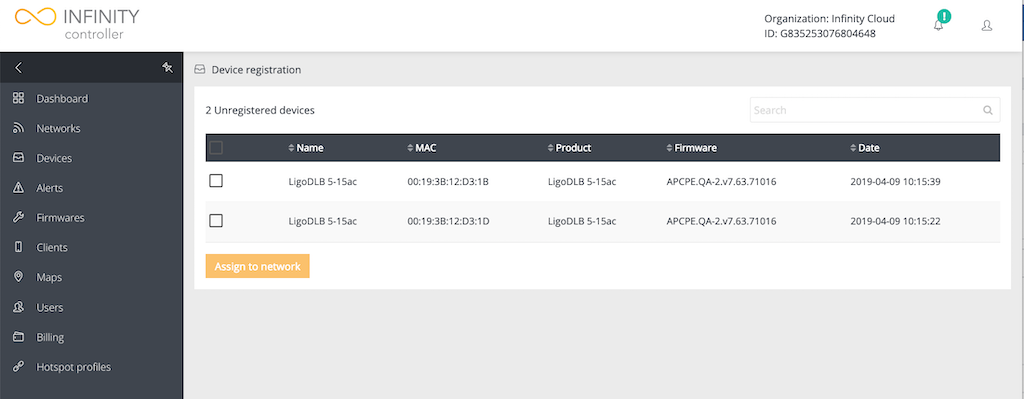
Step 12. Click on the exclamation icon. The notification indicating the count of the unregistered devices will appear on Controller top right menu:
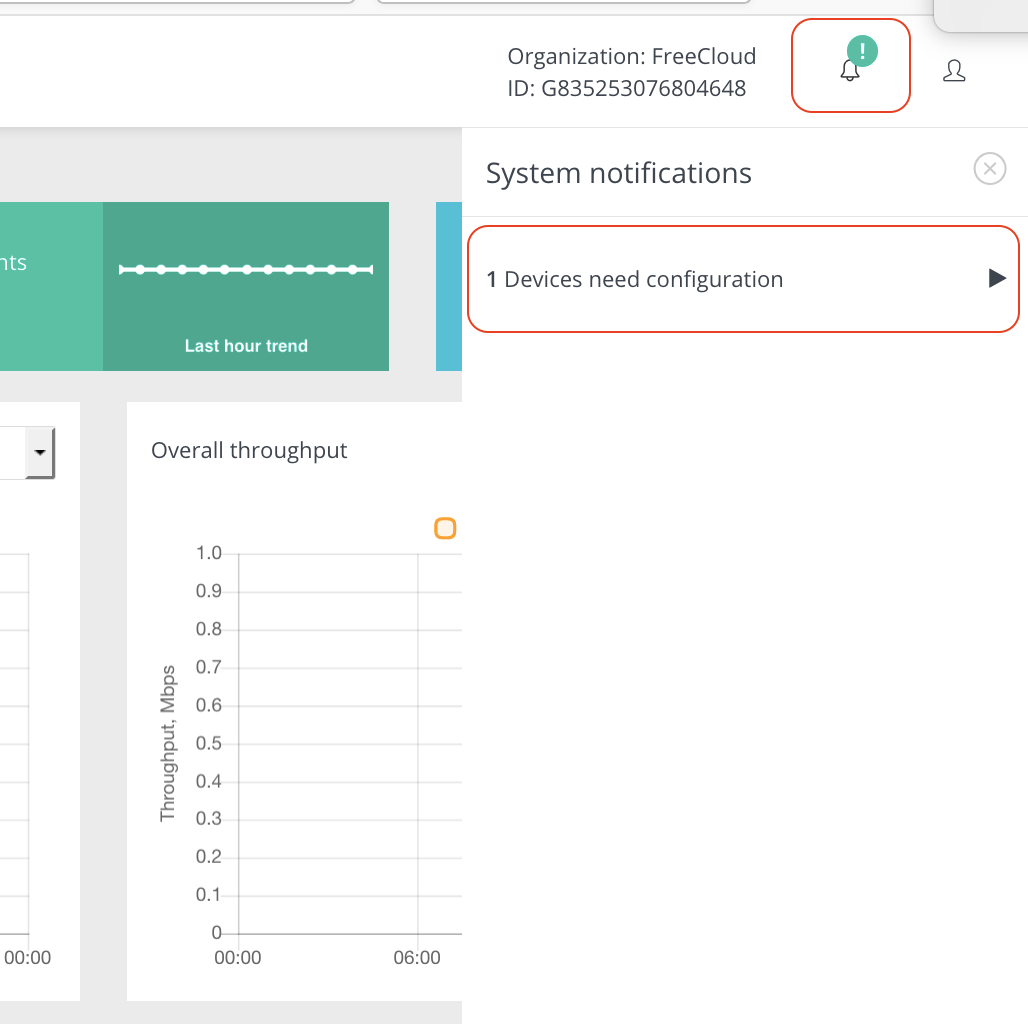
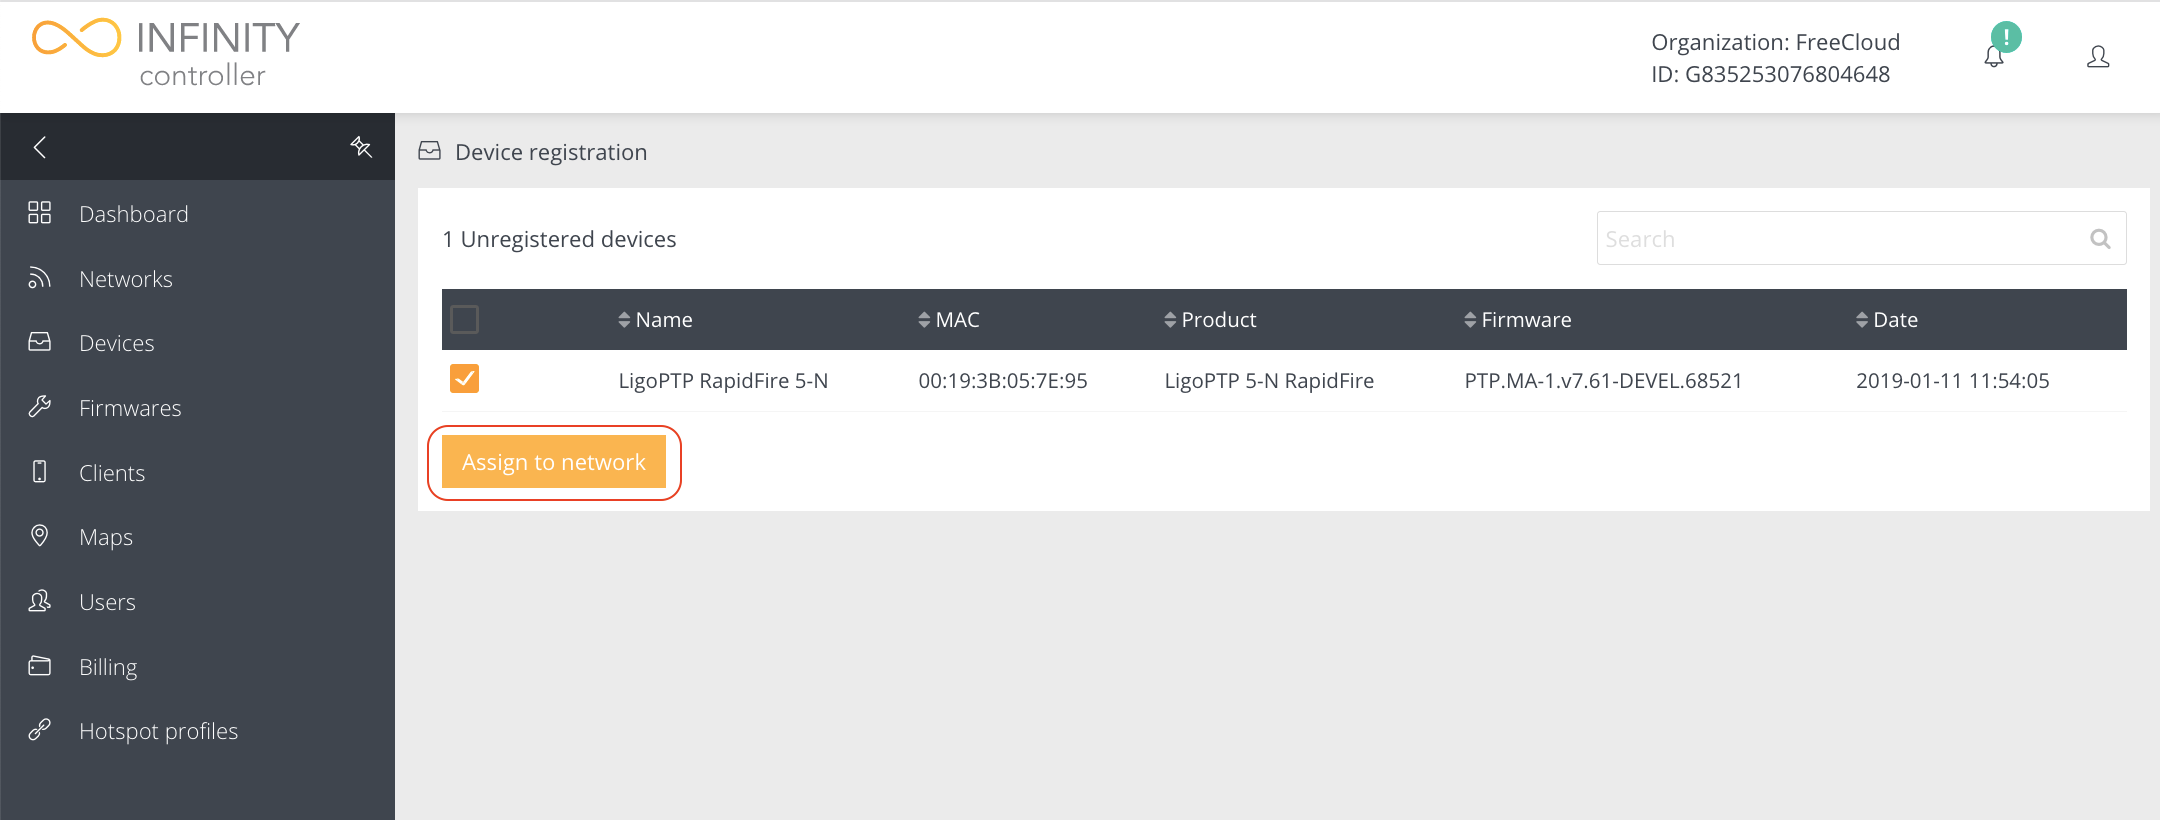
Step 13. Click on the notification and select the devices for registration:
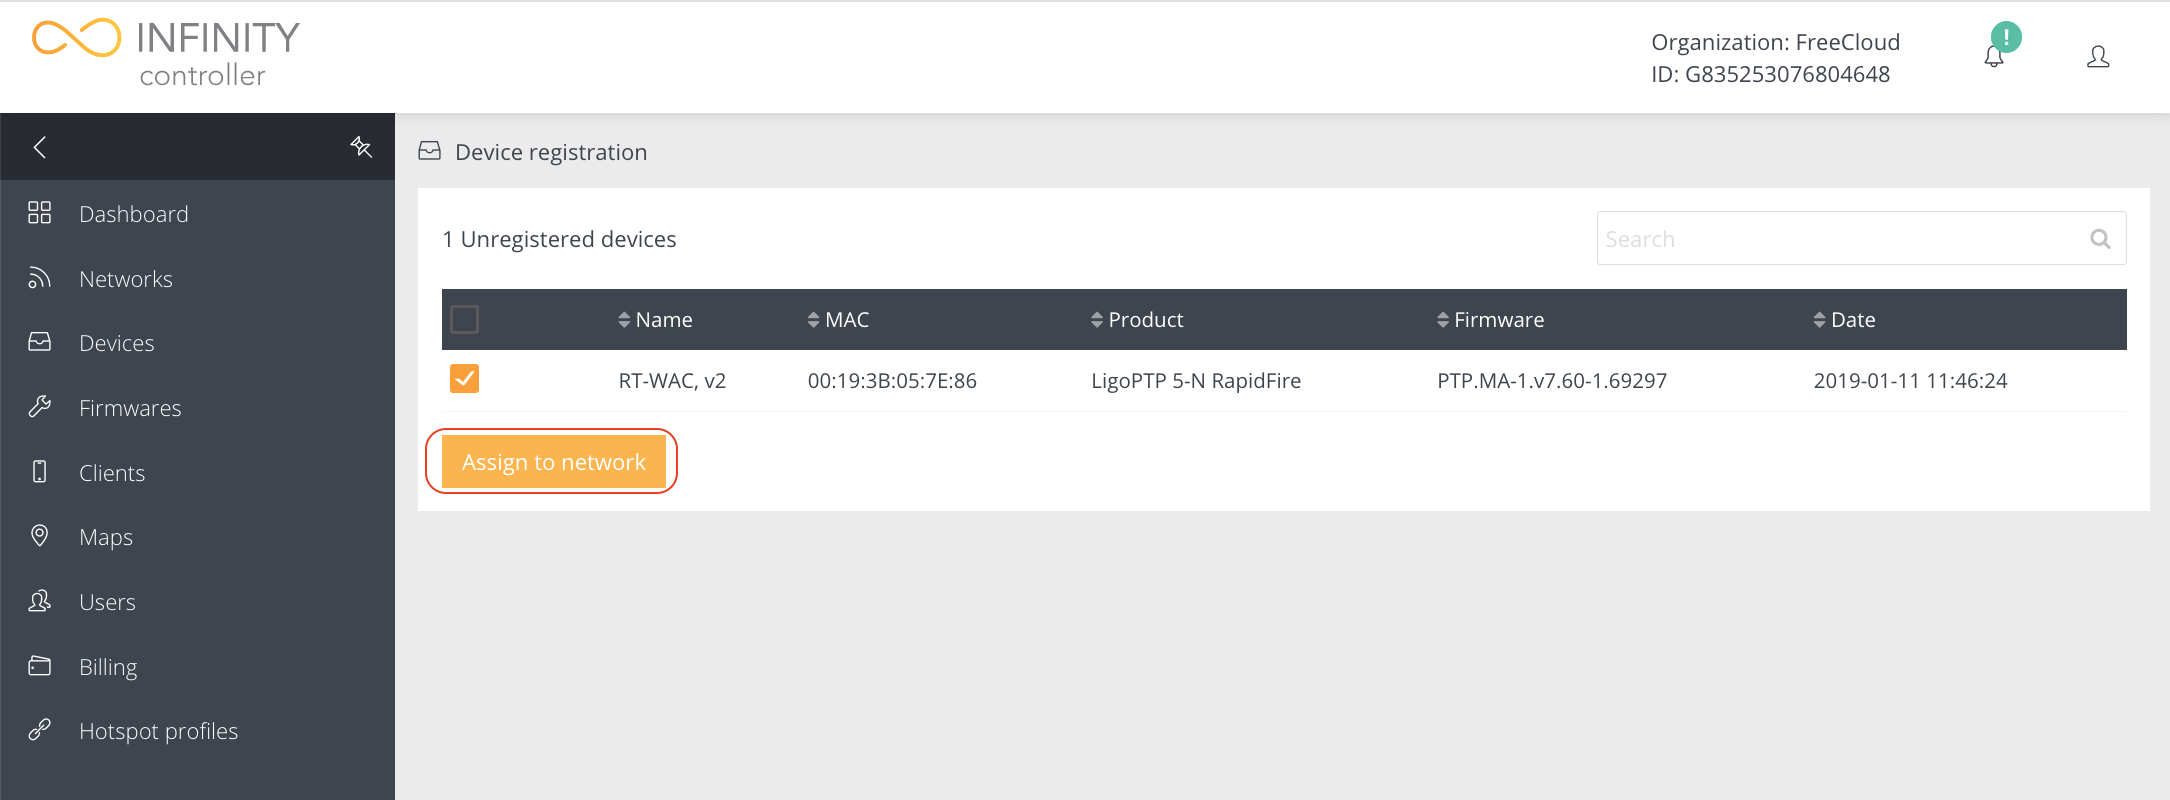
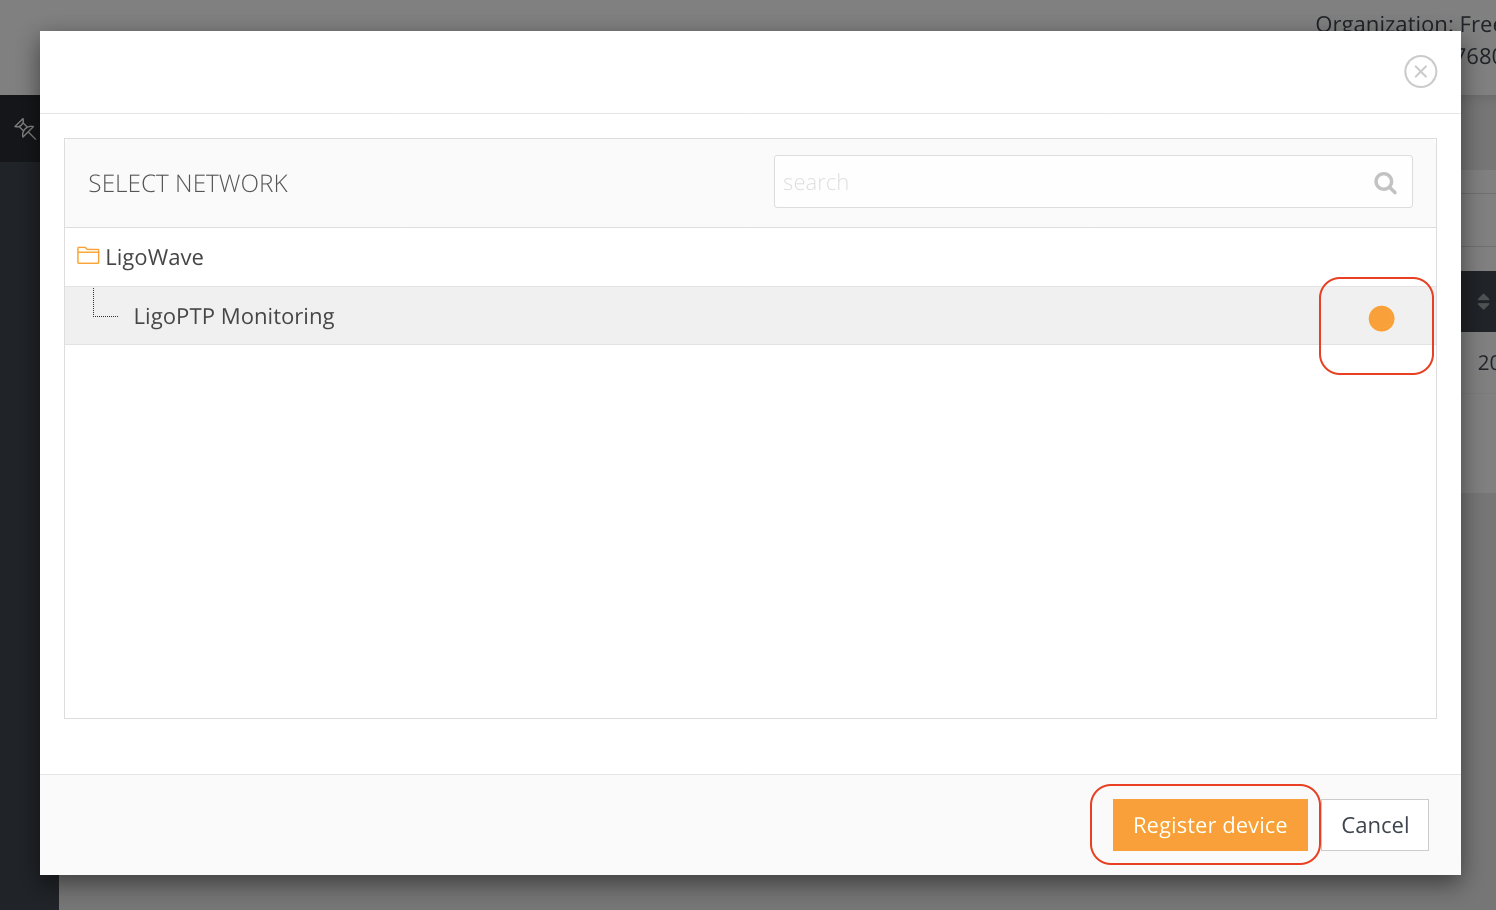
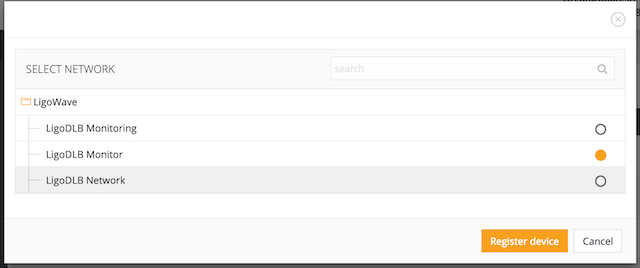
Step 14. Select the network to which the selected devices will be assigned:
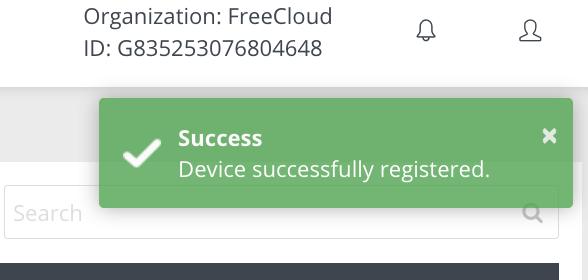
Step 15. A success message will appear after a successful device registration:
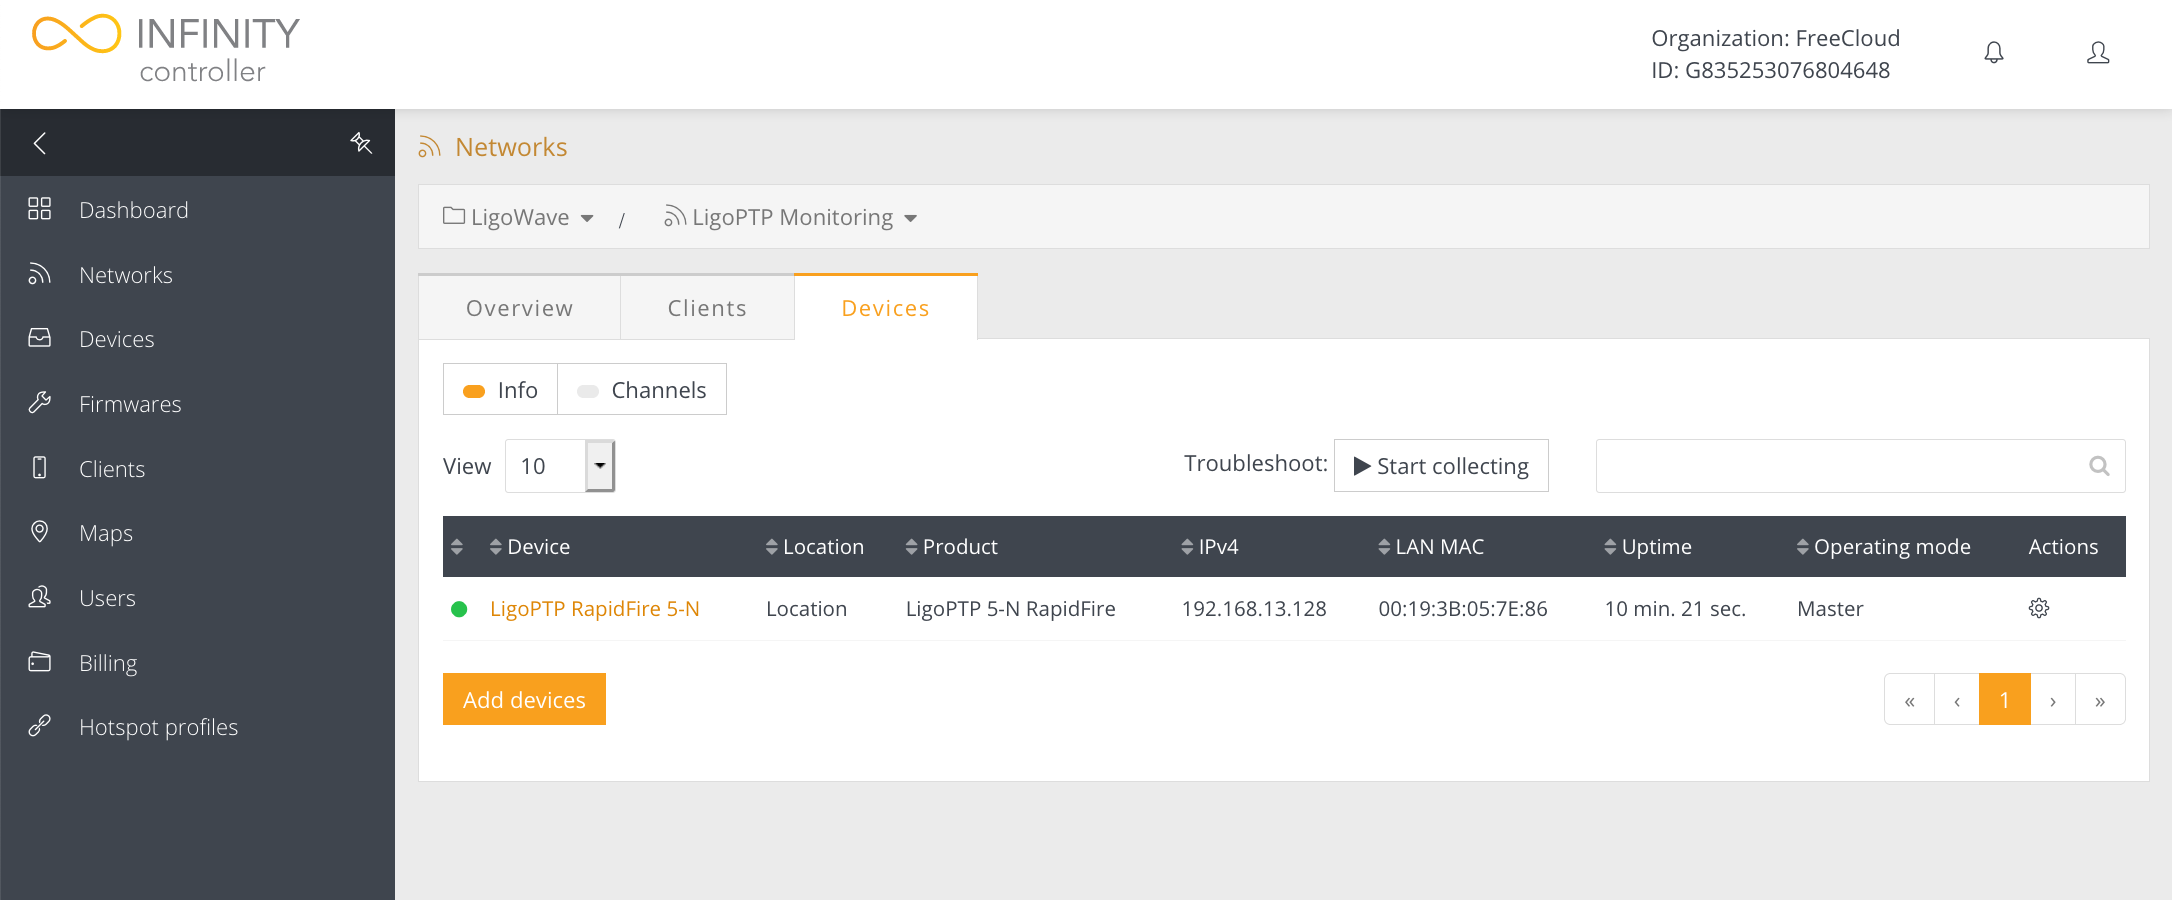
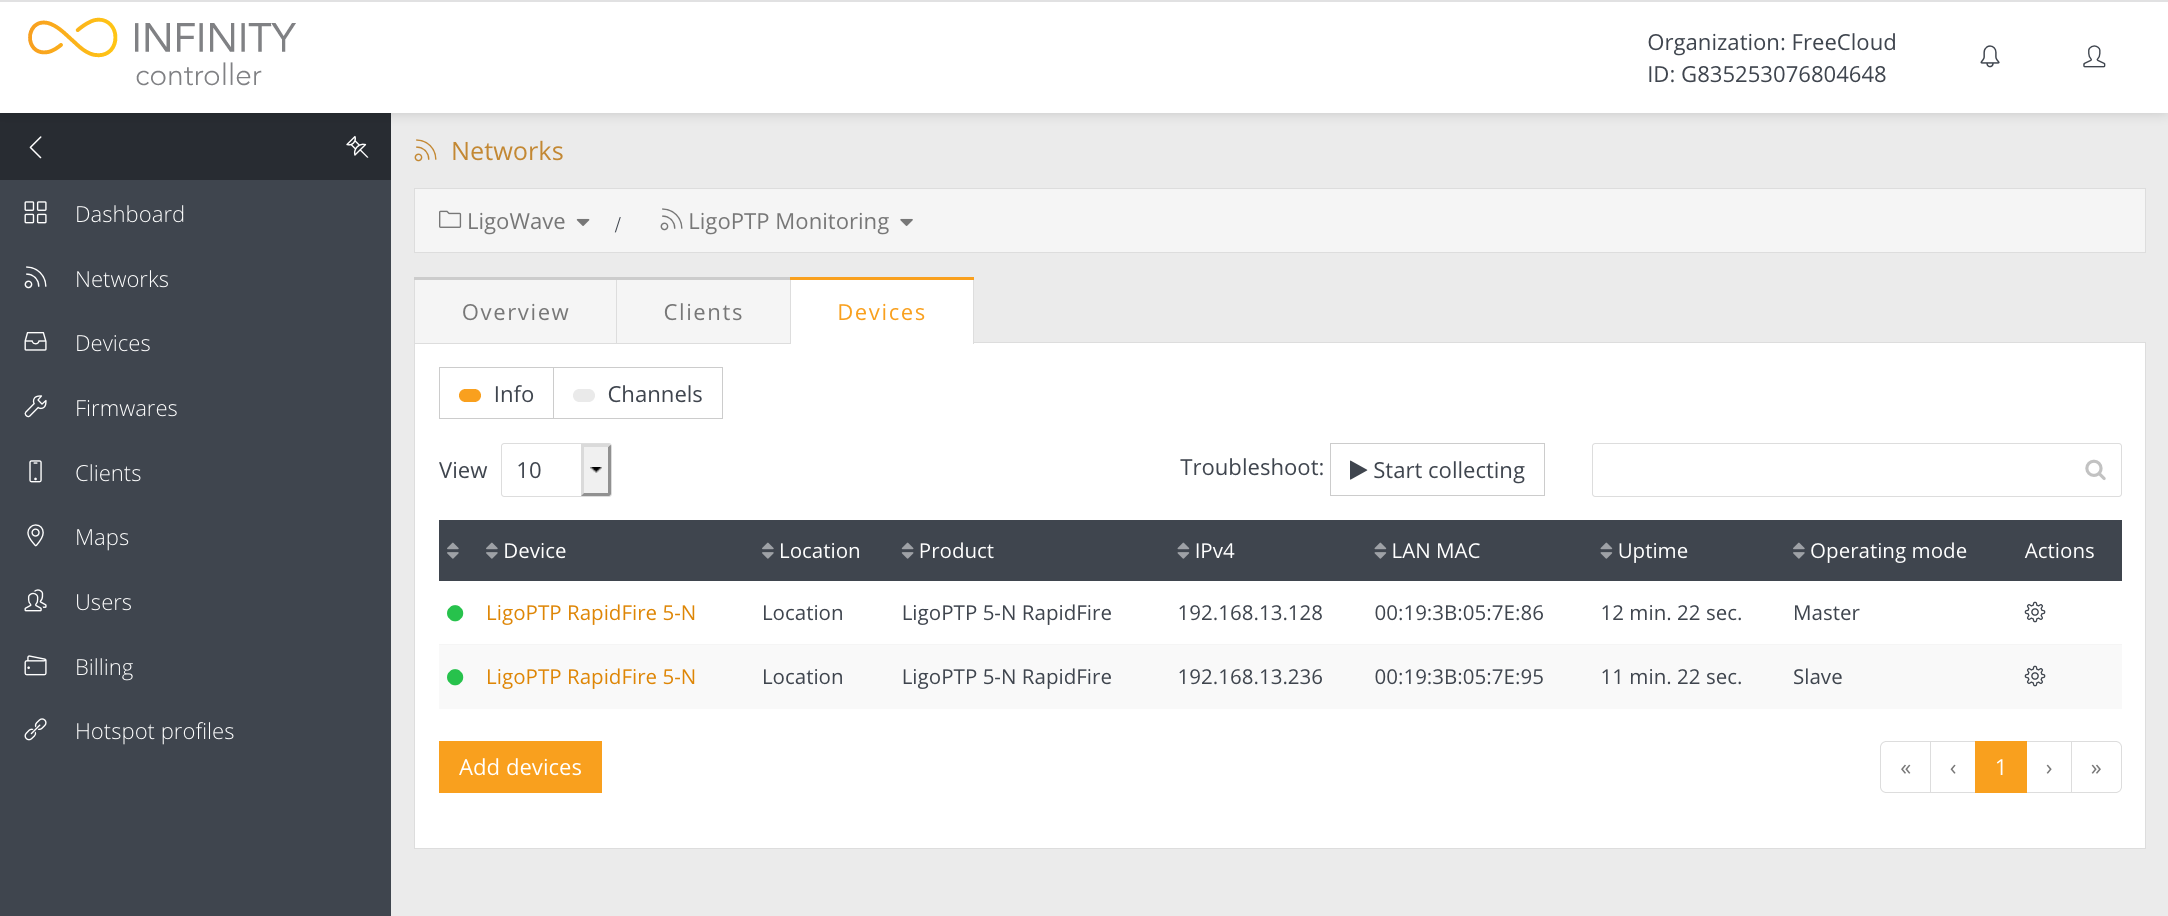
Step 16. Once the Master device registration process is complete, the device should be listed under the selected network Devices section as an Master:
Step 17. Log on to the Slave device and select Cloud Controller Configuration menu and assign the Organization ID and the Controller URL (controller.ligowave.com) of the particular LigoWave Controller:
Step 18. Click on the exclamation icon. The notification indicating the count of the unregistered devices will appear on Controller top right menu:
Step 19. Click on the notification and select the devices for registration:
Step 20. Select the same network as Master device to which the selected devices will be assigned:
Step 21. A success message will appear after a successful device registration:
Step 22. Once the Slave device registration process is complete, the device should be listed under the selected network Devices section as an Slave:
The LigoWave Controller is a software platform for configuring and managing Wi-Fi networks based on LigoWave devices. A LigoWave Cloud Controller trial account is free and supports up to 10 LigoDLB wireless access points.
You can sign up for a free cloud account here.
Follow the steps provided below to create an Infinity Cloud Controller account and to add Infinity devices to it.
Step 1. Register a LigoWave Cloud Controller account here:
Step 2. Add user information and login credentials:
Step 3. Enter the activation code that is sent to your e-mail:
Step 4. Click to activate your account using the code:
Step 5. When the registration process is complete, you will receive your unique organization ID:
Step 6. Enter your credentials and click Log In to enter the LigoWave Cloud Controller:
Step 7. Accept the LigoWave Terms & Conditions and Data Processing Agreement:
Step 8. The LigoWave Controller’s management interface:
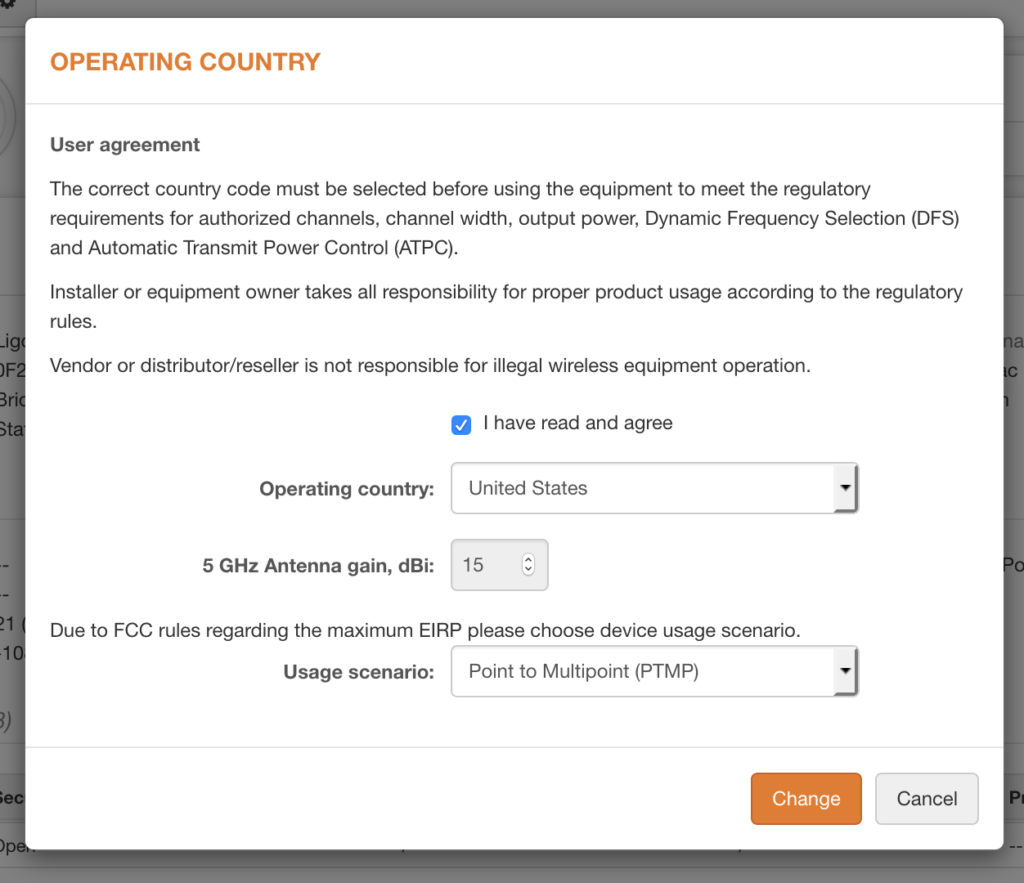
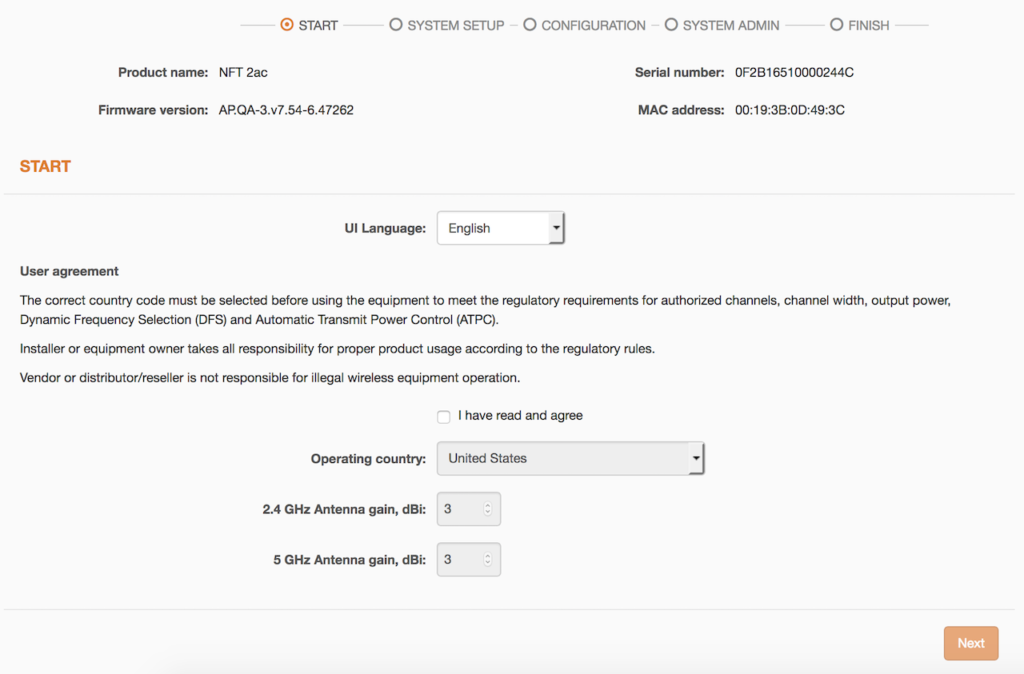
Step 9. Log on to the device (instructions on how to log in for the first time can be found in the FAQ), read the User Agreement, and select your operating country code:
Step 10. Select Cloud Controller Configuration menu and assign the Organization ID and the Controller URL (controller.ligowave.com) of the particular LigoWave Controller:
Step 11. On the Cloud Controller click Create network to add a new network to the parent group:
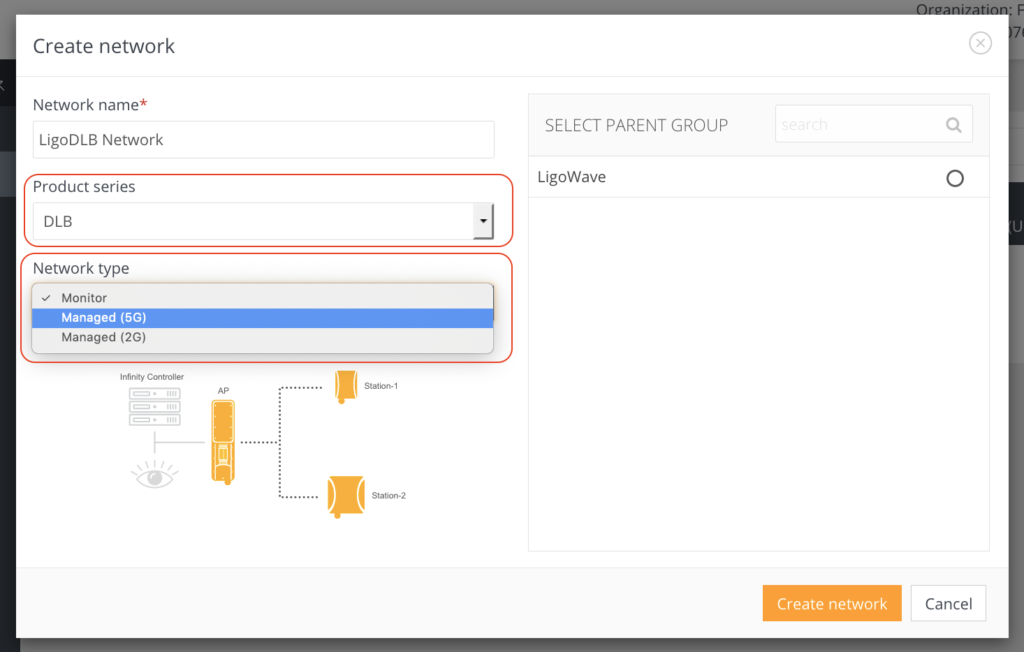
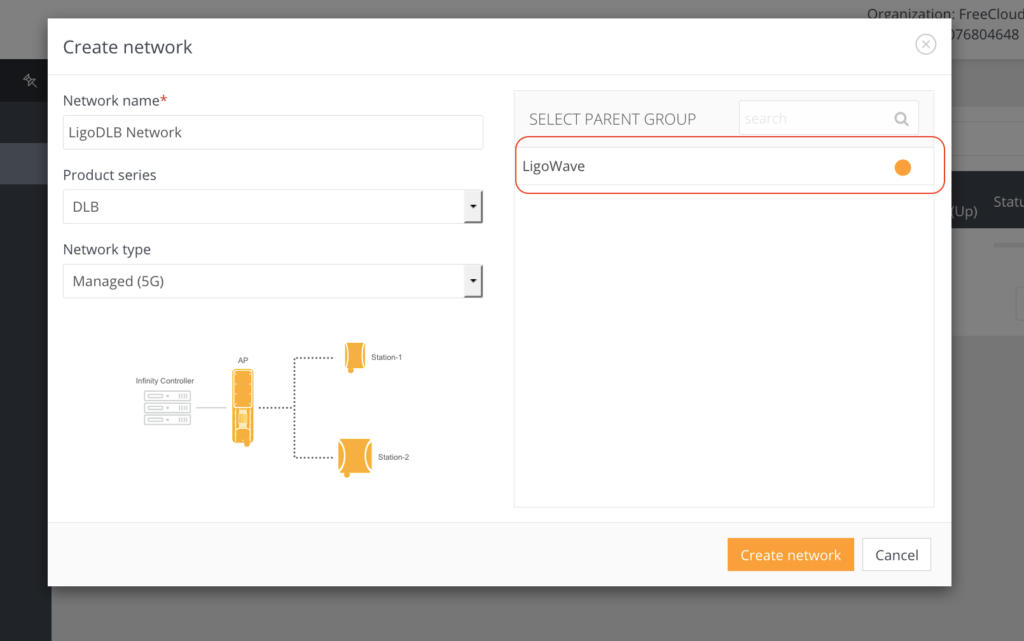
Step 12. Add a network name and select the DLB product series. Select the Monitored or Managed network type. Monitor mode allows device monitoring only and Managed mode adds configuration options. Managed mode has to be selected depending on the devices frequency:
Step 13. Once the network type is configured, select the Parent Group to which this network will be added:
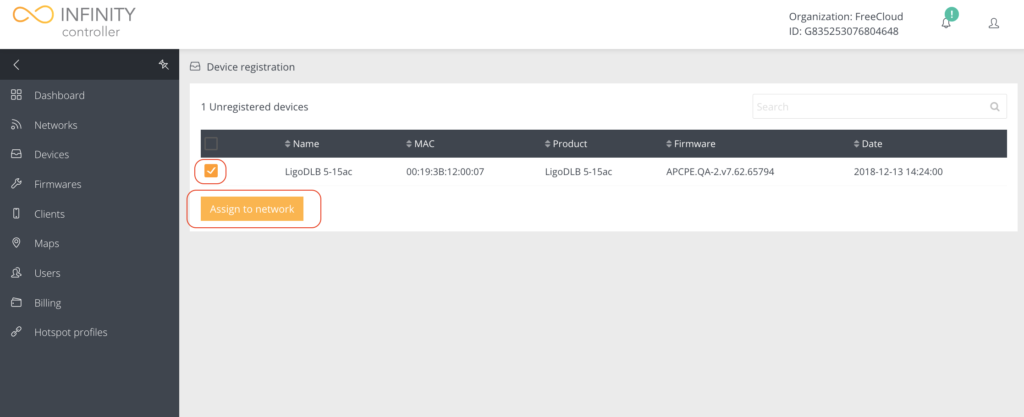
Step 14. Click on the exclamation icon. The notification indicating the count of the unregistered devices will appear:

Step 15. Click on the notification and select the devices for registration:
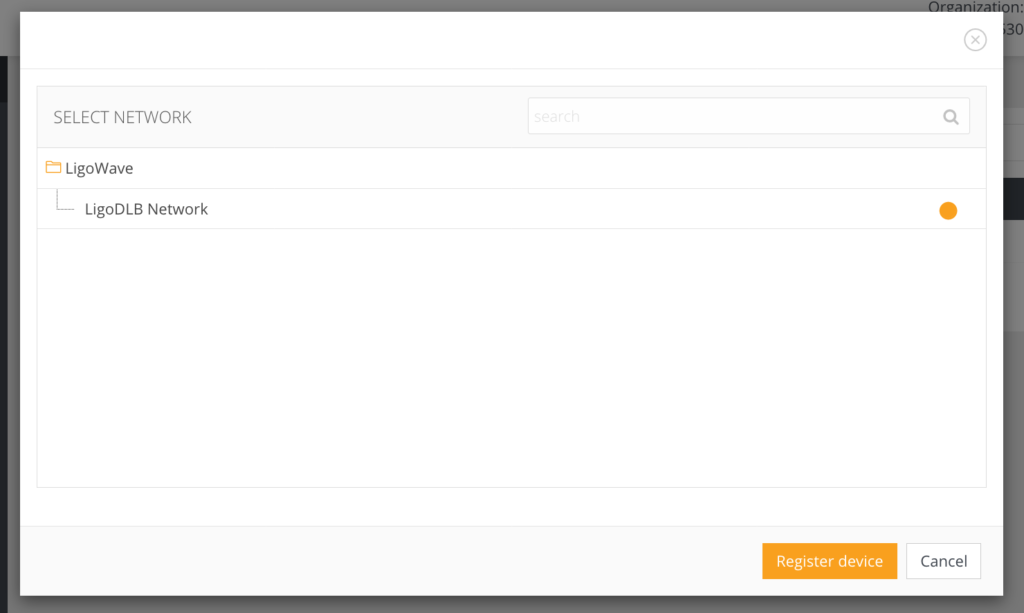
Step 16. Select the network to which the selected devices will be assigned:
Step 17. A success message will appear after a successful device registration:
Step 18.
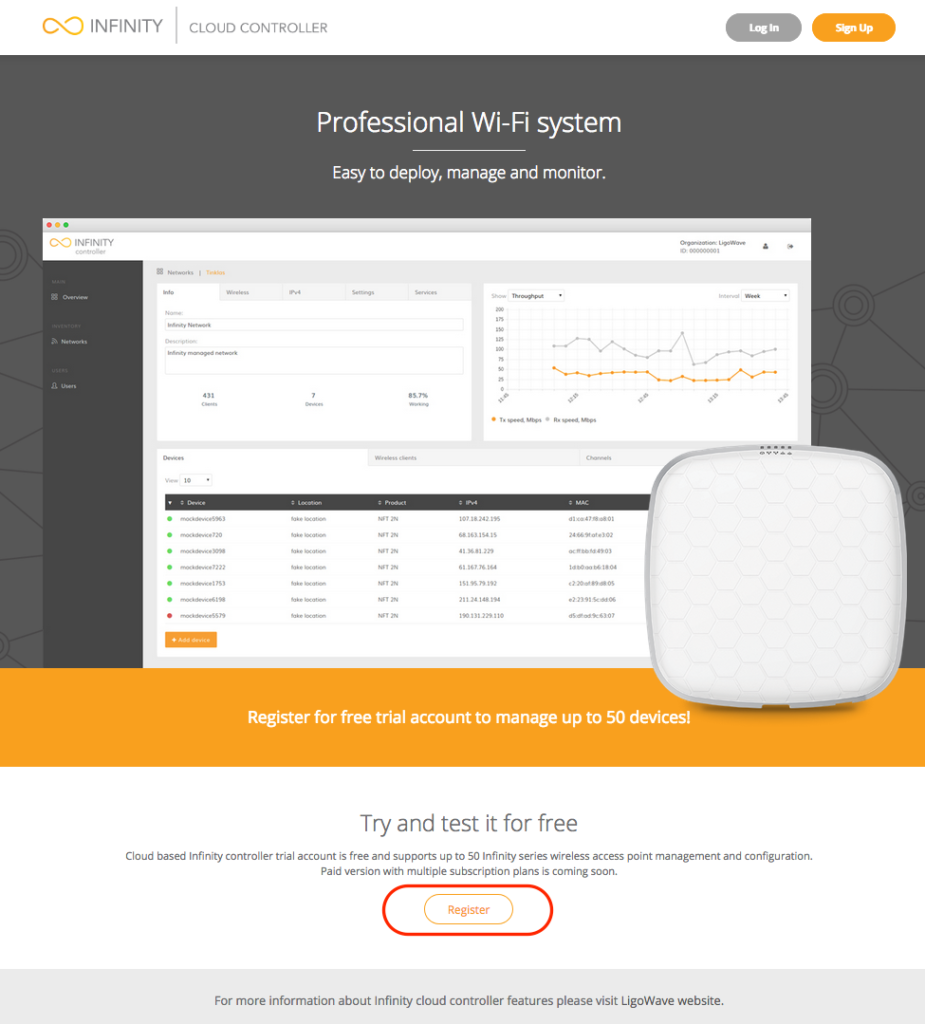
The Infinity Controller is a software platform for configuring and managing Wi-Fi networks based on LigoWave devices. An Infinity Cloud Controller trial account is free and supports up to 50 Infinity wireless access points.
You can sign up for a free cloud account here.
Follow the steps provided below to create an Infinity Cloud Controller account and to add Infinity devices to it.
Step 1. Register an Infinity Cloud Controller account here:
Step 2. Add user information and login credentials:
Step 3. Enter the activation code that is sent to your e-mail:
Step 4. Click to activate your account using the code:
Step 5. When the registration process is complete, you will receive your unique organization ID:
Step 6. Enter your credentials and click Log In to enter the Infinity Cloud Controller:
Step 7. The Infinity Controller’s management interface:
Step 8. Log on to the device (instructions on how to log in for the first time can be found in the FAQ), read the User Agreement, and select your operating country code:
Step 9. Choose the Cloud AP to change the LigoNFT’s operating mode. Once this Cloud AP device is connected to the network, it will download the network-specific configuration from the External Infinity Controller:
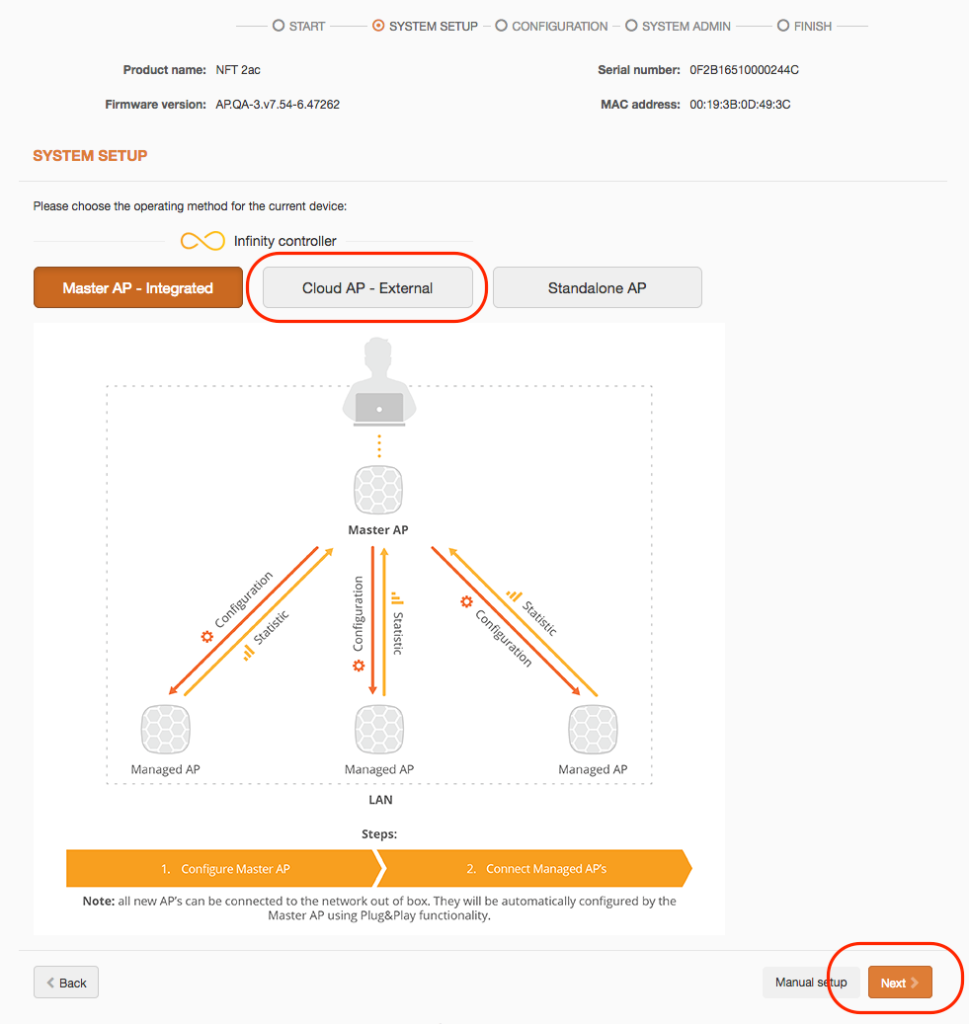
Step 10. Assign the Organization ID and the Controller URL (controller.ligowave.com) of the particular Infinity Controller:

- Organization ID – enter the Organization ID provided by the External Infinity Controller.
- Controller URL – specify the correct External Infinity Controller’s URL where the Cloud AP will be registered and managed. Use Test to check the availability of the controller’s URL.
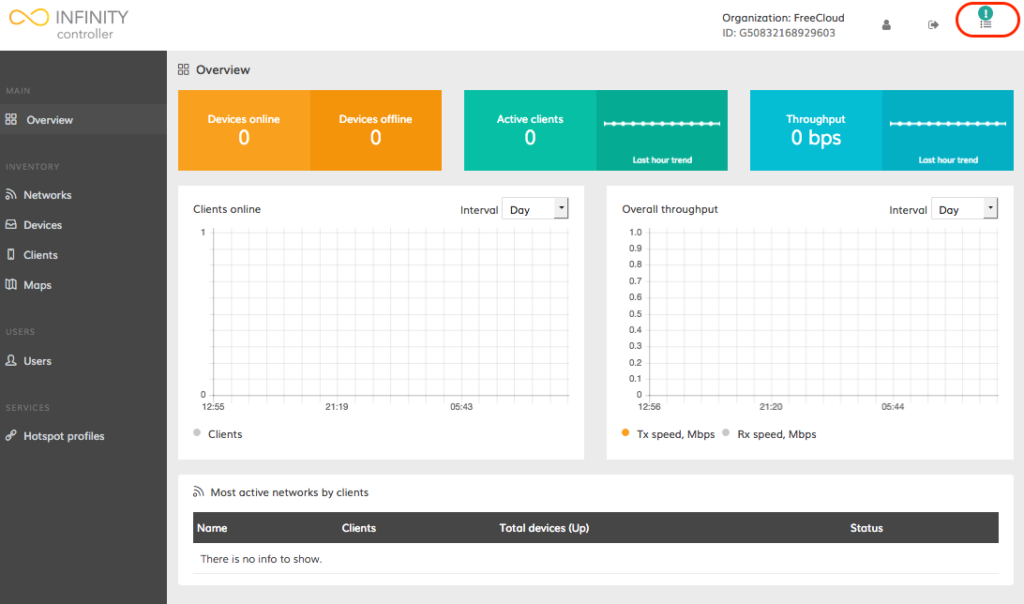
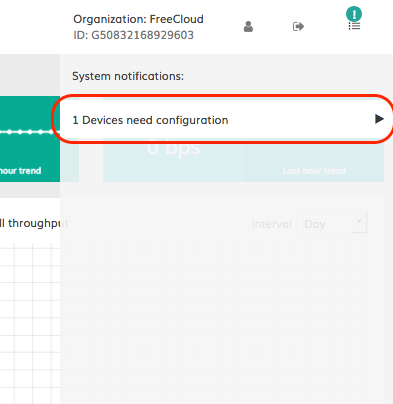
Step 11. Once the device is configured, load the Infinity Controller’s management interface and wait for the device to appear under the unregistered devices list. Wait until the green exclamation icon appears on the upper-right corner of the web management system and click it:
Step 12. Click on the exclamation icon. The notification indicating the count of the unregistered devices will appear:
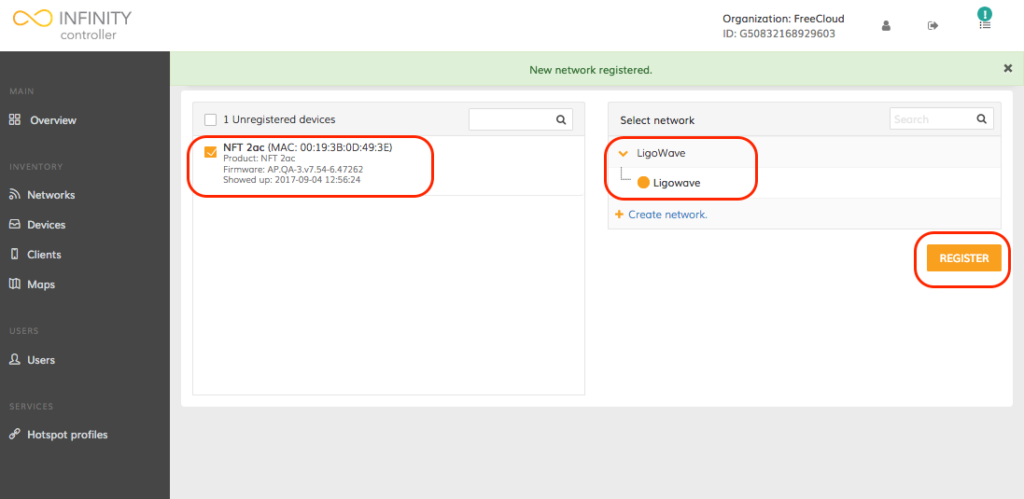
Step 13. Click on the notification and select the devices for registration to the selected network:
Detailed instructions on how to configure the Infinity Cloud Controller can be found here.
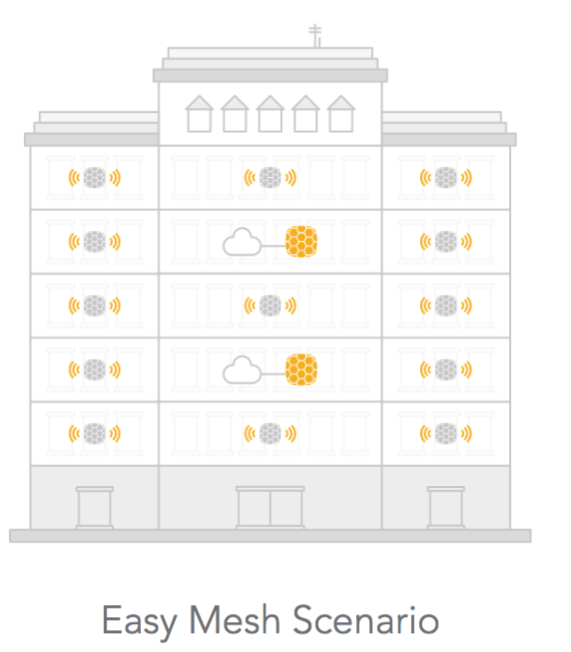
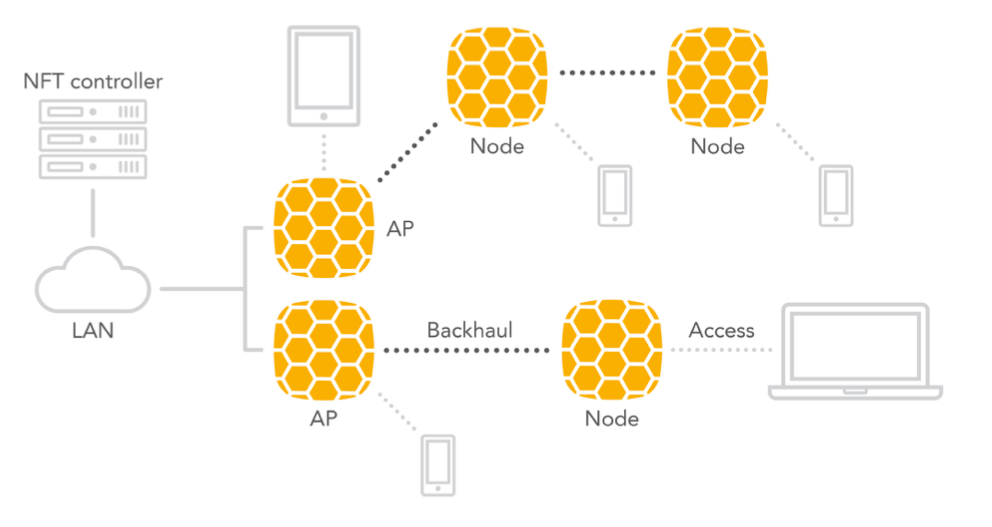
Easy Mesh Scenario Description
Terminology:
- Mesh AP – an AP that has a wired connection to the network and which provides wireless access to end users as well to Node APs.
- Node AP – an AP that is connected wirelessly to another node AP or to a Mesh AP and which provides wireless access to end users and can serve as a backhaul connection to other Node APs.
- Backhaul – a wireless connection between APs.
- Access – a wireless connection to end users.This feature is supported by the External NFT controller only. Any NFT AP (including LigoDLB with NFT firmware) can be used in this type of network. A single-radio AP creates a backhaul and an access at the same time. A dual-radio AP uses 5GHz for both backhaul and access, while a 2.4GHz radio is for access only.
The main idea is to extend Wi-Fi coverage without using wires and to do that in an automated way without manual configuration.
The network allows to have several mesh APs. It is recommended to connect no more than 3 mesh nodes into a single chain.
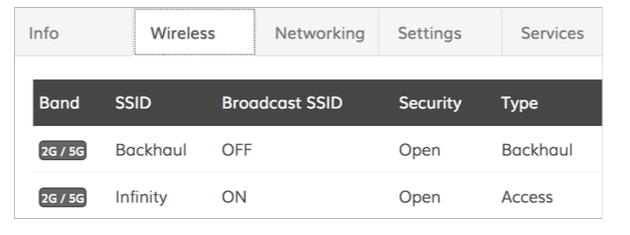
The NFT controller has a new network type called Easy Mesh. When the device is assigned to that network, it starts to act as an auto-repeater: if the AP has a wired connection, it will create two VAPs for access and backhaul; however, if the device has no wired connection, it will create an additional virtual station interface and will look for an access point with the “Backhaul” SSID. Every device should be activated this way from the controller to work under an Easy Mesh scenario. The NFT controller creates two open SSIDs by default, but the name and security settings can be changed.UAM is not allowed.
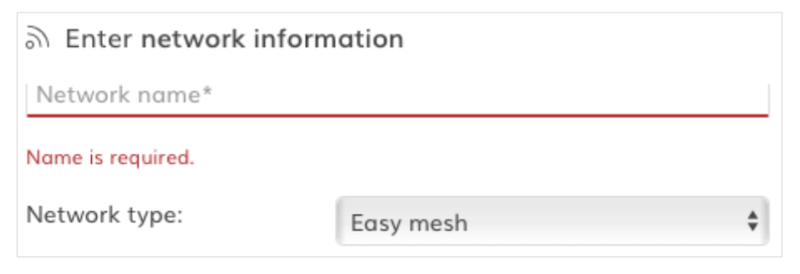
The main steps for creating an Easy Mesh network:
1. Create a new Easy Mesh network:
2. Change the SSID name (if necessary) and turn on encryption (highly recommend).
3. Register all devices onto the Easy Mesh network. Wait several minutes until all of the devices assume the AP type.
4. Leave at least one AP with a LAN connection. The rest of the APs can be placed in locations that will not have a LAN (Ethernet) connection. After several minutes, the APs without a LAN connection will become repeaters and will appear as Nodes in the controller.
5. The network should now be ready for use.
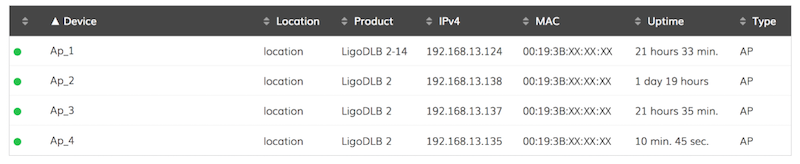
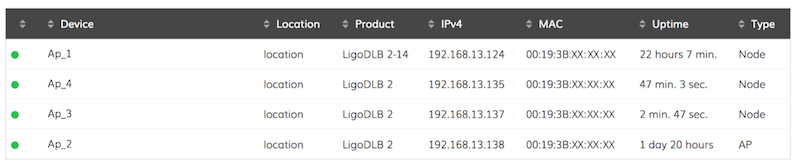
Moreover, users can see how Node APs are connected to the Mesh AP in the “Wireless clients” tab:

In the above example, two Node APs are connected on AP_2, while one Node AP is connected on AP_4.
Step 1. Select the LigoDLB managed network to which the devices will be added. Create the first network and assign devices are here: URL
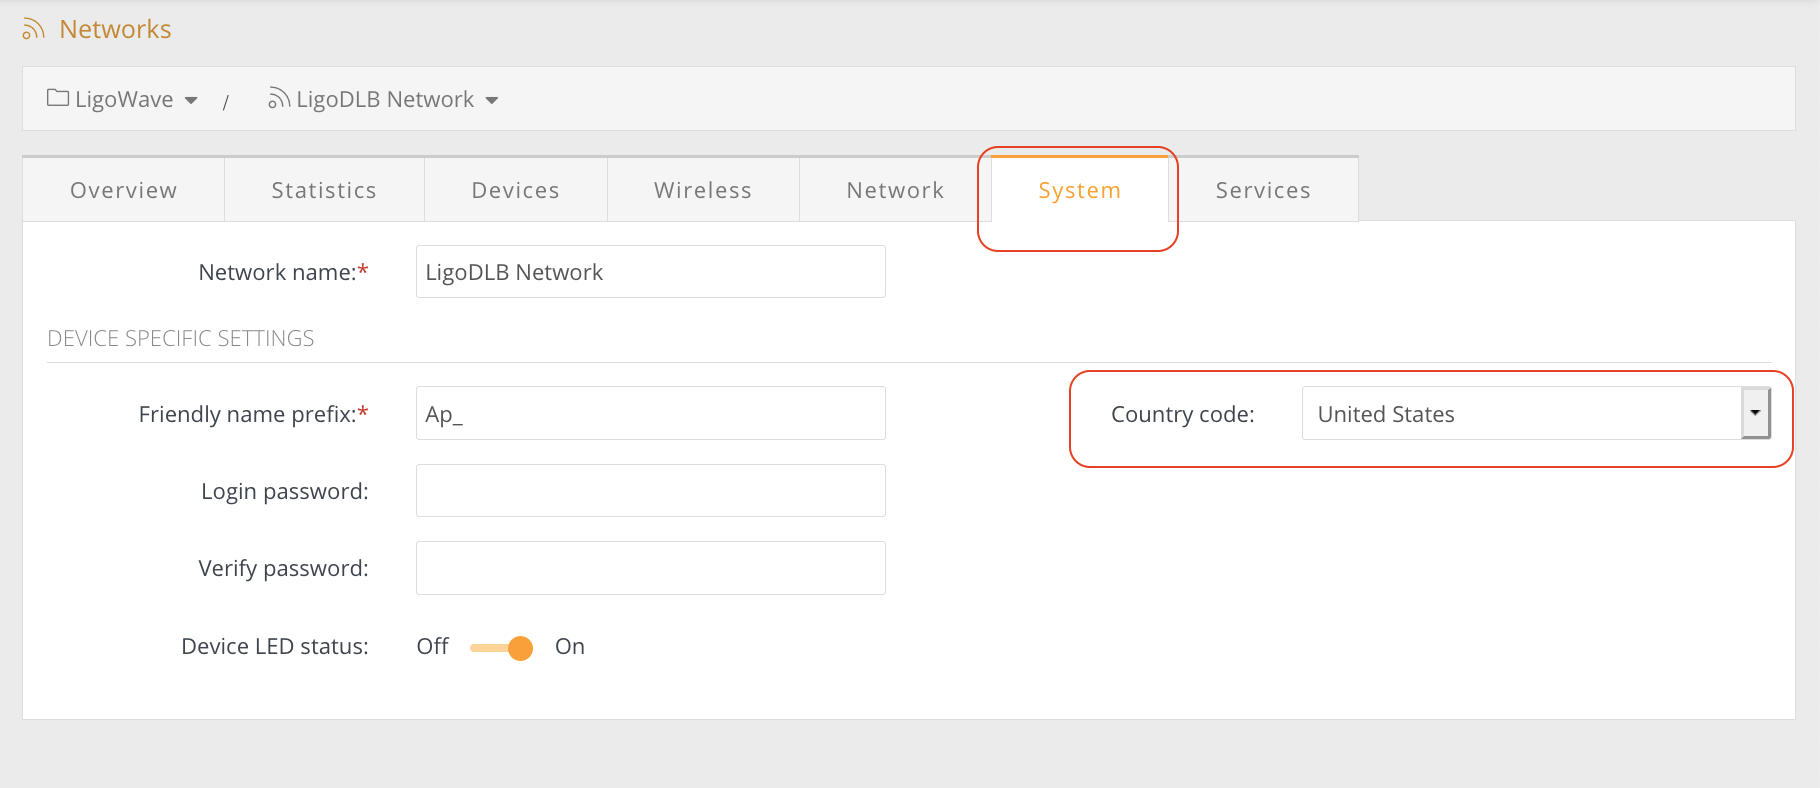
Step 2. Navigate to System and select the Country code that will be used on the LigoDLB devices:
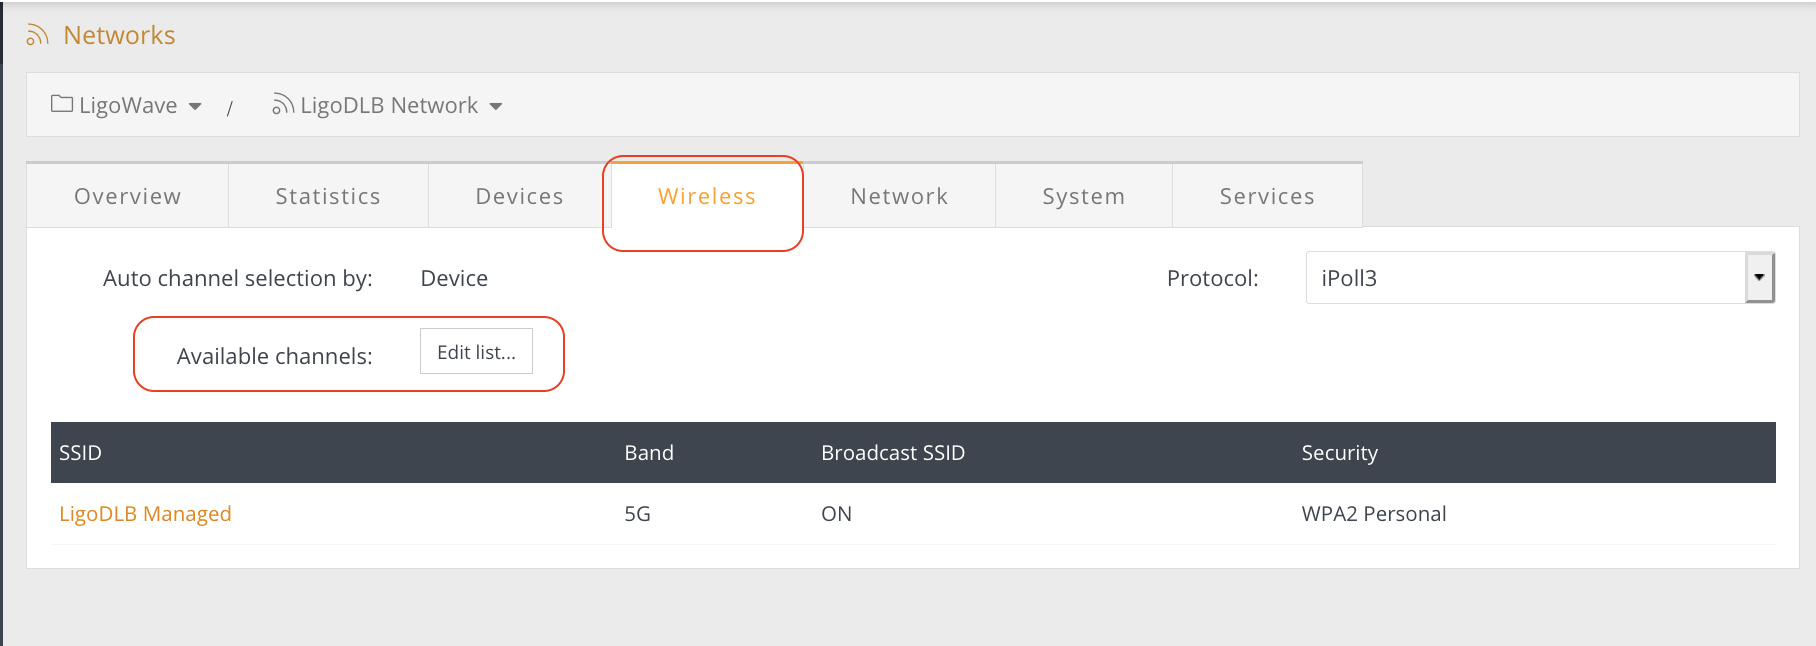
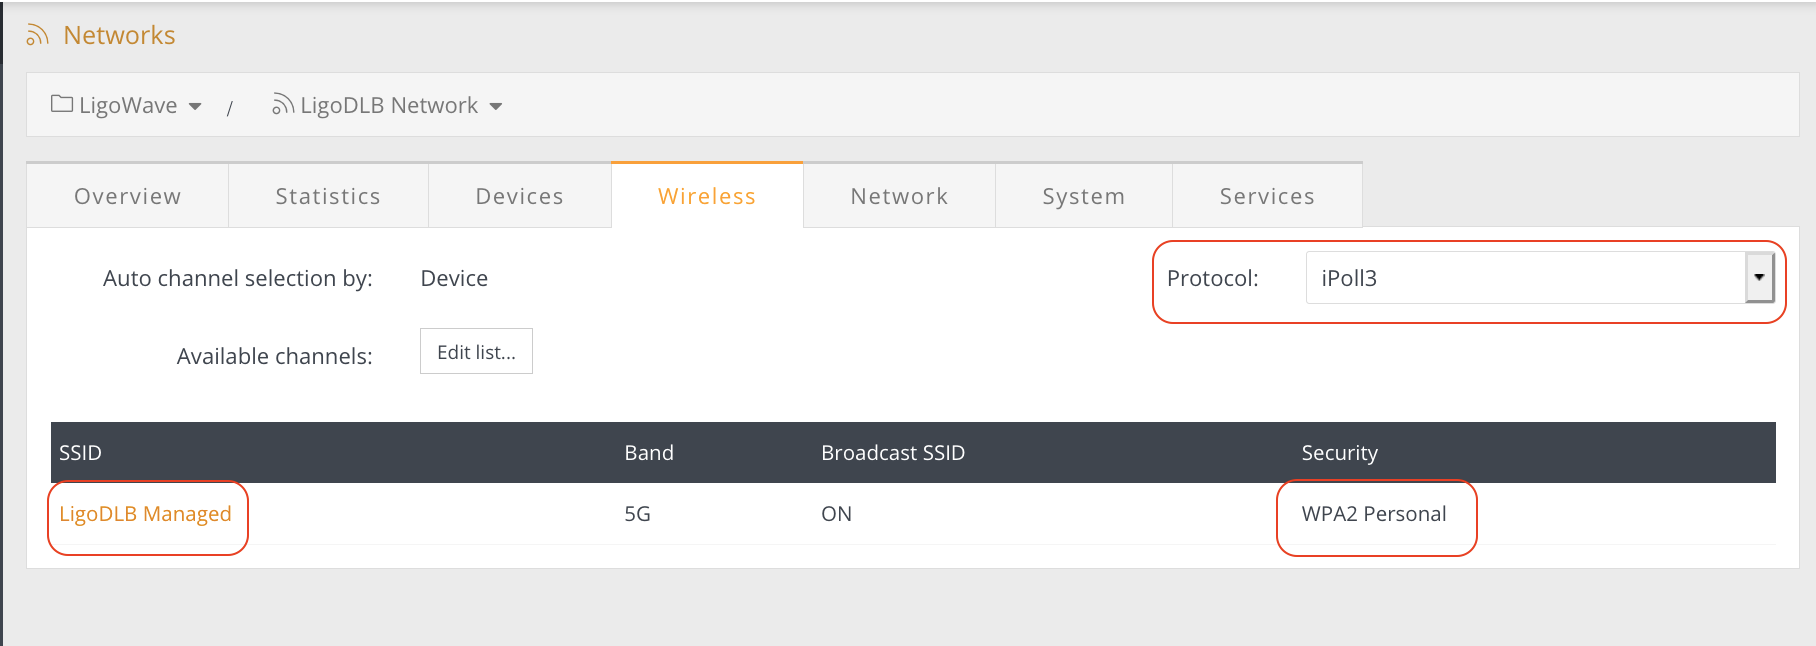
Step 3. Navigate to Wireless and click Edit list… next to the Available channels:
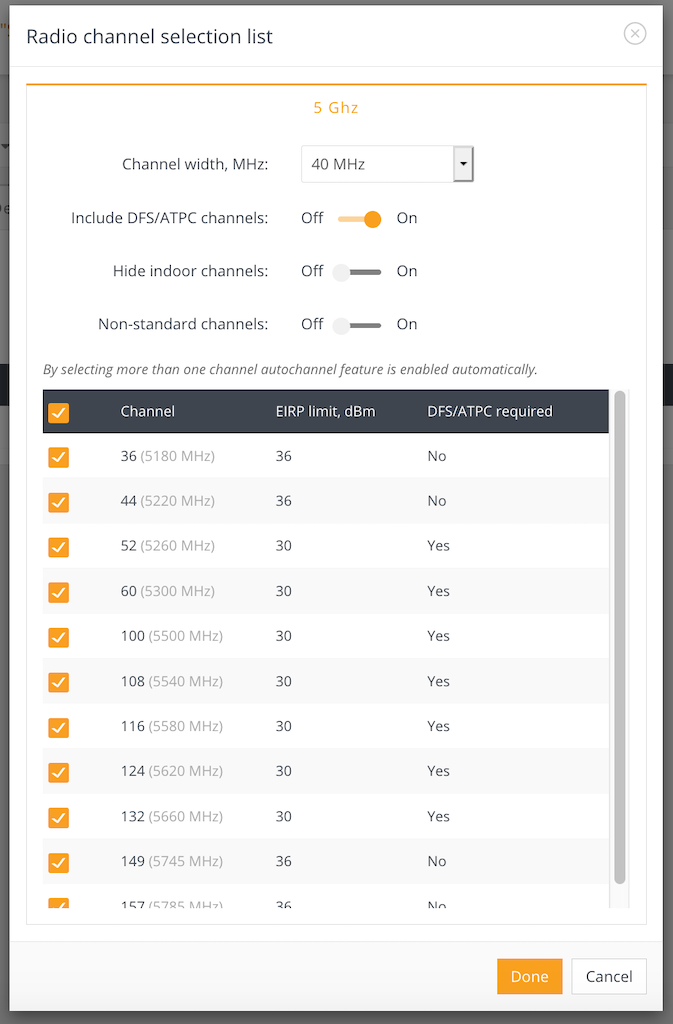
Step 4. Select the width of the operating radio channel. The LigoDLB supports 5, 10, 20 and 40MHz channel widths.
Hide indoor channels – use the slider to hide or display indoor channels.
Non-standard channels – select to enable non-standard channels. Non-standard channels have 5MHz channel steps, therefore some center frequencies will not be valid with 802.11 specifications. This feature may interfere with other networks and may not support all a/n standard clients or Access Points.
Step 5. Select the Protocol (iPoll 3 or Auto WDS). Set the basic wireless parameters such as SSID and Security:
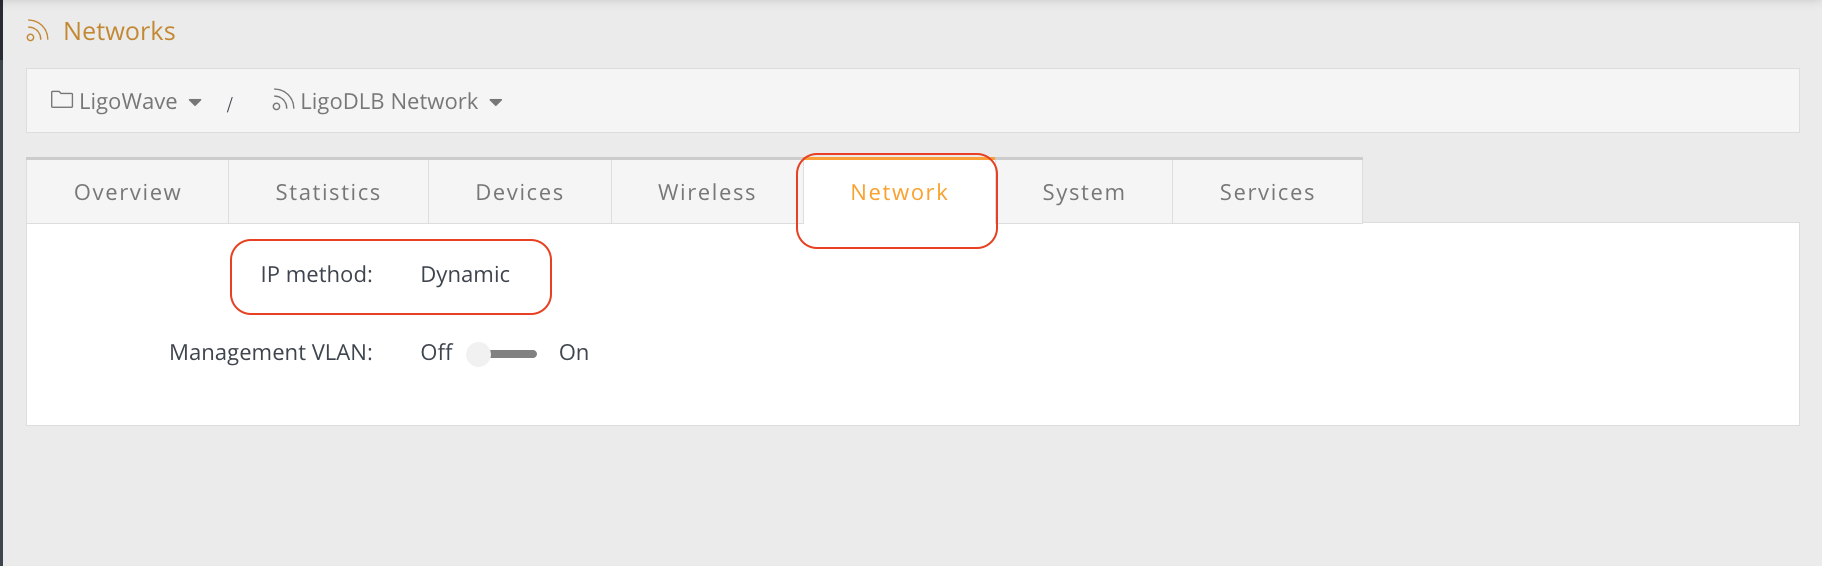
Step 6. Navigate to Network to specify the management VLAN ID, if it is used in the network. The IP method cannot be changed—only Dynamic is allowed.
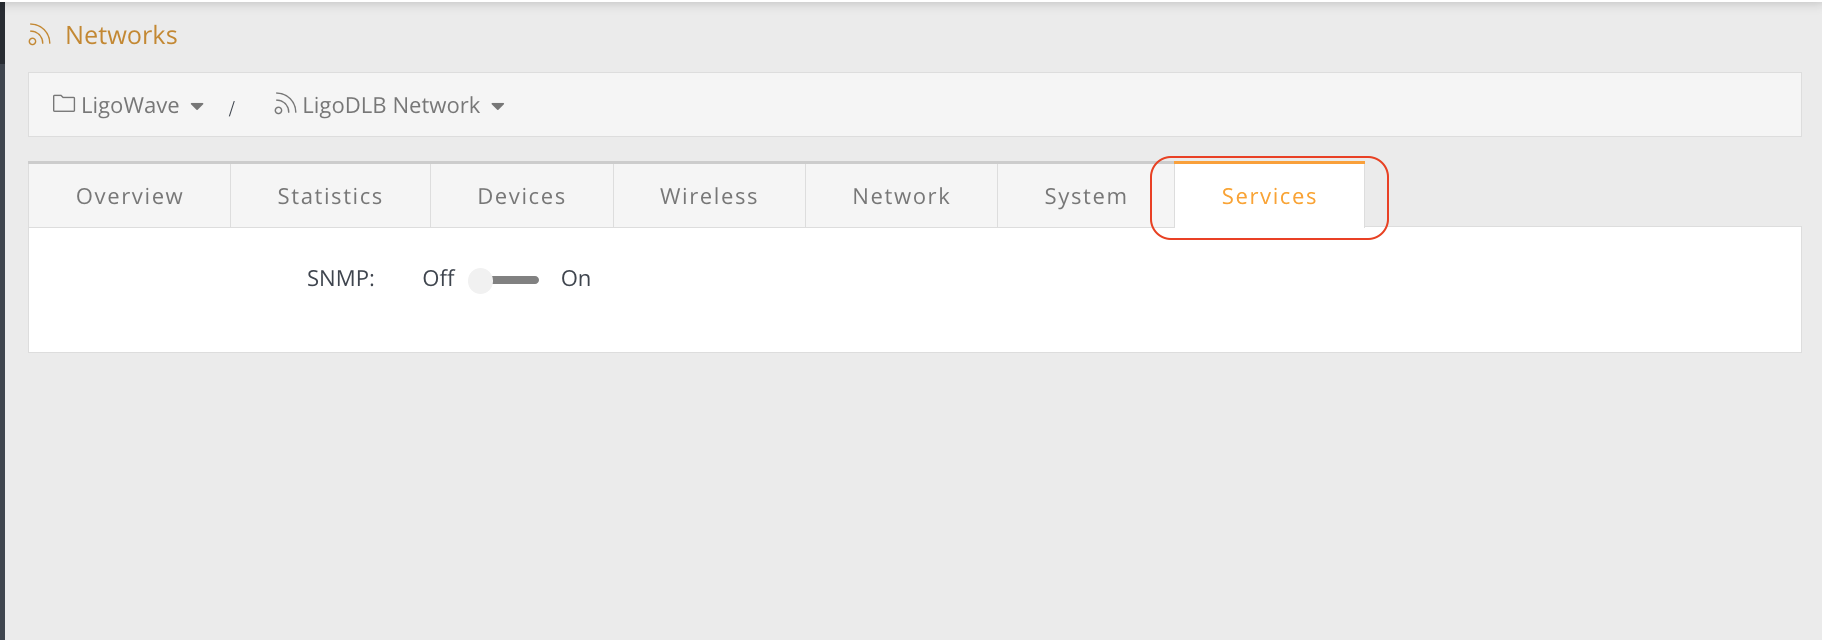
Step 7. Navigate to Services to enable the SNMP service:
Step 8. Select the device to be registered onto the network and click Register:
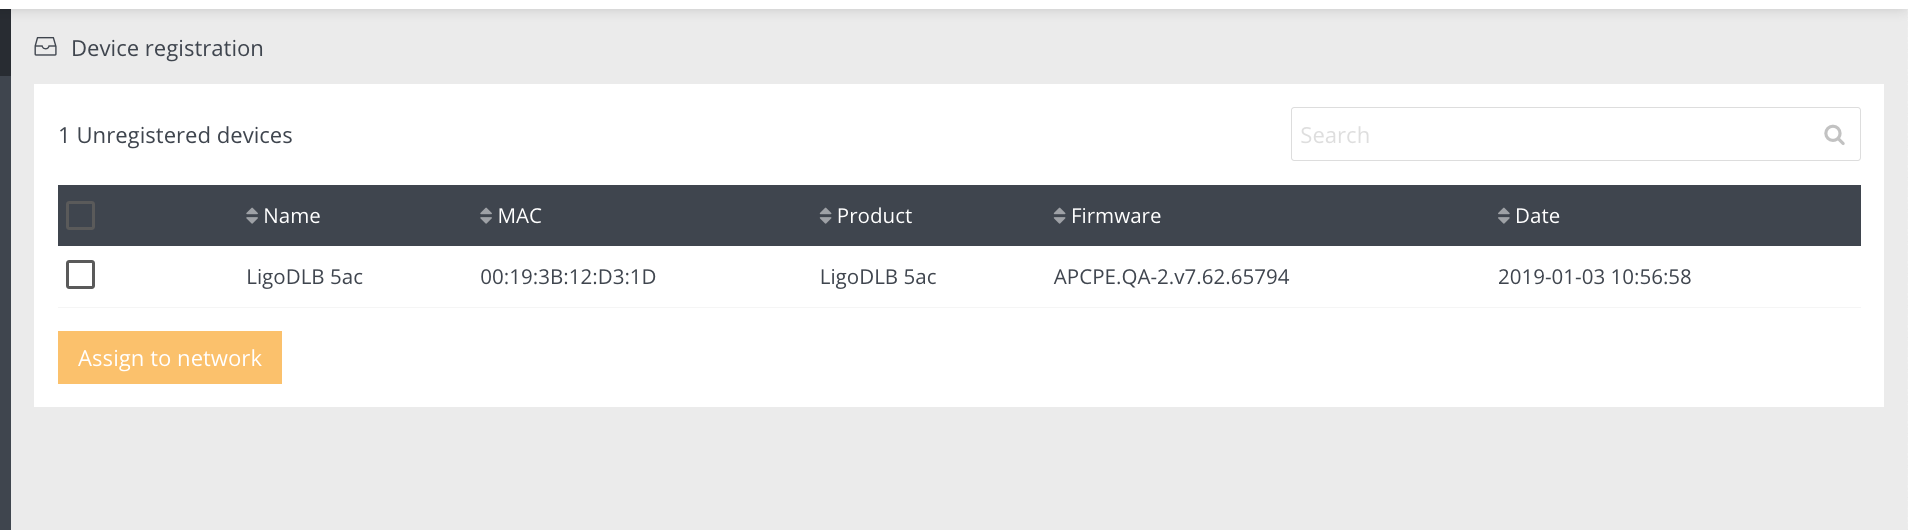
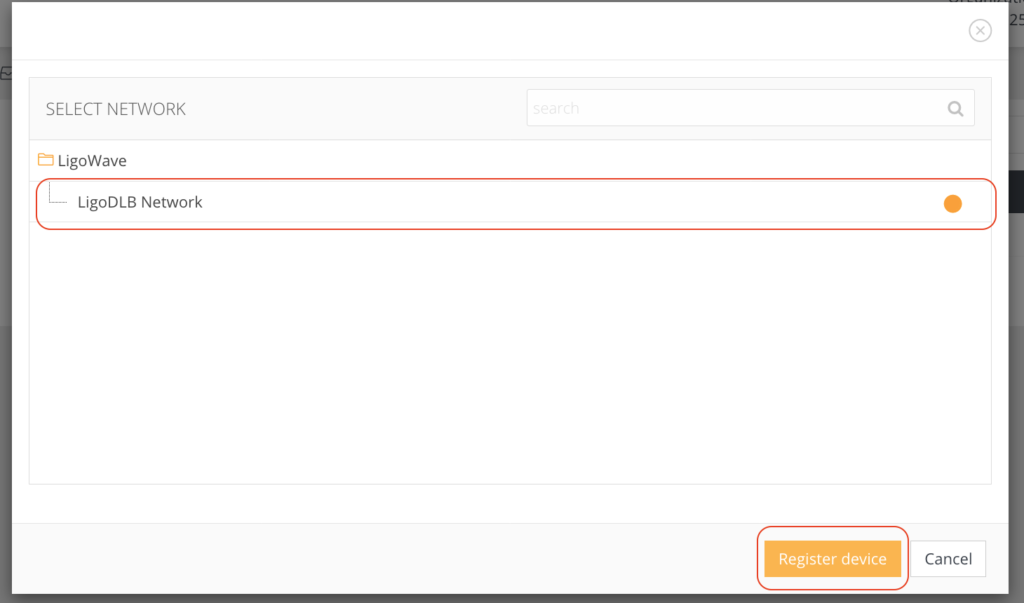
Step 9. Select the network to which the device will be registered and click Register:
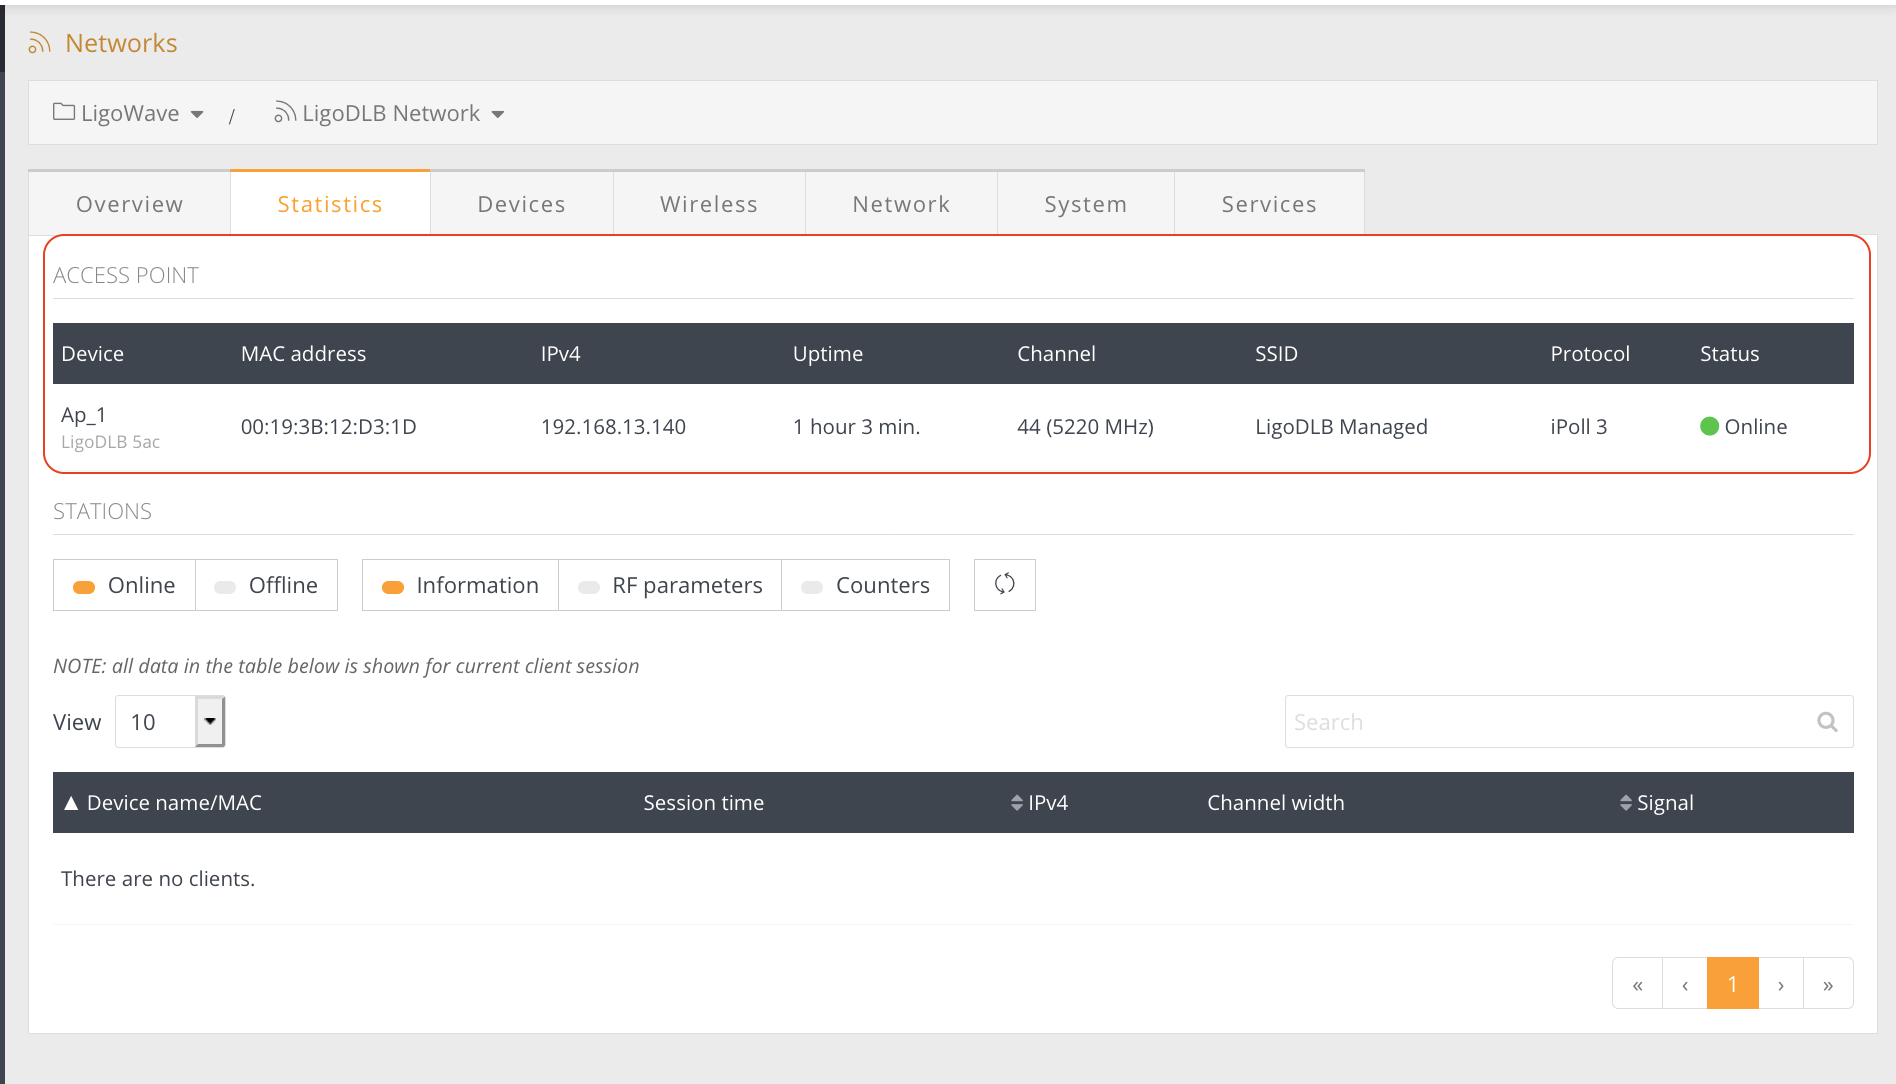
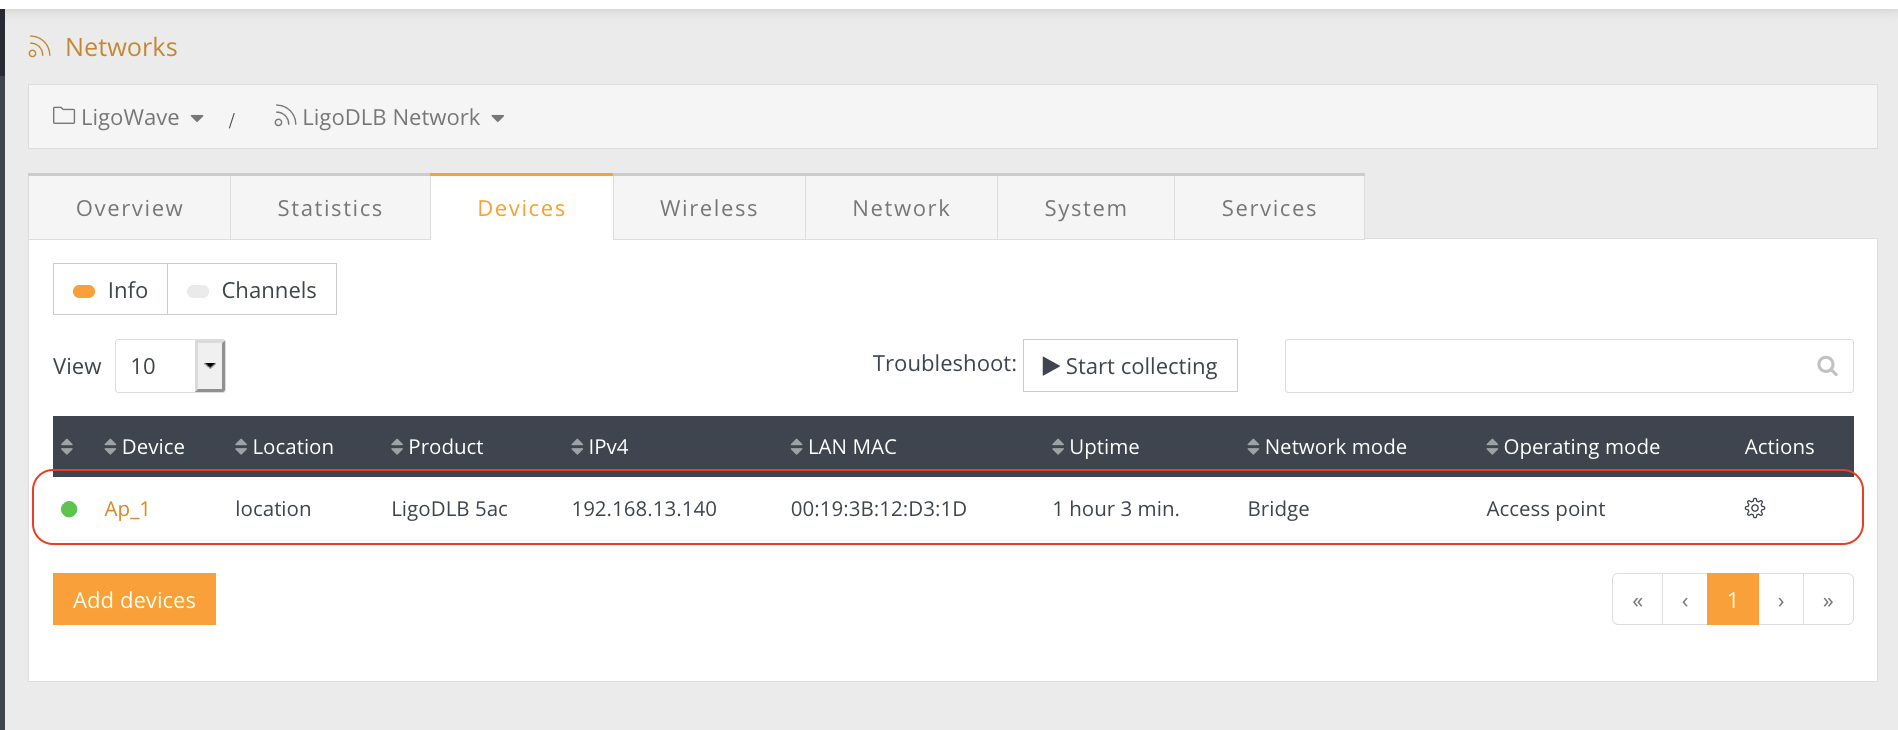
Step 10. Once the first device registration process is complete, the device should be listed under the selected network statistics section as an Access Point:
Step 11. The Devices section has to show the device as an Access Point:
Step 12. Select the second device to be registered onto the network and click Register:

Step 13. Select the network to which the devices will be registered and click Register:
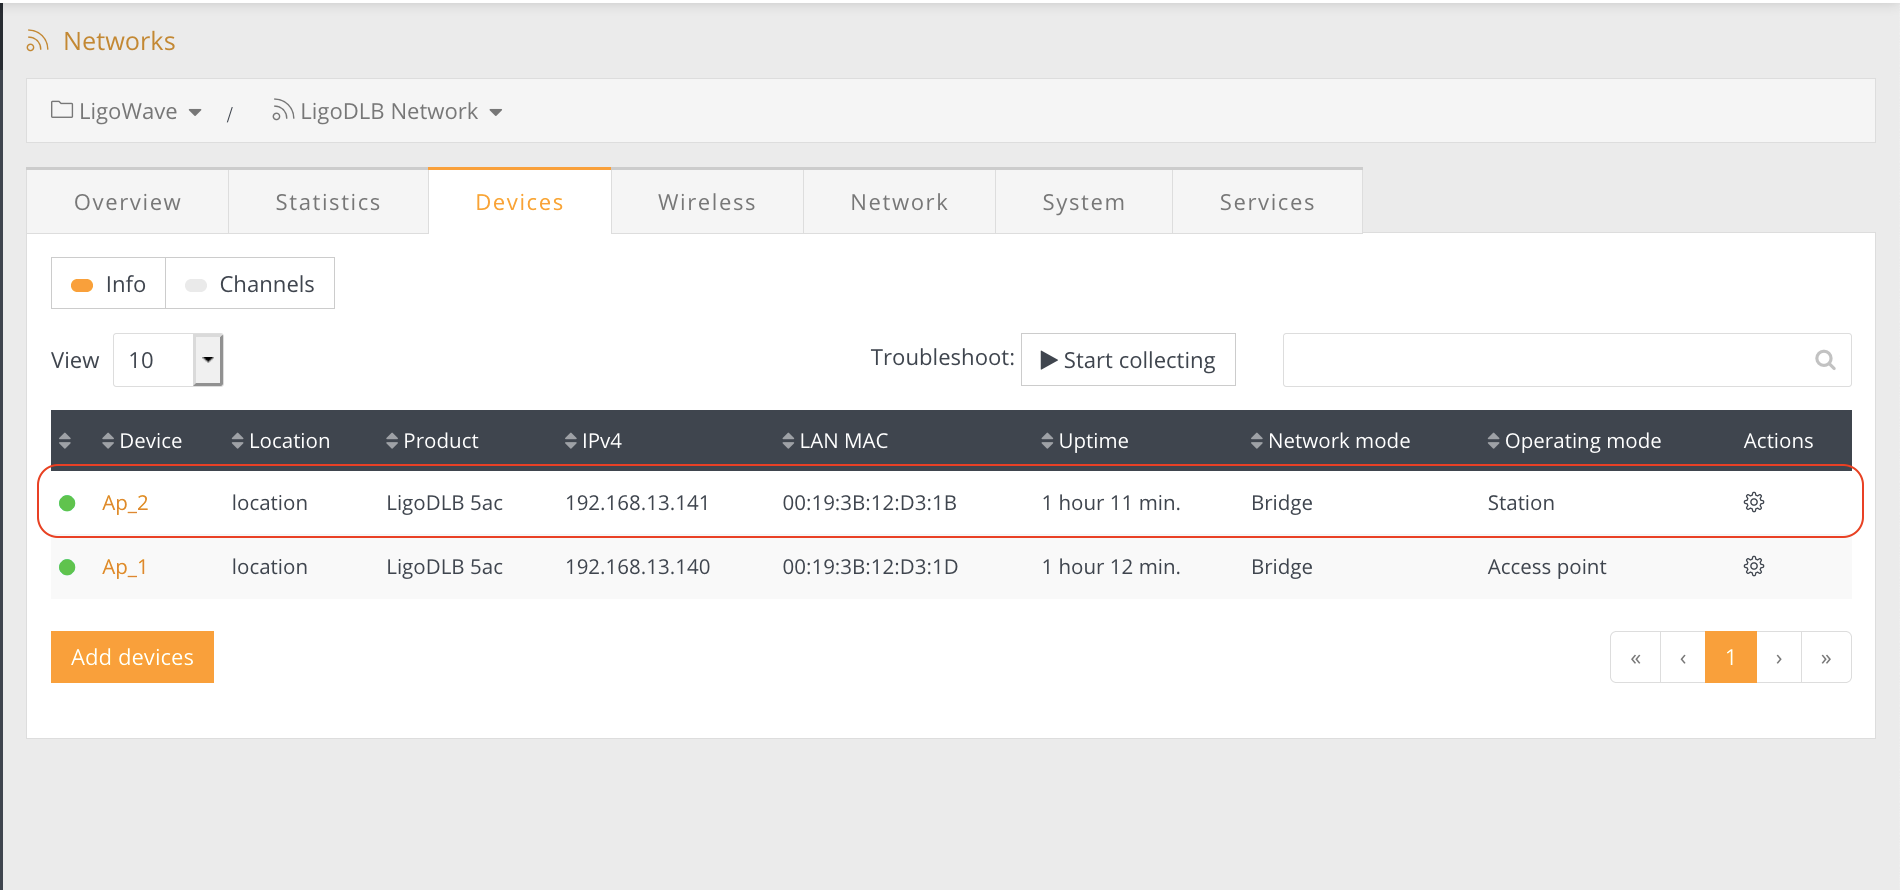
Step 14. Once the second device registration process is complete, the device should be listed under the selected network statistics section as a Station and automatically connected to Access Point:
Step 15. All other devices in the Devices section have to indicate the Station operating mode:
Before registering an existing LigoDLB setup to the LigoWave controller, check if all applied configuration parameters are available on it. Currently, configuration parameters are limited to basic settings only.
Limitations:
- The iPoll 2 protocol is not supported.
- Only the Dynamic IP method is supported.
- Bridge mode only.
- Not all services and parameters are currently available.
Follow these steps to add an existing LigoDLB network to the LigoWave Cloud Controller:
Step 1. Configure the network on the Controller with the same network, wireless and system settings as they are set on the LigoDLB devices.
Step 2. First add the Access Point to the network as the first added device and the Controller will be automatically set it as the Access Point.
Step 3. Wait until it is configured and a green indicator appears on the Controller. Check if the stations have connected back to Access Point.
Step 4. Register the stations to the Controller one by one. The operating mode on the devices will automatically be set to Station by the Controller.
The LigoWave Controller is a software platform made for configuring and managing Wi-Fi networks based on LigoWave devices. A LigoWave Cloud Controller trial account is free and supports up to 10 LigoDLB wireless access points.
You can sign up for a free cloud account here.
Follow the steps provided below to create an Infinity Cloud Controller account and to add LigoDLB devices to it.
Step 1. Register to get a LigoWave Cloud Controller account here:
Step 2. Provide user information and click Register for a Free Version:
Step 3. Enter the activation code that is sent to your e-mail:
Step 4. Click activate to enable your account using the code:
Step 5. When the registration process is complete, you will receive your unique organization ID:
Step 6. Enter your credentials and click Log In to enter the LigoWave Cloud Controller:
Step 7. Accept the LigoWave Terms & Conditions and Data Processing Agreement:
The LigoWave Controller’s management interface:
Step 8. Log on to the device (instructions on how to log in for the first time can be found in the FAQ), read the User Agreement, and select your operating country:
Step 9. Go to the Cloud Controller configuration menu to assign the Organization ID and the Controller URL (controller.ligowave.com) of the particular LigoWave Controller:
Step 10. In the Cloud Controller, click Create Network to add a new network to the parent group:
Step 11. Create the network by adding a Network Name, setting the Product Series to DLB, setting the Network Type to Monitor, selecting the Parent Group to which the network will be added, and click Create Network.
Step 12. Click on the exclamation icon. The notification indicating the count of the unregistered devices will appear—click it:

Step 13. Select the devices for registration:
Step 14. Select the network to which the selected devices will be assigned:
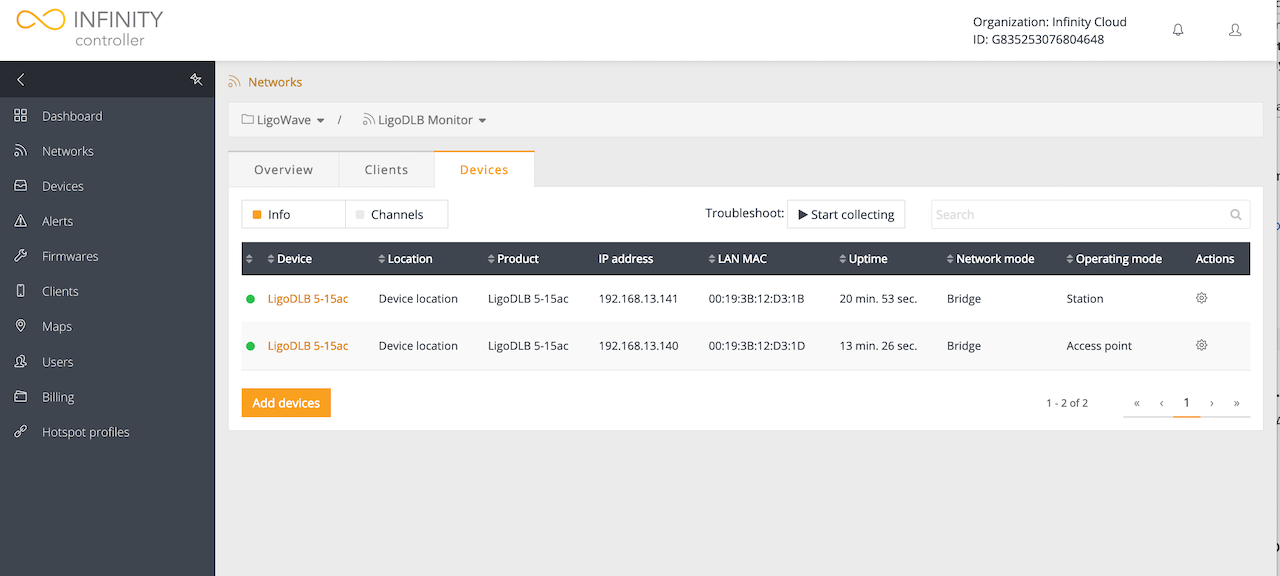
Step 15. Once the Access Point and Station device registration process is complete, the devices should be listed under the selected network Devices info section:
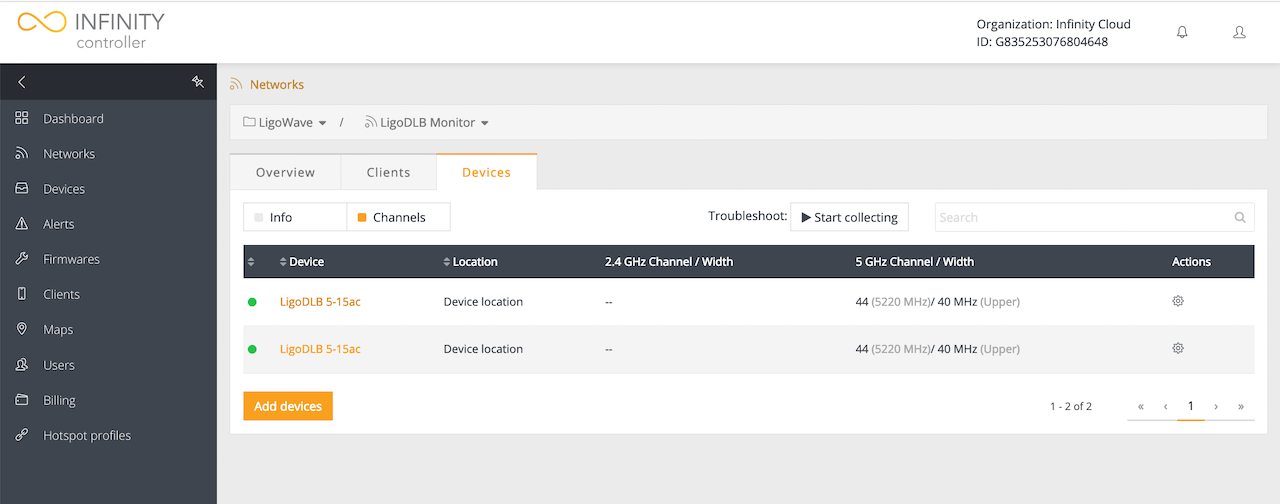
Step 16. The operating channel and width of the devices are listed under the selected network Devices channels section:
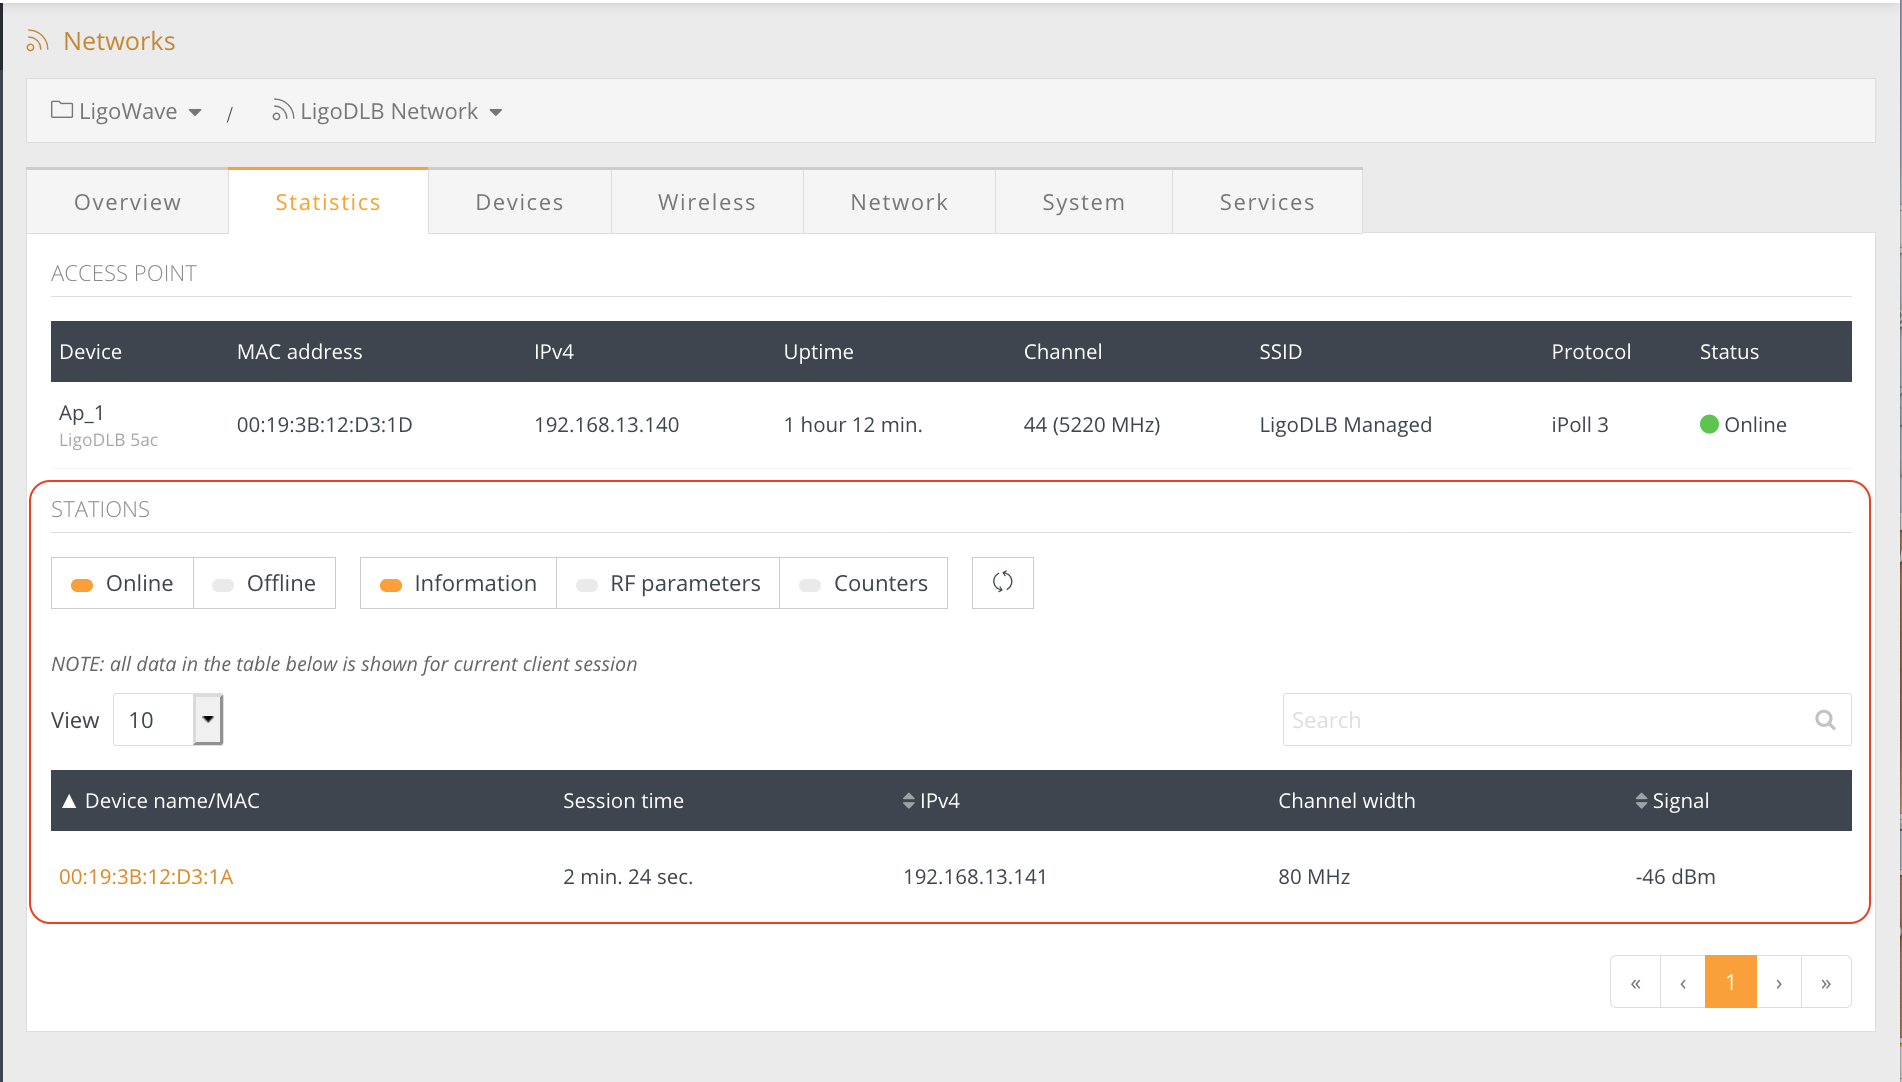
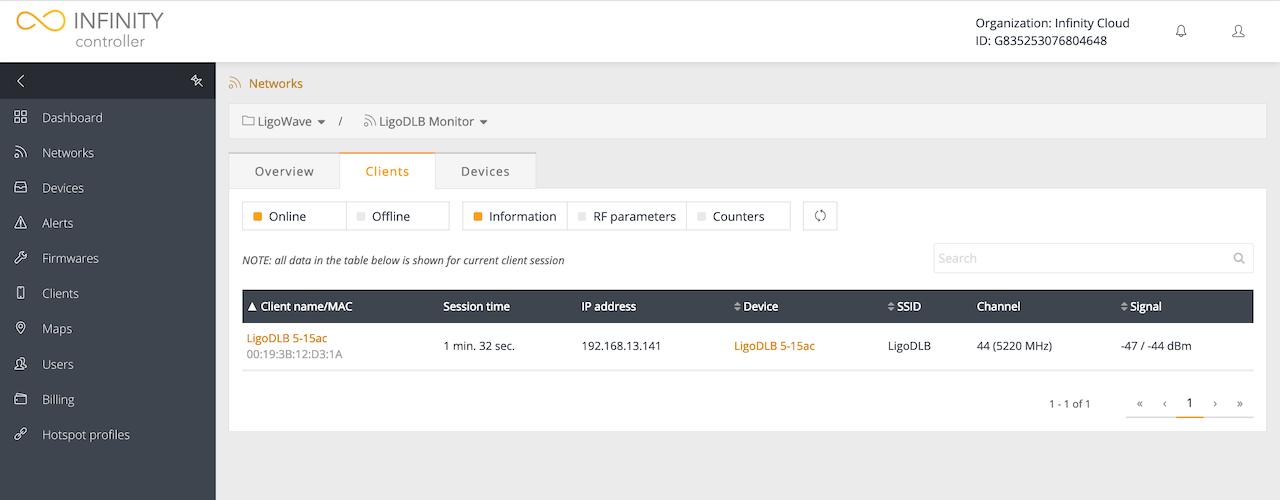
Step 17. Detailed client information is available in the Clients info section:
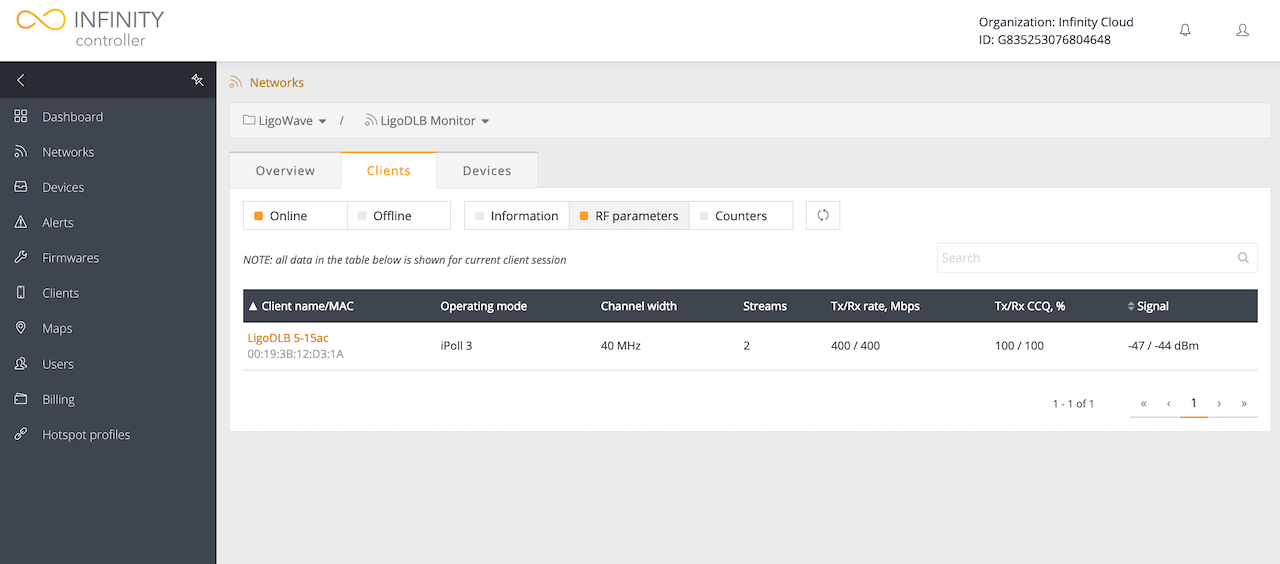
Step 18. Detailed client radio statistics are available in the Clients RF parameters section:
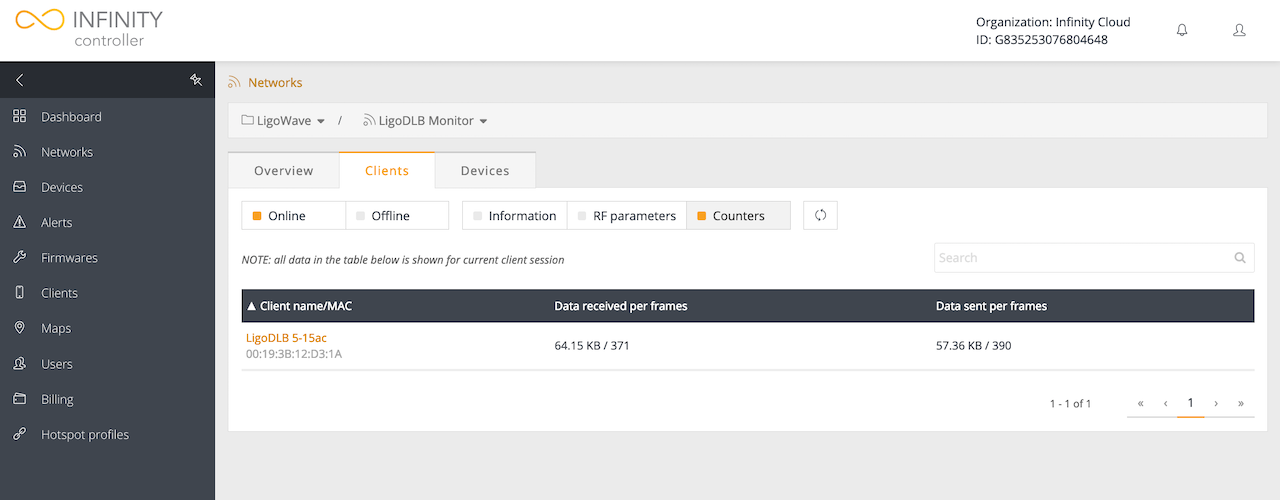
Step 19. Detailed client radio counters are available in the Clients Counters section:
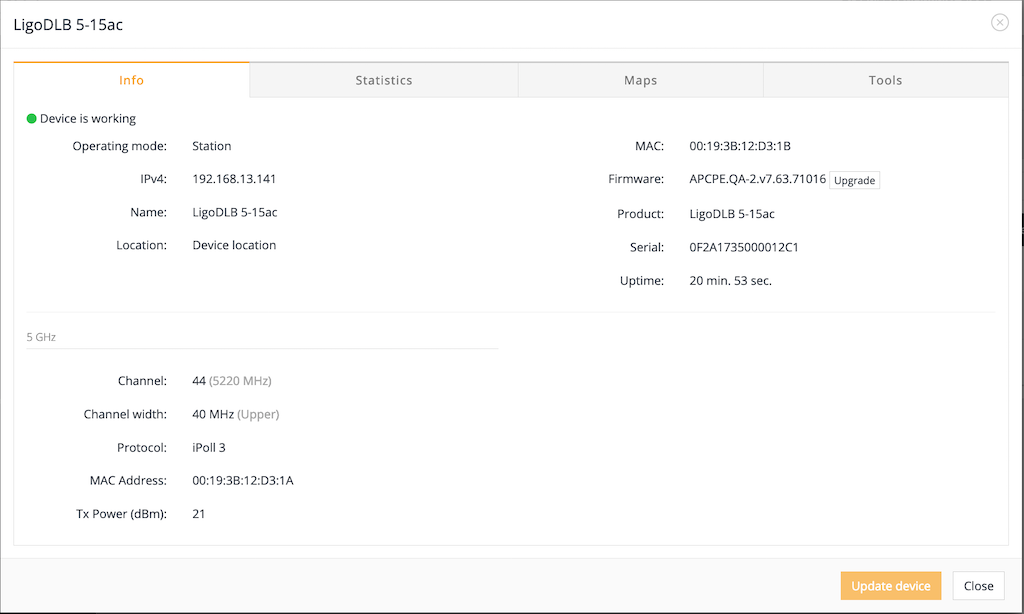
Step 20. The following can be viewed by clicking on the device global information:
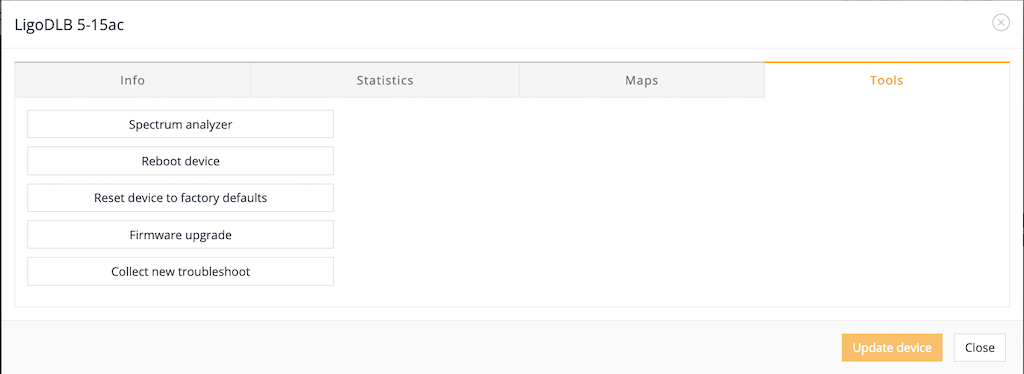
Step 21. The following management options can be found under the device’s Tools section:
Follow the steps provided below to enable system alerts for LigoDLB devices on the LigoWave Cloud Controller.
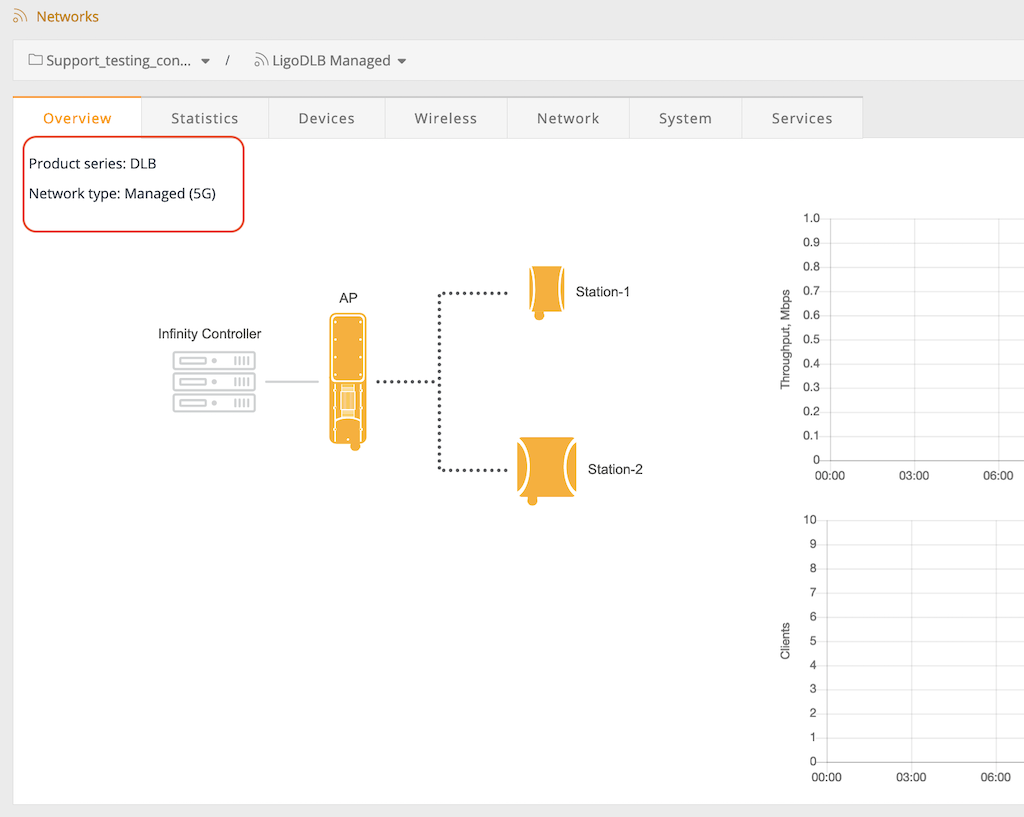
Step 1. Select the LigoDLB managed network to which the devices will be added and Alerts will be enabled:
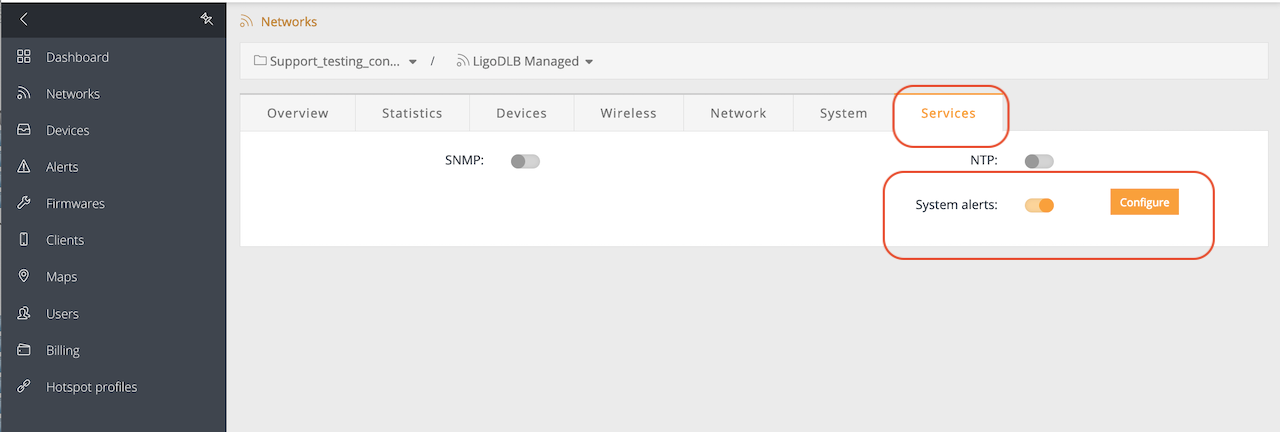
Step 2. Navigate to Services and enable the System alerts option:
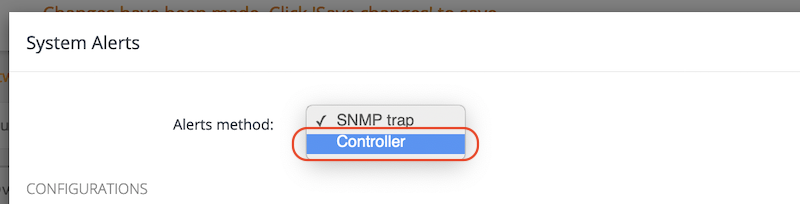
Step 3. Click Configure and set the Alerts method to Controller:
Step 4. Select and enable the preferred Alert definitions. There are three alarm severity levels: critical, warning and informational. These alarm levels are user-definable and customizable. RSSI level lower than and Rx drop greater than use threshold parameters.
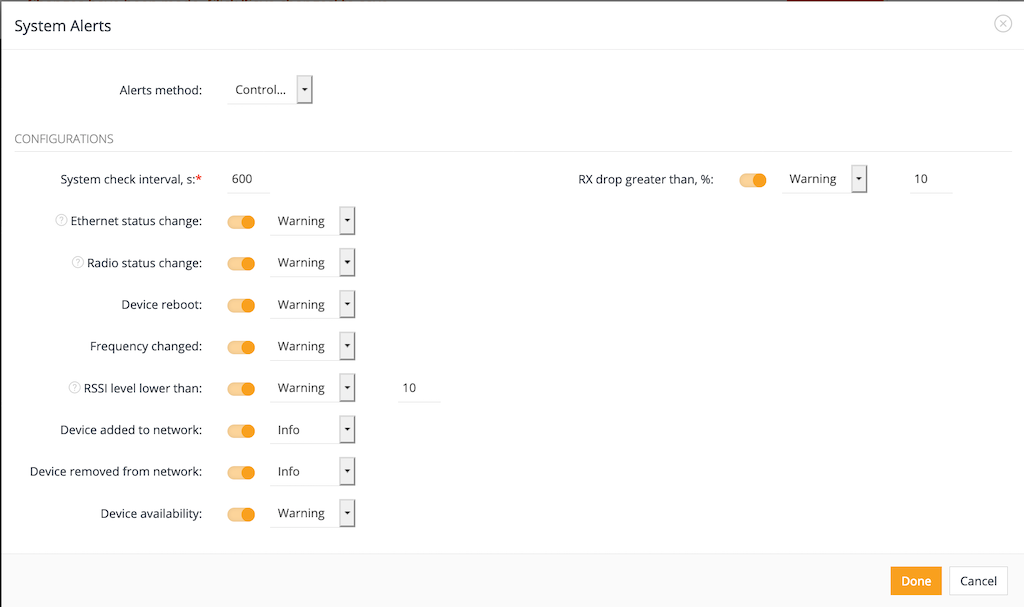
- System check interval: the period between device communications with the server.
- Ethernet status change: an alert (warning) regarding the Ethernet port state change (up or down).
- Radio status change: an alert (warning) regarding the radio port state change (up or down).
- Device Reboot: an alert (warning) regarding whether a device has rebooted.
- Frequency change: an alert (warning) regarding a change in frequency.
- RSSI level lower than: an alert (warning) for when the RSSI is less than 10.
- Device added to network: an alert (info) regarding the addition of a new device to the network.
- Device removed from network: an alert (info) regarding the removal of a device from the network.
- Device availability: an alert (warning) regarding the device state change (up or down).
- RX drop greater than: an alert (warning) for when the RX packet drop rate becomes more than 10%.
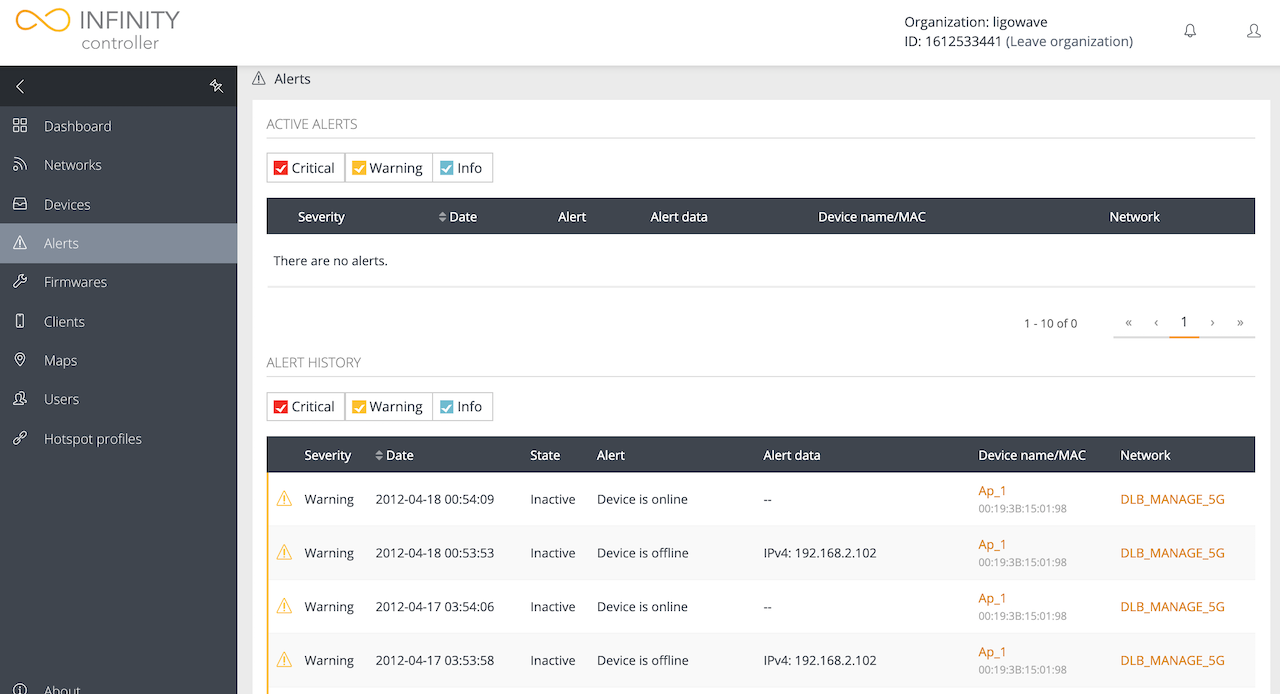
Step 5. Navigate to the Alerts menu to view system alerts that were sent by the registered devices to the network: