To run WNMS server on any linux distribution you need to use Docker.
Docker allows you to package an application with all of its dependencies into a standardized unit for software development.
Docker could be used to run WNMS server on: Ubuntu 14.04 distribution or later, Debian, CentOS, Fedora..
Native system have to be 64Bit.
Docker installation guide: https://docs.docker.com/installation/
Example how to install Docker and WNMS on Ubuntu 14.04 and 15.04
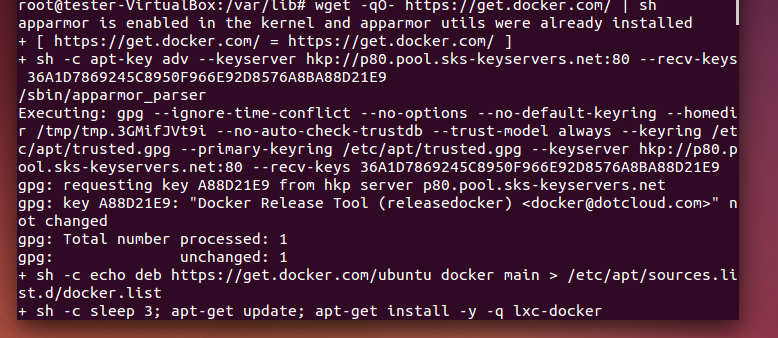
Download the latest Docker version with command:
wget -qO- https://get.docker.com/ | sh
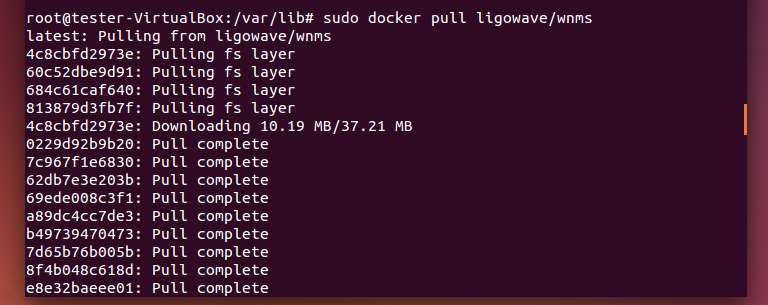
Download WNMS server to Docker:
sudo docker pull ligowave/wnms
Run WNMS server:
sudo docker run --name=wnms -d -t -i -p 80:80 -p 443:443 ligowave/wnms

Check if WNMS are running:
sudo docker ps

If you want to stop wnms server:
sudo docker stop wnms
For more information: https://docs.docker.com/installation/
The following steps have to be executed before upgrading:
1. Change working protocol from iPoll 1 to 11n on Base Station (BS) through device GUI
2. Ensure that all CPEs are connected to BS and available on WNMS
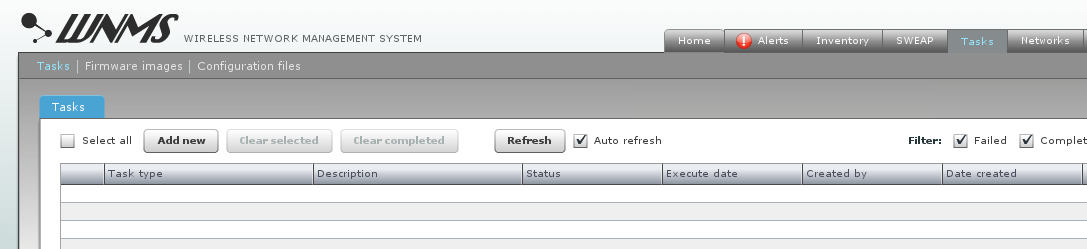
Steps how to create firmware upgrade task in WNMS:
Step 1. Go to Tasks section and click on Add new:
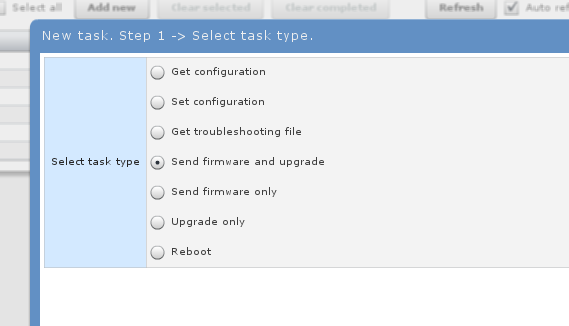
Step 2. Choose Send firmware and Upgrade task:
Step 3. Download v7.00 firmware from APC devices from www.ligowave.com/downloads website.
Upload new firmware, choose Execute and Upgrade time after that fill Task description:

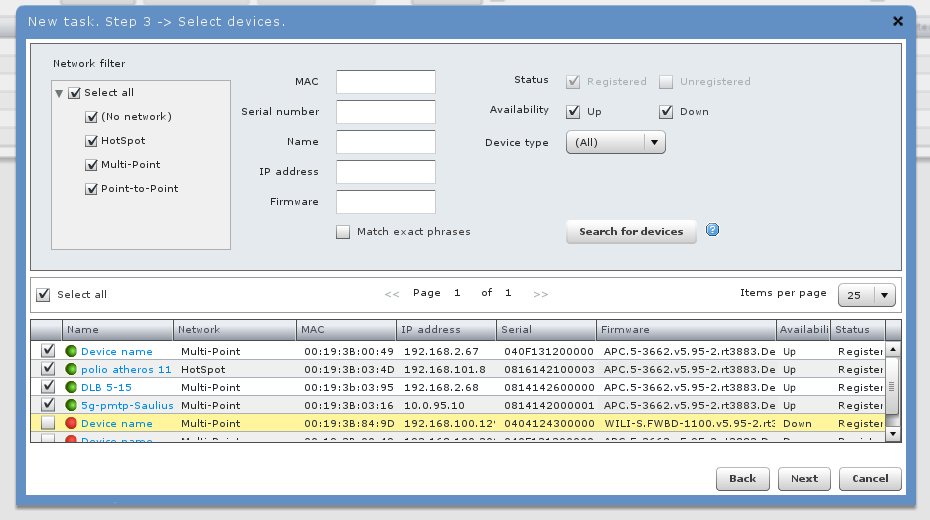
Step 4. Click search for devices and select the ones which have to be upgraded:
Step 5. To complete task creation process, click Finish button:

Step 6. Check if task is planned corectly:
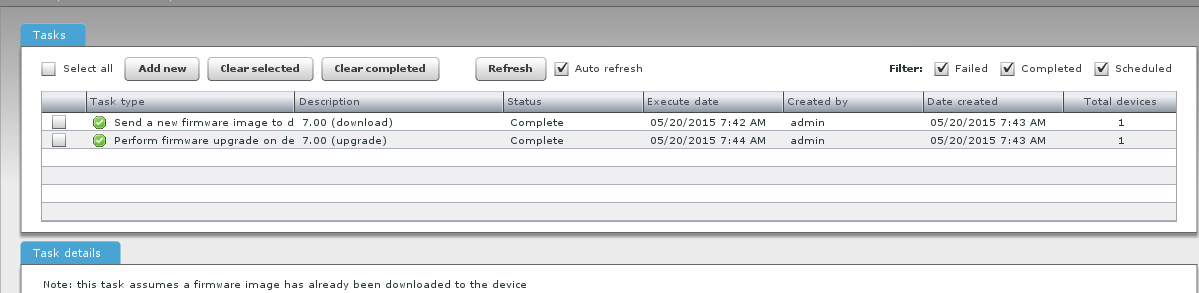
Step 7. If upgrade was performed correctly status will change from Scheduled to Complete:
Step 8. Check if all devices are reachable
The last step have to be executed after upgrading:
1. Change working protocol from 11n to iPoll 2 on BS. Stations will reconnect automatically

Windows version
This section provides instructions on how to install and uninstall WNMS on Windows OS (Windows XP, Windows Server 2003, Windows VISTA, Windows Server 2008 and Windows 7).
WNMS is now available on Windows OS as well. To see the installation instructions, please read the QIG. Currently it can run on:
- Windows XP
- Windows Server 2003
- Windows VISTA
- Windows Server 2008
- Windows 7
- Windows 8
To download the Windows version of WNMS Click here
Linux version
WNMS is available for Linux operating system, Ubuntu or Debian. Installation packages (.deb) can be downloaded from the LigoWave software repository.
For recent Ubuntu or Debian release please use a repository according to your system codename:
deb http://wnms.ligowave.com/ vivid main
deb http://wnms.ligowave.com/ trusty main
deb http://wnms.ligowave.com/ jessie main
deb http://wnms.ligowave.com/ wheezy main
deb http://wnms.ligowave.com/ raring main
deb http://wnms.ligowave.com/ precise main
For more detailed instruction look at: Quick Install Guide
How to install the WNMS for Linux system please look at the: Quick Install Guide
Virtual machine version
The virtual image option is not only a simple and quick way to start WNMS on most of the operating systems, but also makes it easier to familiarize with WNMS features, test its functionality and even use it for normal network operation. The WNMS virtual image works seamlessly with VMware and VirtualBox.
To learn how to install WNMS using VMWARE or VirtualBox software, please read the Quick installation guide.
There are two different download mirrors for your convenience (see below).
WNMS configuration document: WNMS Quick Start Guide
WNMS configuration video tutorial:
新增:
- SWEAP: third party equipment monitoring and alerting through SNMP (separate application for Windows and Linux)
- WNMS on the cloud
改进:
- Added WNMS Windows installer support to upgrade from previous 1.1 and 1.0 versions
- Improved overall database performance
- Added confirmation prompt before deleting the link between devices
- Replaced Google maps with OpenStreet maps
- Changed yellow graph color to more visible
- Added Chinese language
修复:
- Fixed alert listing for network-restricted used

Register SWEAP Instance
SWEAP stands for SNMP to WNMS External Agent/Proxy and is a software application that runs independently of WNMS and is able to turn any SNMP-enabled network device into a WNMS-friendly piece of equipment.
By default successfully installed SWEAP instance gets “Unregistered” state on WNMS server.
Follow the steps to register SWEAP on WNMS:
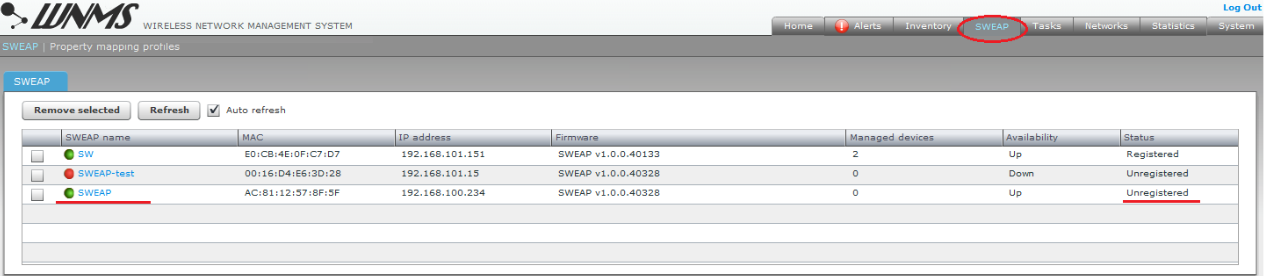
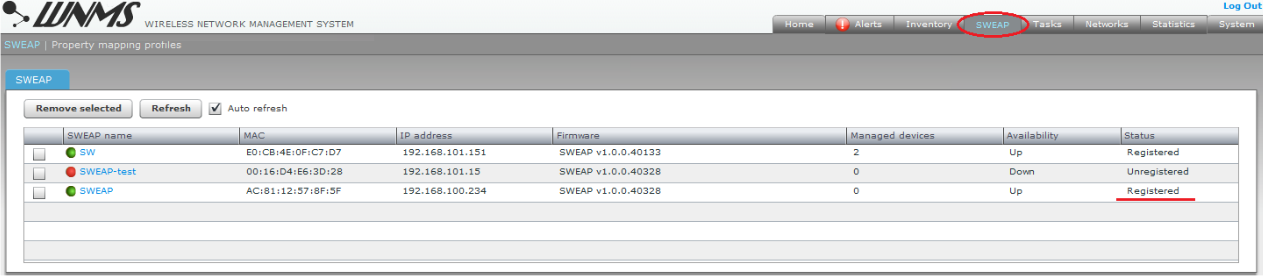
Step1. Navigate to the SWEAP menu to view list of connected SWEAPs to the WNMS server.
Step 2. Click on a SWEAP name to load Details window where certain information about SWEAP instance is displayed. Click Register button for registration. Optionally the coordinates and heartbeat interval may be specified:
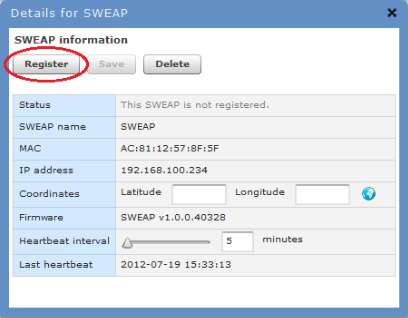
There are 3 functional buttons that controls device settings:
- Register – click to register the SWEAP . This button is active only if state is “Unregistered”.
- Save – saves changes that were made on this page.
- Delete – deletes particular SWEAP from the WNMS server. If deleted SWEAP continues to send heartbeats to WNMS server, it will appear on WNMS server under “Unregistered” state as soon as the first heartbeat will be get.
Step 3. The registration of the SWEAP has been finished successfully:
Add devices to SWEAP
After the SWEAP was successfully registered on the WNMS server, the required third-party devices can be added to the SWEAP for monitoring purposes. Follow the steps to add managed devices on the SWEAP:
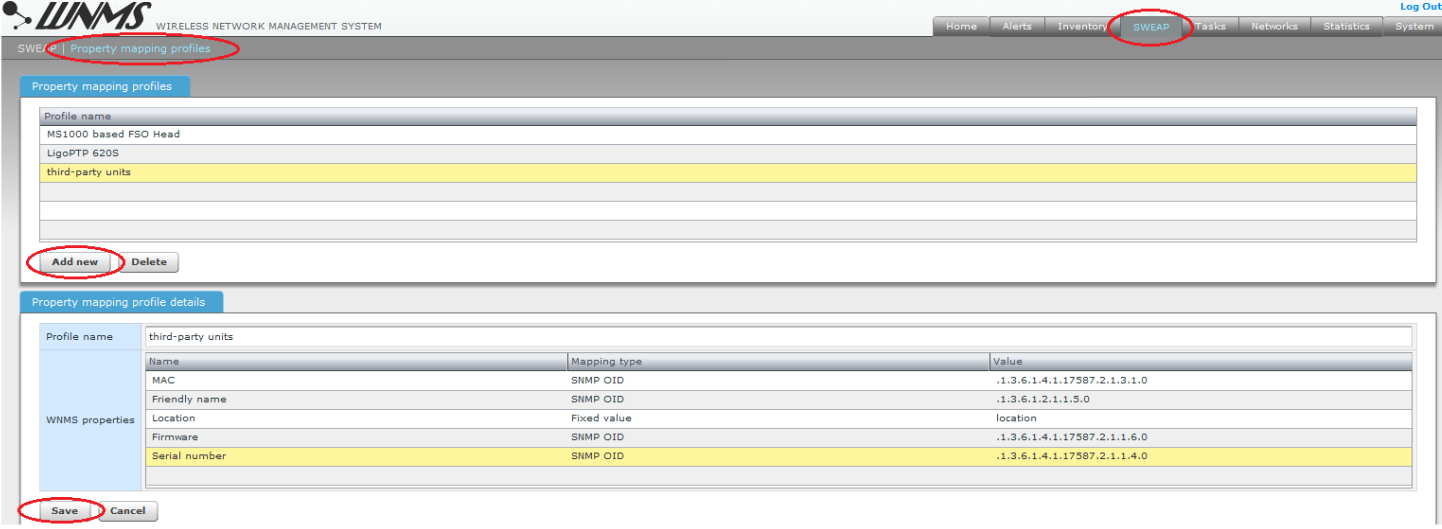
Step 1. Create a Property mapping profile for the required third-party device. This profile will gather the main statistical information about third-party device ( based on SNMP OIDs or specified by fixed value ). Click Add new button and fill all mandatory fields with specific statistical information on SWEAP|Property mapping profiles page :
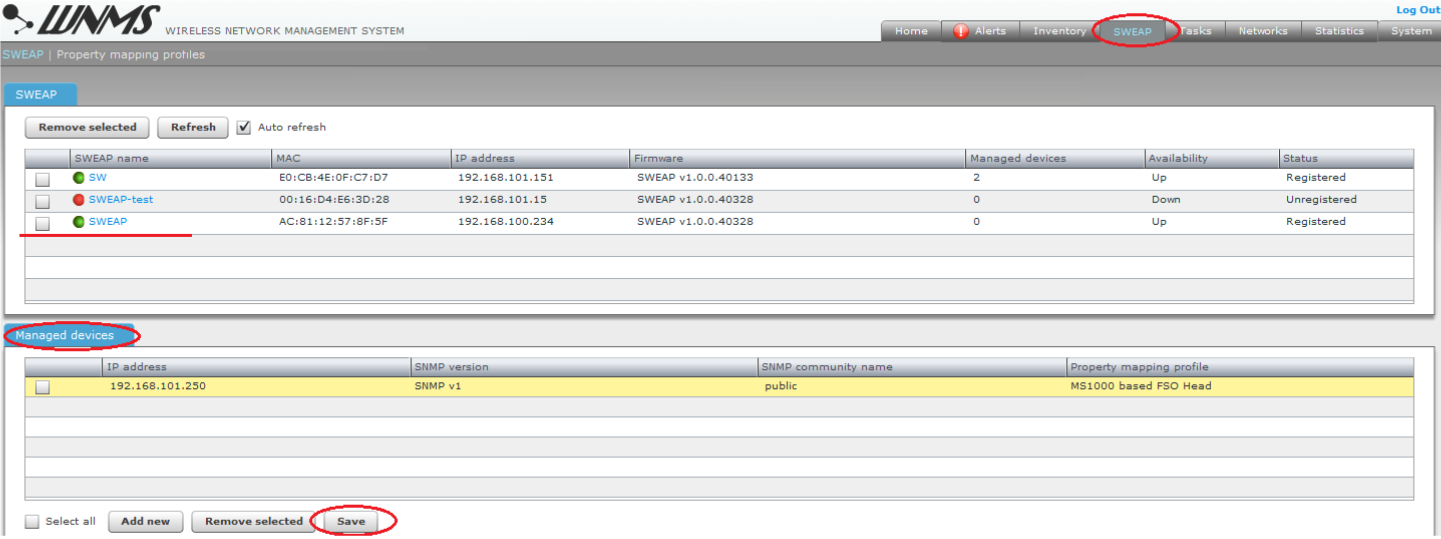
Step 2. To add devices to a SWEAP, select it and the table of Managed devices will appear below. Specify the IP address of the device, select the SNMP version, SNMP community, choose the correct Property mapping profile for the monitored device and click the Save button.
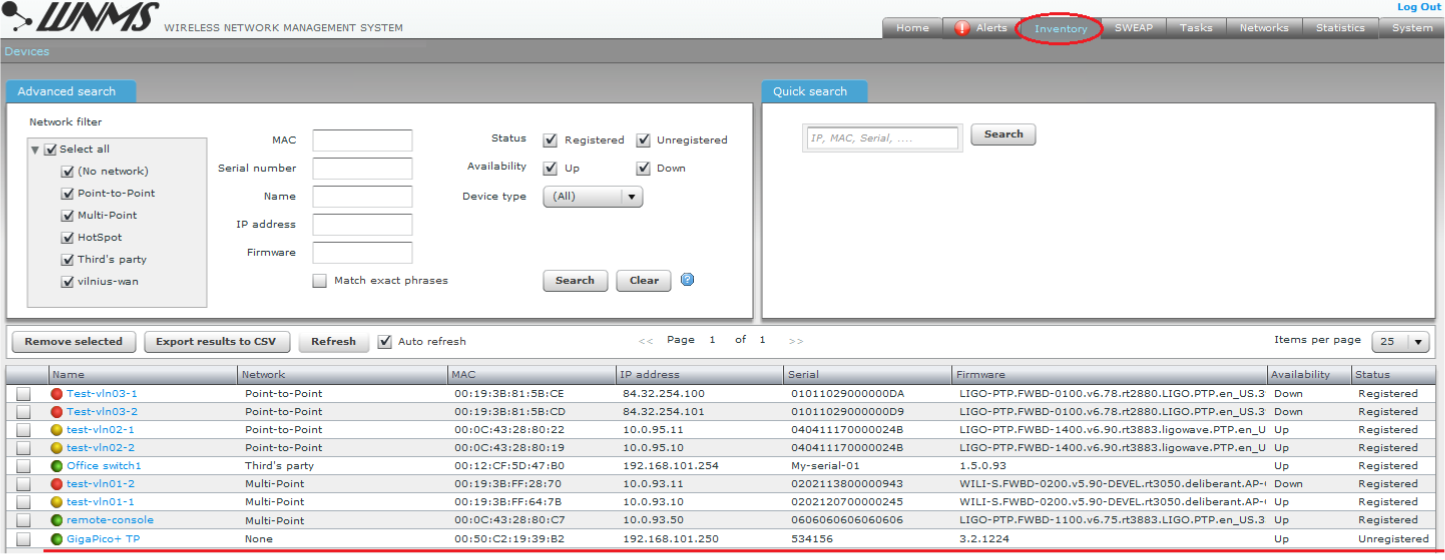
Step 3. It will take a few minutes for the device to appear on the Inventory table with Unregistered state.
Step 4. The third’s party device is now ready for management and monitoring. Refer to the respective document “WNMS Quick Start Guide” for detailed informat ion how to register and monitor devices individually.