版本 1.7
新增:
- Google Maps added for visual devices representation.
修复:
- Group assignment to parent group issue fixed.
- Wireless client listing fixed for the Network section and the table (not all clients were shown).
- Second SSID with data VLAN fixed on bridge AP (mini-hotspot scenario).
- VLAN indication on UAM wireless profile fixed (mini-hotspot scenario).
- Incorrect indication of connected client number fixed (mini-hotspot scenario).
优化:
- Firmware version indicator added to the single device configuration section.
- Firmware version upload check added.
- “Cancel upgrade” button removed from when the firmware is already updating.
- Additional information/warning added for when deleting a Network with active device.
- Confirmation for resetting a device to its default factory settings added.
- 2.4GHz Spectrum Analyzer selection option removed from devices that do not support it.
- Added Automatic firmware selection added to drop-down menu for devices upgrade.
版本 1.6
新增:
- New network type—Easy Mesh.
- Option to disable management VLAN wirelessly added.
- Indication, signifying devices are scheduled for a firmware upgrade, added.
- Option to add offline devices to the queue for firmware upgrade added.
- RADIUS failover server support added.
修复:
- NFT controller backup fixed (some system files were missing).
- Repeating refresh fixed on Closed device settings.
- Radio scheduler validation error fixed (even if the feature was disabled).
- Issues with information about offline devices missing fixed.
- Device button status fixed in the Devices menu.
- Device tool capability information fixed in the Channels tab.
- Device firmware upgrade validation fixed for when the device has a newer firmware version than the NFT controller system.
- System crash fixed for when devices are being upgraded with a firmware that is deleted from a system.
- UI elements visual look&feel fixed.
优化:
- Current operating channel added to Network Channel tab when “Autochannel selected by device” is enabled.
- Visualization improved for radio scheduler.
- Network search using Organization or Group ID improved.
- Device ‘Uptime’ changed to ‘Last Seen’ information while the device is down.
- Wireless clients tab column renamed from “MAC” to “Client MAC”.
- Wireless clients tab column renamed from “Uptime” to “Session time”
- Firmware upgrade notification messages improved.
- Sorting by device status added.
- Validation improved for when deleting the Mini hotspot profile.
版本 1.5.1
新增:
- Network scenarios added: Office/Home LAN, Hotspot.
- VLAN configuration feature added for NFT 2ac/3ac products.
- Hotspot profile tab added for global UAM settings configuration.
- Mixed mode and WPA2 only selection added to the wireless network profiles.
- Hotspot welcome URL added.
- Option to override hotspot black/white lists added.
- Option to disable/enable the reset button added.
- Network group ID added.
修复:
- Validation of ‘Start upgrade’ time improved in the radio scheduler.
- Network and group statistics updates fixed on GUI.
- Configuration settings fixed for the NFT 3ac for when an 80MHz channel is selected.
- Super user limitation to change their own password fixed.
优化:
- The default 2.4GHz channel size is set to 20MHz.
- Requirement to set up two NTP servers removed.
- Access point info and wireless clients can be accessed from the Devices page.
版本 1.4.2
新增:
- Option to create two-level groups added.
修复:
- Issues with the Spectrum Analyzed not turning off when changing radios fixed.
- Expanded group collapse once statistics are updated issue fixed.
- Time input field validation for “Auto firmware update time” and “Radio on/off schedule time” fixed.
- Fixed Last hour throughput value fixed in dashboard mini-diagram.
优化:
- User permission handling improved by allowing to assign permission for a group only, not network.
- Most active networks (by client count) display in dashboard improved.
版本 v1.4.1
新增:
- Unregistered device list added for network manager user type.
- Individual organization IDs added for Free Cloud users.
优化:
- Device discovery is now always enabled.
版本 v1.4
新增:
- Management VLAN configuration added.
- Traffic shaping per VAP added.
- Option to move the device to another network added.
- Option to use a native-based device auto-channel function instead of the controller-based one added.
- Daily automatic firmware upgrades added to schedule.
- Network config copying option added.
- System alert (SNMP traps) configuration added.
- Option to disable Ethernet LAN ports added.
- Device, network, and user count limits added to network groups.
- Radio scheduling added.
- Automatic firmware upgrade, if hidden features are available, added.
- Option to configure whether the uploaded firmware will be visible to all users added.
- Option to disable VAP for individual devices added.
修复:
- Mini- and normal chart inconsistencies in dashboard fixed.
- Issues with first data points always being zero charts fixed.
- Most active network table renewal issue fixed.
- Throughput measurement units fixed in dashboard.
- Wireless profile save issue fixed for when some fields are left empty.
- Network config saving issue fixed for when a county with no 80MHz (5G) bandwidth is selected.
- Tx-power config saving error fixed with countries that do not have a 5GHz frequency band.
- Fixed Issues with missing expansion button after a network search fixed.
优化:
- Cloud stability and performance improved by migrating all users to a single organization.
版本 v1.3
新增:
- Network search added to Device Registration page.
- Unregistered device count added to the Registration page.
- Pagination added for network list in the Registration page.
- Multiple device firmware upgrade option added.
- Network groups added.
- Network manager and network monitor user permissions added.
- Spectrum Analyzer added.
- Troubleshooting file download tool added to network and device.
- Reset to default settings option added.
- Device reboot tool added.
- Quick-access drop-down menu added to the Network page.
- Serial number and radio MAC added to device info modal.
- Option to postpone firmware upgrades added.
- Instant data renewal added to network table.
修复:
- 5GHz radio handling fixed for when a country code does not have a 5GHz frequency band.
- IE10 select option issue fixed.
- Modal handling fixed for when using the browser’s back button.
- Issues with being able to create multiple organizations by accident fixed.
- SSH and Telnet port configuration fixed.
- Date selection fixed in Firefox.
- Settings validation issues fixed in WPA-Enterprise configuration.
- Issues with devices showing up in the unregistered list incorrectly fixed.
优化:
- Auto-channel selection improved to always use the maximum available channel width.
- Device uptime value representation improved.
- Device Rx/Tx value representation improved.
- Dashboard improved with new graphs and counters.
- Device radio configuration improved to be in a single tab.
- Responsive design improved in most pages.
版本 v1.2
新增:
- Product name added to device inventory table.
- Option to override SSID on individual device added.
修复:
- ‘Leave organization’ button fixed on small resolutions.
- ‘Superadmin’ menu responsive design fixed.
- Channel width info fixed in channels table.
版本 v1.1
新增:
- Product name and device IP information added to Registration table.
- User self-registration wizard added.
- Landing page added for cloud version.
- New user type—owner—added.
- Tooltip added to organization name.
- Organization management and exporting to Excel options added.
- All client table added to dashboard.
- User password recovery via email added.
修复:
- Device modal animations fixed.
- Issues with device friendly name prefix update being too long fixed.
- Wireless profile frequency change issue fixed.
- Unsupported CT country code removed.
优化:
- Responsive design improved.
- Error message readability improved.
版本 v1.0
初始版本
The Infinity Controller allows easy, simple, and fast network configuration, installation and troubleshooting. All management is carried out through a web browser and can be accessed from a laptop, smartphone, or any other device.
The Infinity Controller mechanism is a self-configuring system that allows users to easily maintain and expand networks. The network management system can be integrated or external:
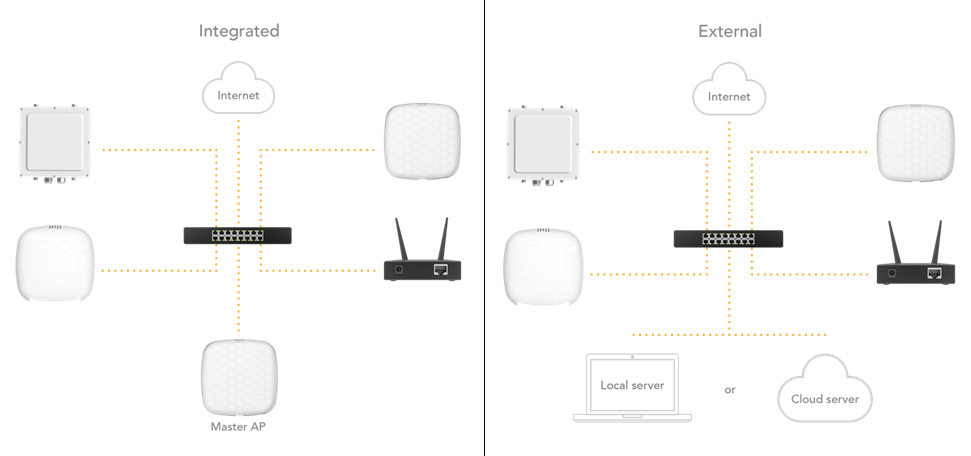
- Integrated – the network is managed by a local device (NFT series product acting as the Master AP). This option does not require any additional management hardware or software.
- External – the network is managed by the Infinity Controller software located on a server. The management software may be put on a cloud or installed in a client’s premises, which can be cloud-based or installed locally.
The table provided below shows the core differences between the Internal and the External controller options:
| Integrated | External | |
| Network managed by | Master AP (local device) | Infinity Controller (server) |
| Feature set | Basic | Advanced |
| Network scale | Local | Global |
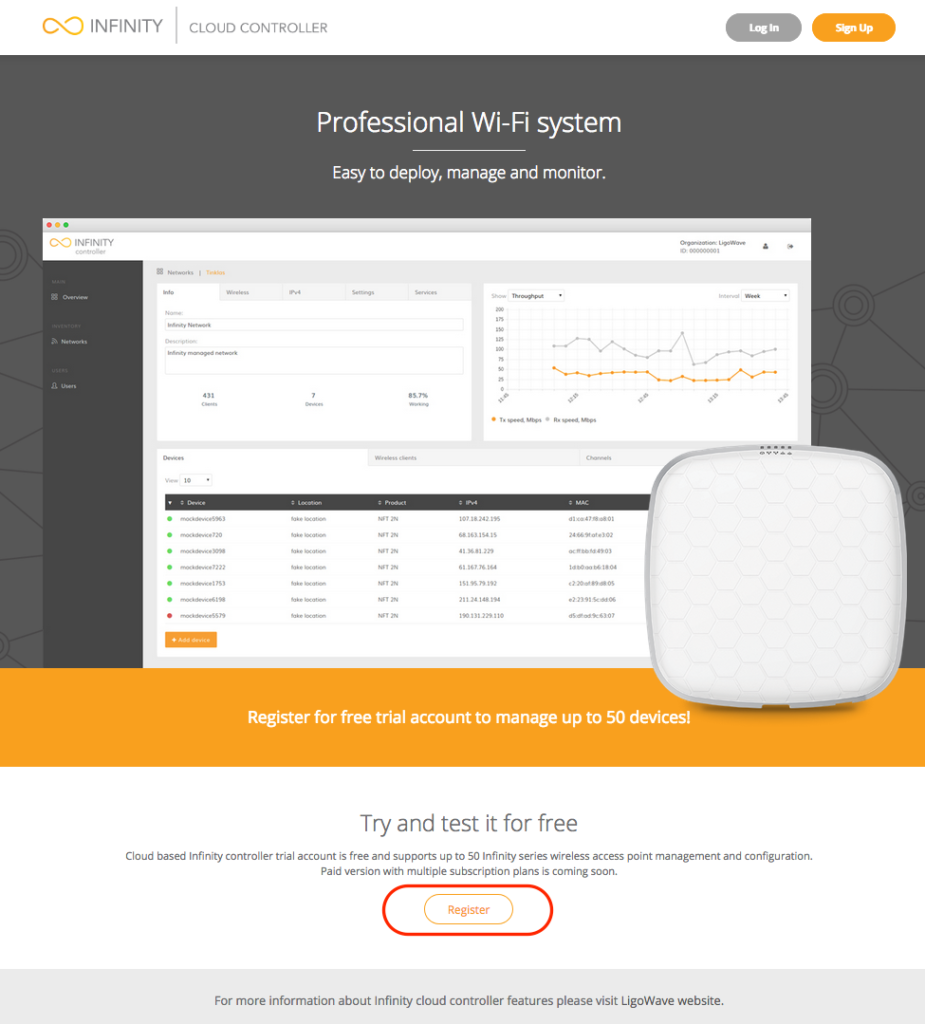
The Infinity Controller is a software platform for configuring and managing Wi-Fi networks based on LigoWave devices. An Infinity Cloud Controller trial account is free and supports up to 50 Infinity wireless access points.
You can sign up for a free cloud account here.
Follow the steps provided below to create an Infinity Cloud Controller account and to add Infinity devices to it.
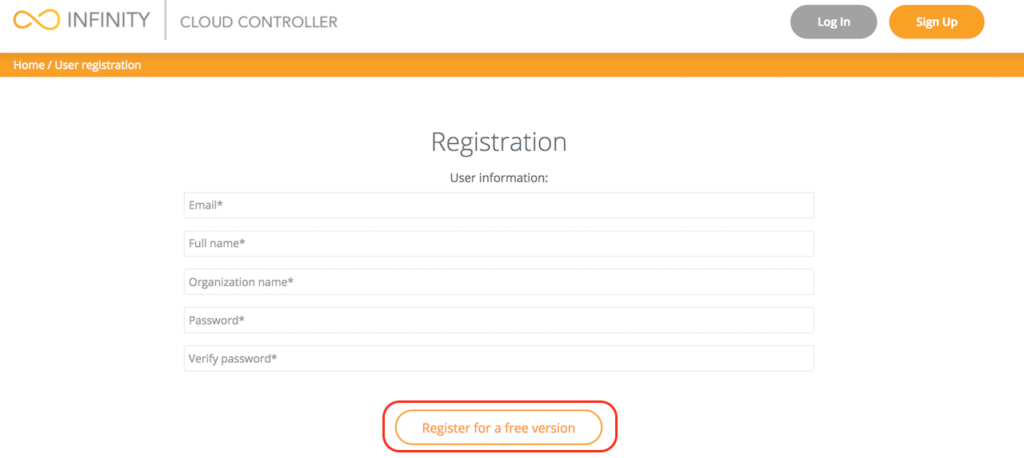
Step 1. Register an Infinity Cloud Controller account here:
Step 2. Add user information and login credentials:
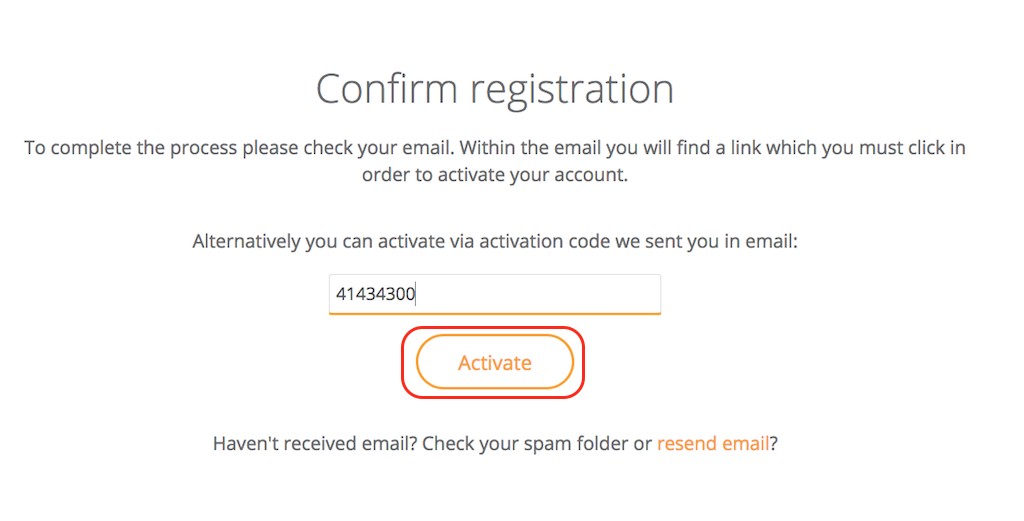
Step 3. Enter the activation code that is sent to your e-mail:
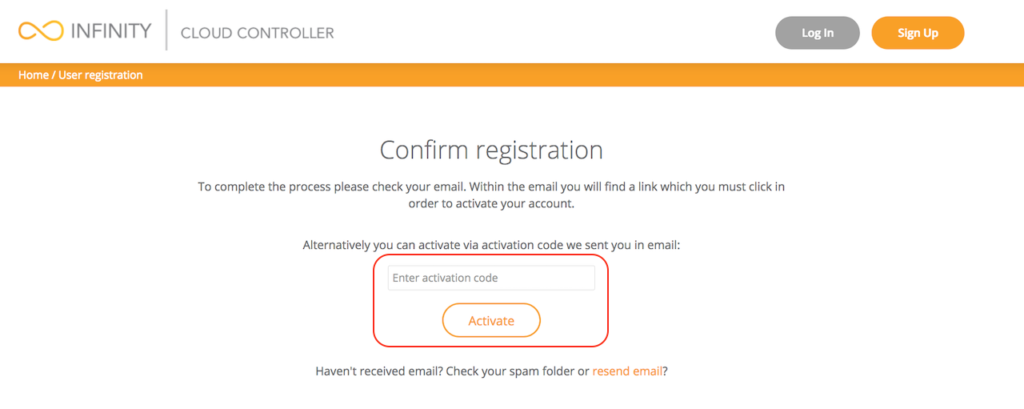
Step 4. Click to activate your account using the code:
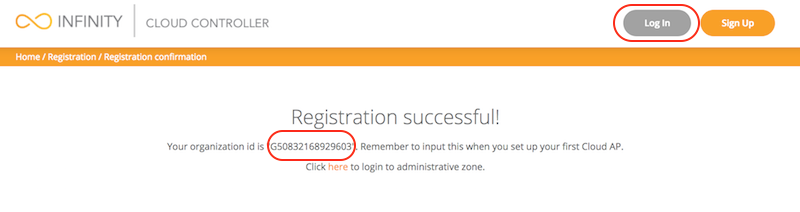
 Step 5. When the registration process is complete, you will receive your unique organization ID:
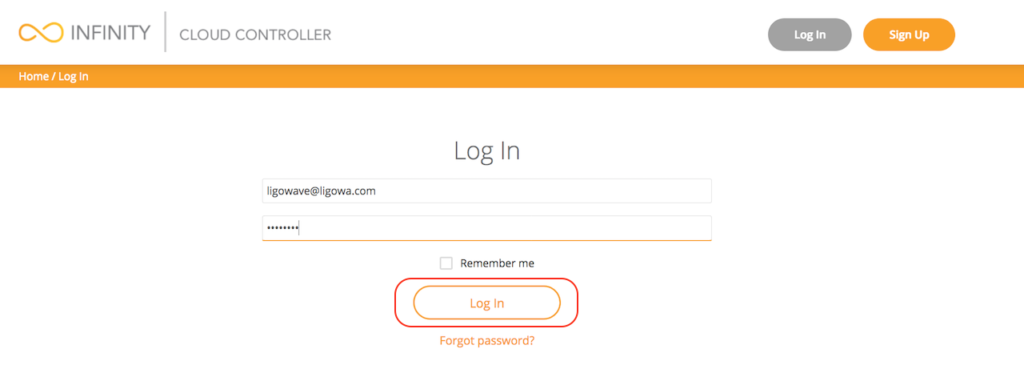
Step 6. Enter your credentials and click Log In to enter the Infinity Cloud Controller:
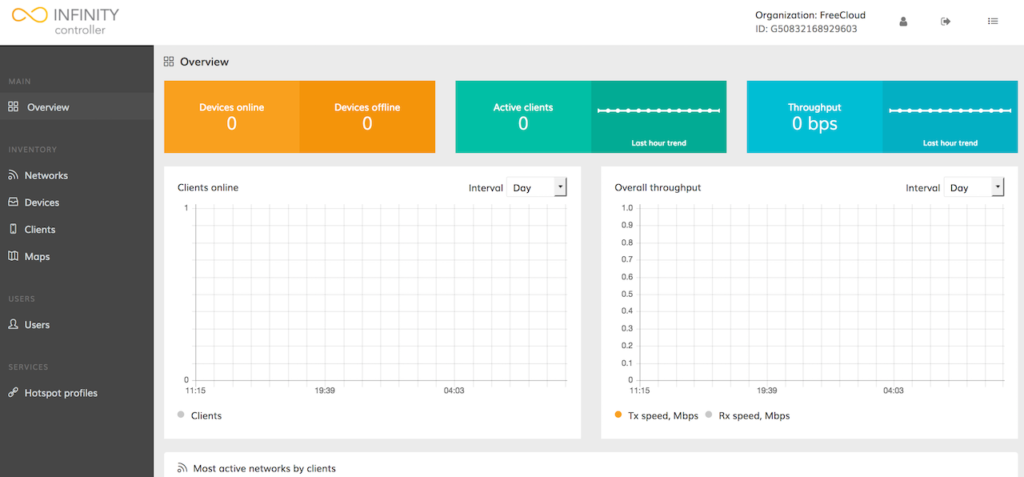
Step 7. The Infinity Controller’s management interface:
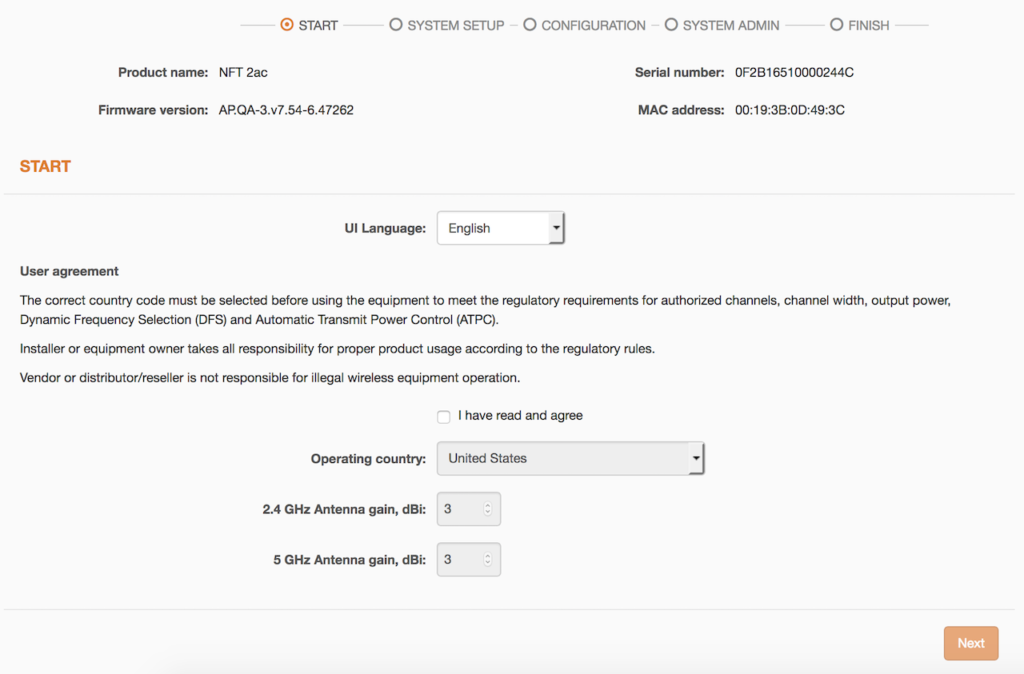
Step 8. Log on to the device (instructions on how to log in for the first time can be found in the FAQ), read the User Agreement, and select your operating country code:
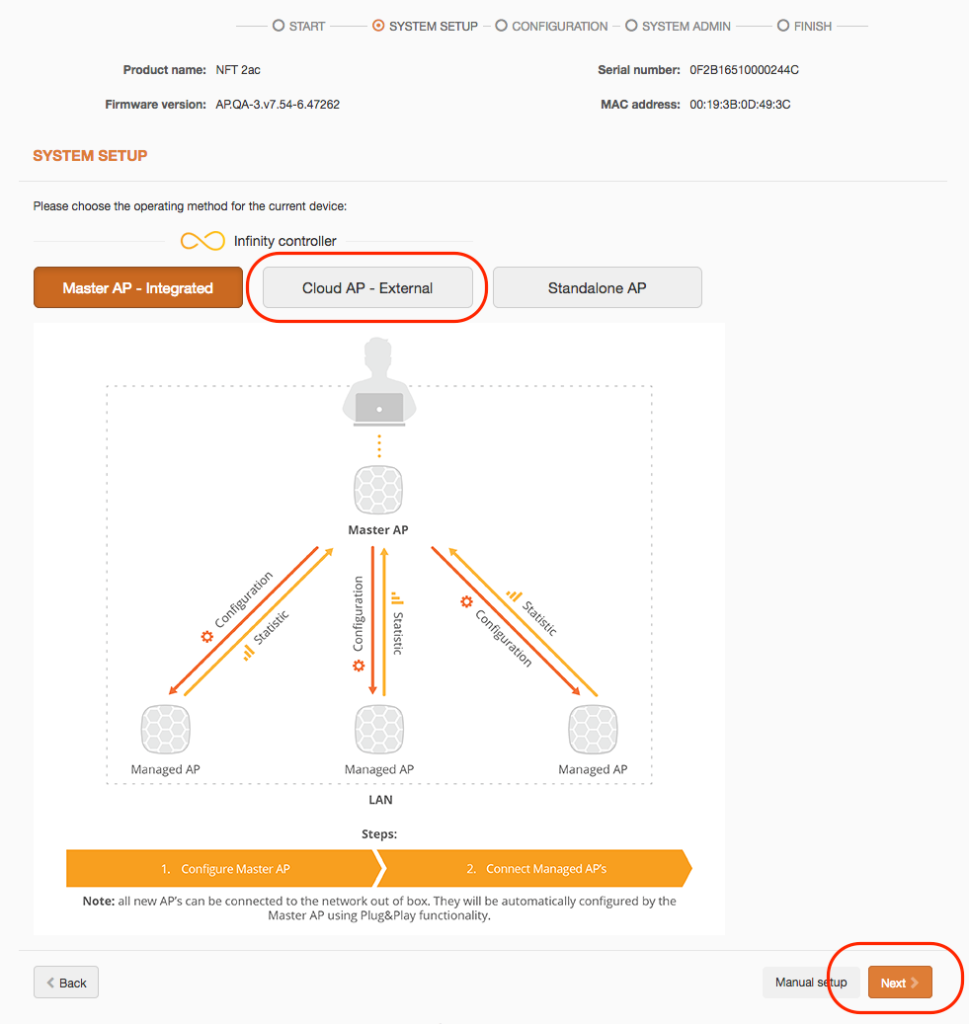
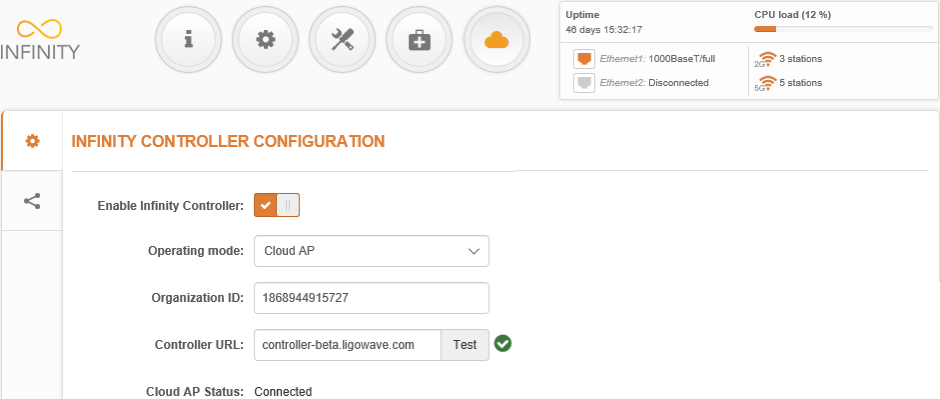
Step 9. Choose the Cloud AP to change the LigoNFT’s operating mode. Once this Cloud AP device is connected to the network, it will download the network-specific configuration from the External Infinity Controller:
Step 10. Assign the Organization ID and the Controller URL (controller.ligowave.com) of the particular Infinity Controller:

- Organization ID – enter the Organization ID provided by the External Infinity Controller.
- Controller URL – specify the correct External Infinity Controller’s URL where the Cloud AP will be registered and managed. Use Test to check the availability of the controller’s URL.
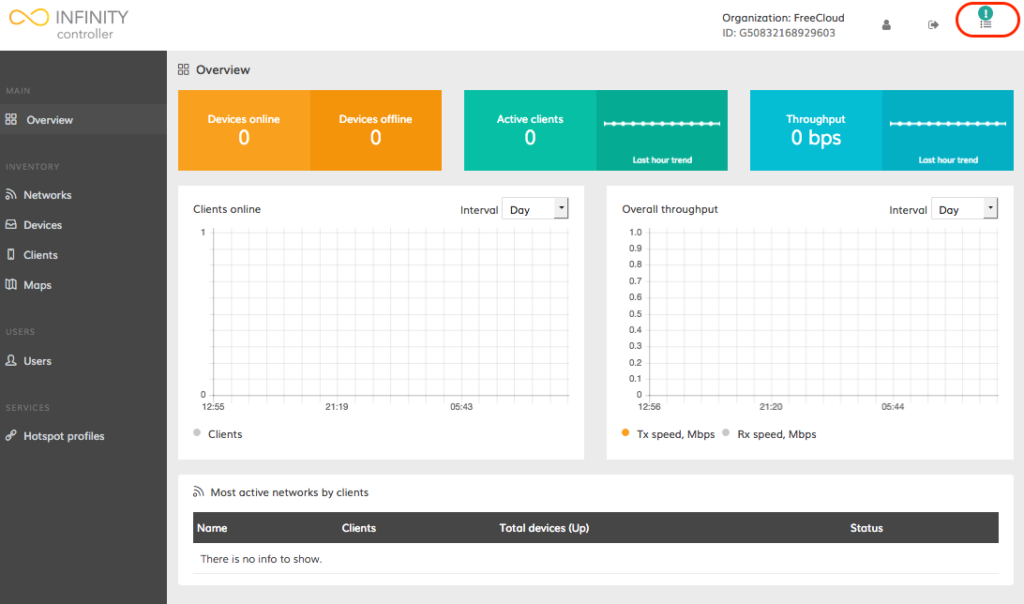
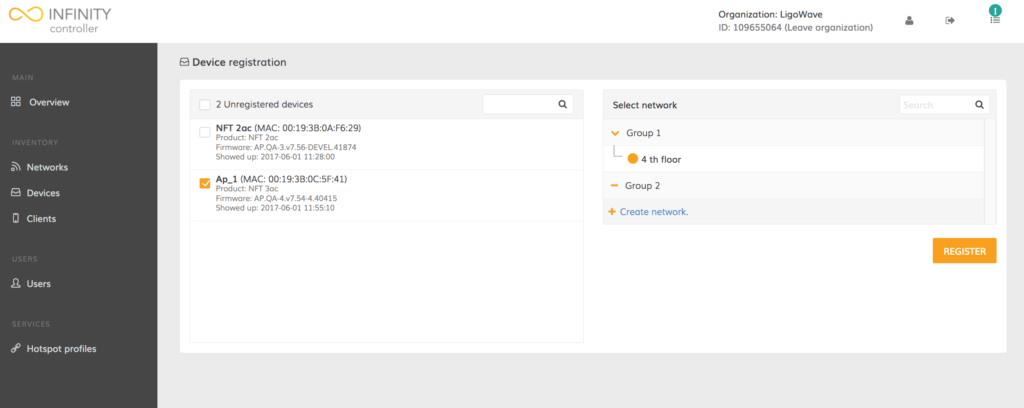
Step 11. Once the device is configured, load the Infinity Controller’s management interface and wait for the device to appear under the unregistered devices list. Wait until the green exclamation icon appears on the upper-right corner of the web management system and click it:
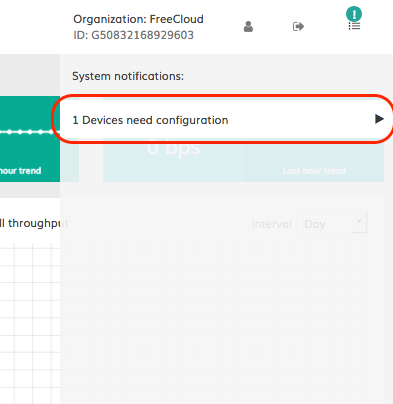
Step 12. Click on the exclamation icon. The notification indicating the count of the unregistered devices will appear:
Step 13. Click on the notification and select the devices for registration to the selected network:
Detailed instructions on how to configure the Infinity Cloud Controller can be found here.
Introduction
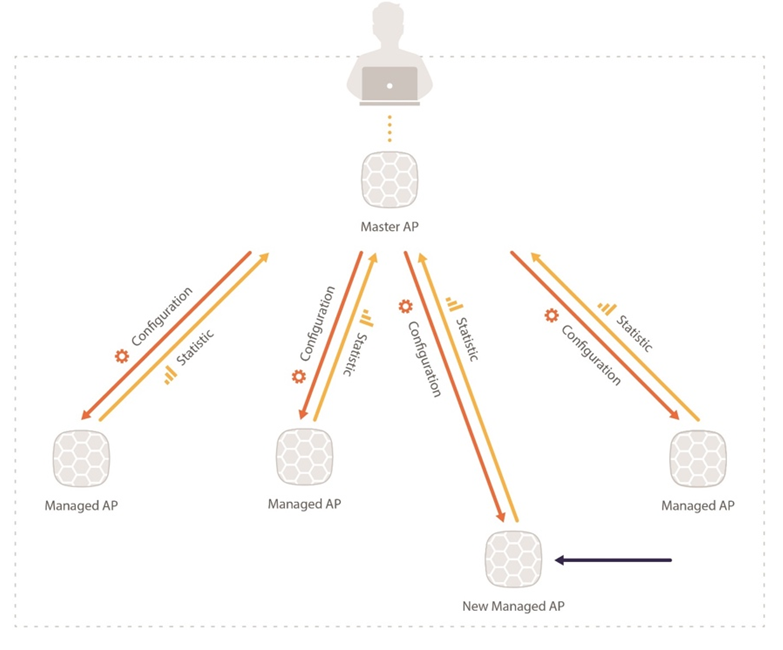
In this scenario, the first device will be designated to act as the control unit, called the Master AP. It will automatically configure each new device connected to the same network (subnet), thus creating a self-configuring Infinity Controller system. There is no need to install any management software—configuration is done on the Master AP only and then it is applied to all devices on the network.
Once a new out-of-the-box device connects to the network, the Master AP will upload the configuration for each Managed AP onto the network. The setup of a custom configuration is made on the Master AP web management system and the same parameters will be assigned to each device connected to the same network automatically, thus creating centralized configuration from a single device.
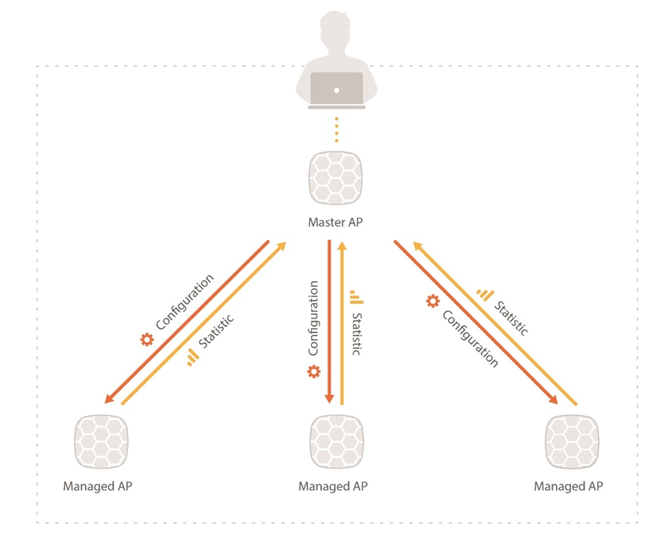
Integrated Infinity Controller system requirements:
- one device operating as the Master AP and other devices operating as Managed APs;
- all devices present on the same network;
- DHCP server running on the network.
Setup of New Master AP
To set up the Integrated Infinity Controller system, first configure the Master AP. All of the parameters that are configured on the Master AP are automatically applied to all Managed APs connected to the same network.
Follow these steps for quick Master AP configuration using the initial setup wizard:
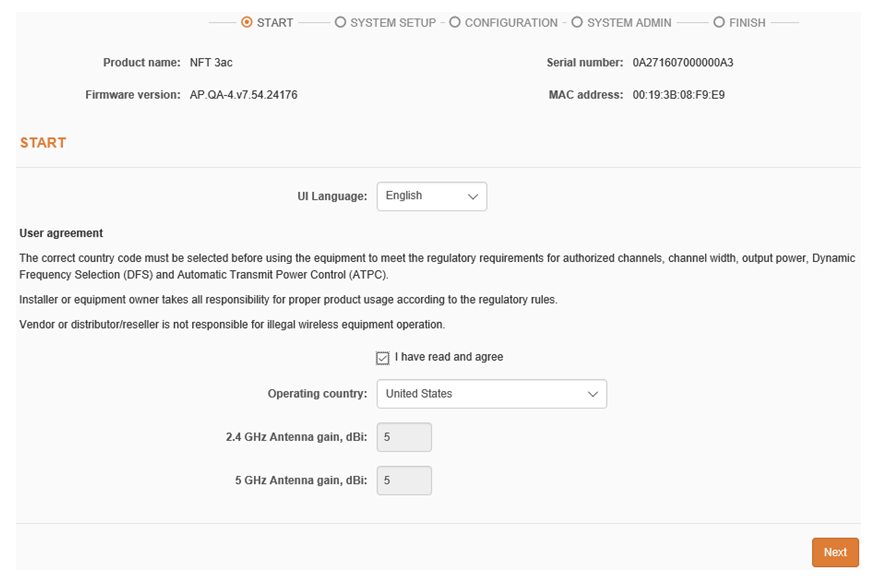
Step 1. Connect the PC to the device using Ethernet.
Step 2. Launch the web browser.
Step 3. Enter the device’s IP address in the web browser’s IP field and enter the default login settings (admin/admin01).
Step 4. Below is the initial screen, presenting the user agreement and some options. Agree to the user agreement, select the operating country, and set the radio channels and RF output power values permitted in the selected country and regulatory domain. Then, click Next.
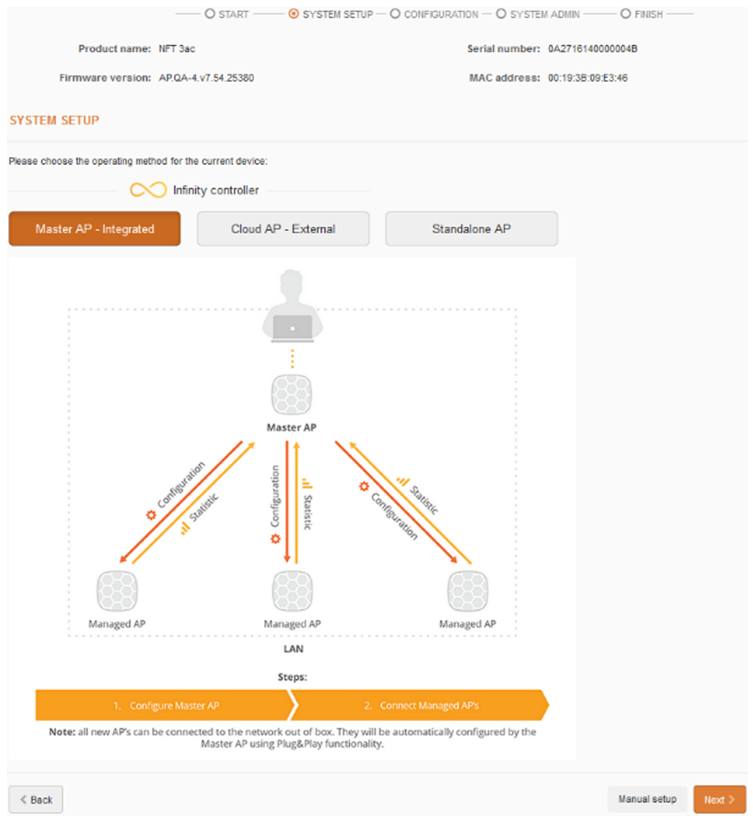
Step 5. Set the device’s operating mode to Master AP – Integrated and click Next:
Step 6. Set the following parameters for the Master AP and click Next:
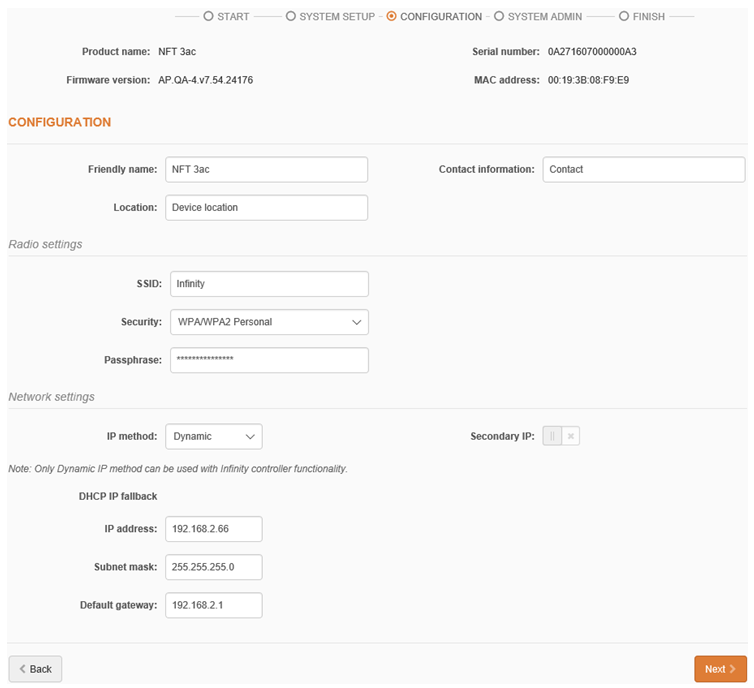
- Friendly device name – provide a meaningful identifying name to the device.
- Contact information – provide the name of the person to contact regarding the device (such as a network administrator).
- Device location – briefly describe the location of the device.
- SSID – specify the SSID of the wireless network.
- Security – set up the security for the Integrated Infinity Controller’s system (WPA/WPA2 Personal, WPA/WPA2 Enterprise).
- IP settings – set the device to operate under the Dynamic IP mode (if not already set up) as the Integrated Infinity Controller requires dynamic IP assignment for all units.
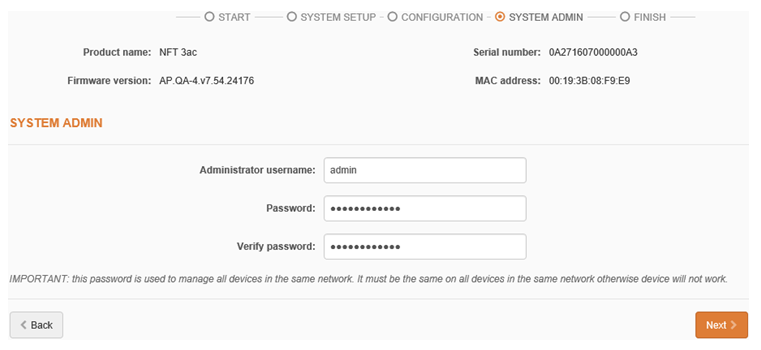
Step 7. Set the administrator’s username and password and then click Next:
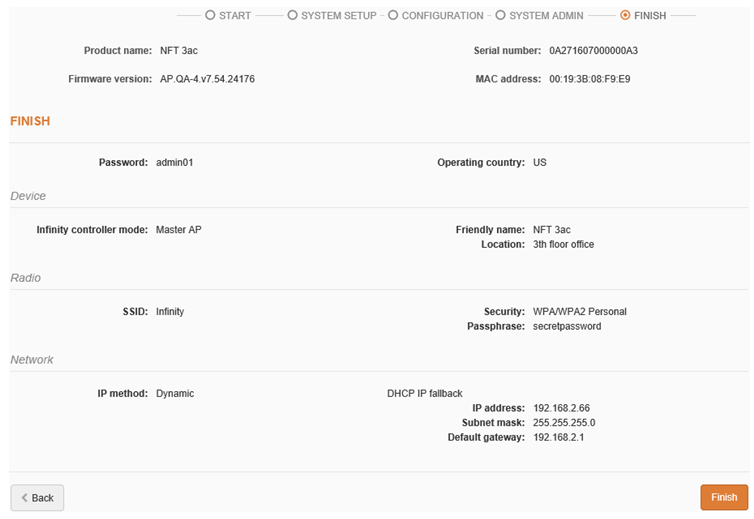
Step 8. Verify the Master AP configuration and click Finish to conclude the setup:
To change other parameters not included in the Quick Setup Wizard, navigate the GUI appropriately and change the desired parameters. All settings changed on the Master AP will be automatically uploaded to all of the Managed APs in the Infinity Controller’s network.
Adding a New Managed AP
If the user wishes to increase the number of devices within the network or to replace an existing one (due to malfunctions), simply power up a new device out-of-the-box and connect it to the network. It will be automatically added to the Integrated Infinity Controller’s system using Plug & Play.
Replacing the Master AP
If the Master AP goes down, all of the Managed APs will continue to function independently. To make the Infinity Controller network full again, simply install and configure a new devices to function as the Master AP.
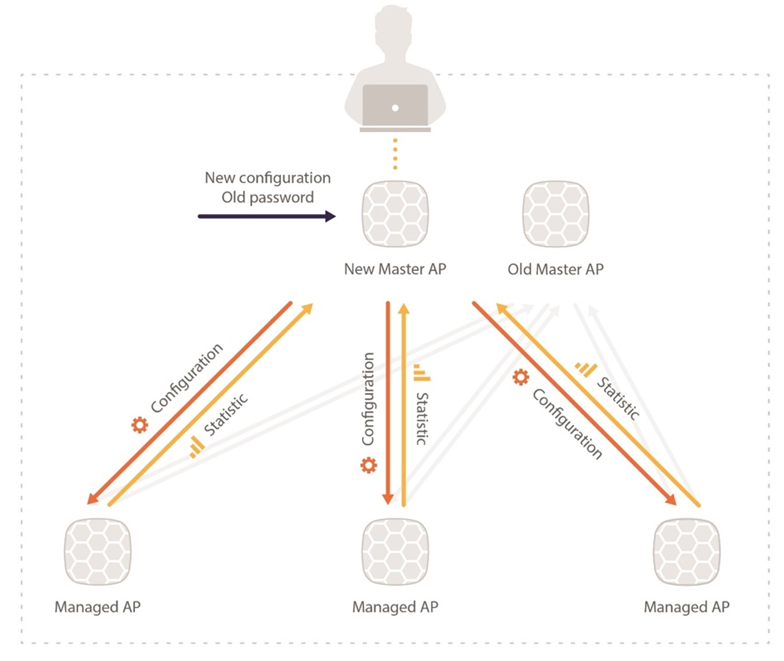
How to replace the Master AP:
- Connect the new AP directly to the computer using the UTP cable. The default device IP is provided by the DHCP server and falls back to 192.168.2.66, if necessary.
- Power up the device.
- Connect to the device over the web management interface and set up the Master AP.
- Connect the configured Master AP to the network.
- All of the Managed APs will connect to the new Master AP automatically.
Control Managed APs
To view and manage the Infinity Controller’s devices, log on to the Master AP’s web management interface and navigate to the Controller menu:

The following are the Master AP’s Internal Infinity Controller settings:

- Enable Infinity Controller – enables or disables all Infinity Controller functionality.
- Operating mode – displays the operating mode of the unit:
- Master AP – if enabled, the device controls all Managed APs operating on the network (the current operating mode).
- Managed AP – if enabled, the unit will wait for automatic configuration from the Master AP running on the network.
- Cloud AP – if enabled, the unit will wait for automatic configuration from the registered External Infinity Controller.
- Managed AP table – displays all of the managed APs connected to the current Integrated Infinity Controller network.
Managed AP Table
This table displays all of the Managed APs found on the network. Active units are indicated in orange, while inactive Managed APs are displayed in grey:

Users can change some Managed AP parameters individually. To load the individual settings, click on the configuration (gear) icon.
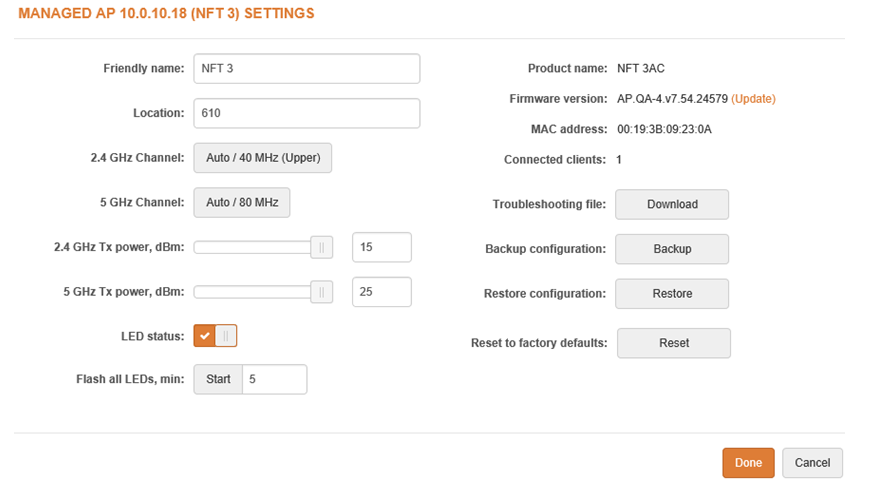
- Friendly name – a meaningful device name used to easily identify it.
- Location – briefly describe the physical location of the unit.
- Channel – displays what channel the AP is operating on or that the auto-channel function is enabled. Click the button to configure the channel.
- Tx power, dBm – control the unit’s radio transmitting power.
- LED status – enable or disable all LEDs. If disabled, LEDs will not light up on the unit.
- Flash LEDs – use this function to identify a particular unit. Once enabled, all LEDs of the unit will flash for 5 minutes (changeable parameter) thus helping identify the location of the unit in the area.
- Connected clients – displays the number of connected client to this particular Managed AP.
- Troubleshooting file – generate and download a troubleshoot file with device’s status information which may help in resolving support issues.
- Backup configuration – click to download current configuration file. The configuration file is useful to restore a configuration in case of a device misconfiguration or to upload a standard configuration to multiple devices without the need to manually configure each device through the web interface.
- Restore configuration – click to upload an existing configuration file to the device.
- Reset to factory defaults – click to restore unit’s factory configuration.
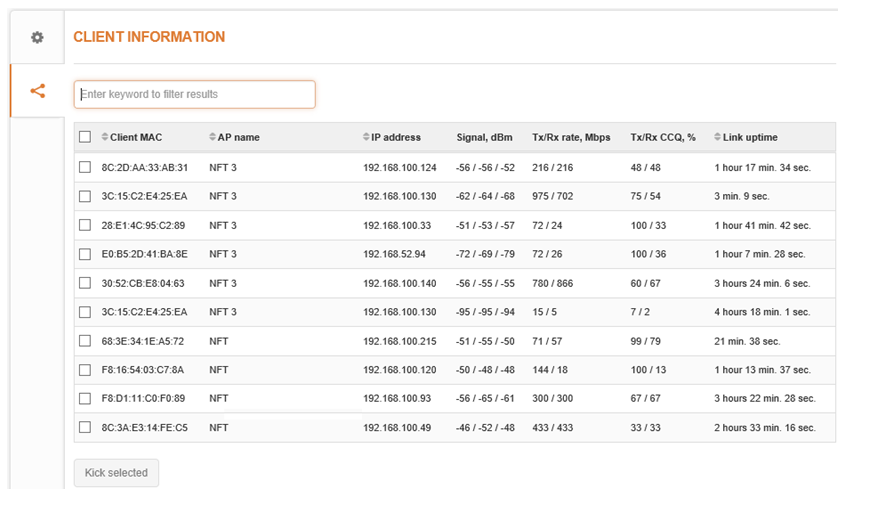
Wireless Clients Table
To view the wireless clients connected to each master AP and Managed AP, navigate to Controller > Client Information:
Creating a network
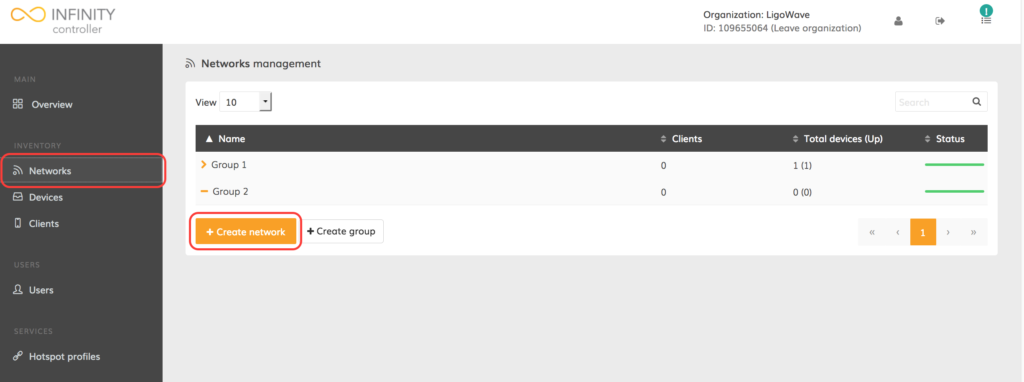
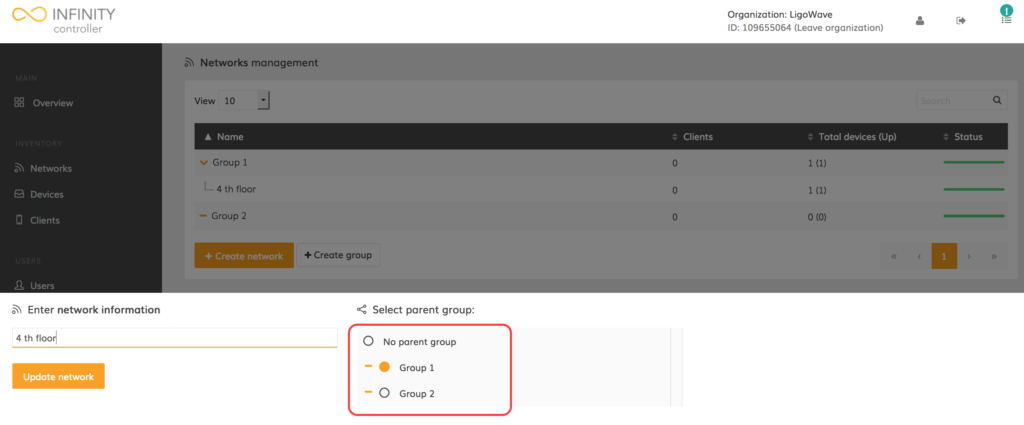
The Infinity Controller can categorize devices into logical groups and networks. Follow these steps to create a new network and to assign it to a group in the Infinity Controller
Step 1. Click on Networks (found in the navigation menu on the left side of the screen). An empty group table should open up.
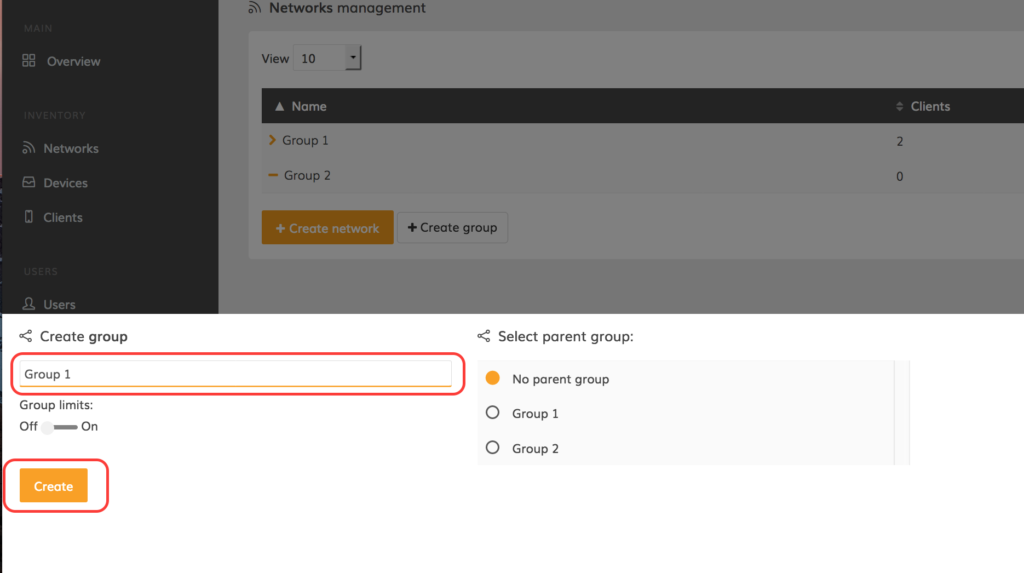
Step 2. Click Create group to add a new group.

Step 3. Indicate the group’s name and select to whether set the current group as a part of a parent group. Once done, click Create group:
Step 4. Click on Networks (found in the navigation menu on the left side of the screen). An empty group table should open up.
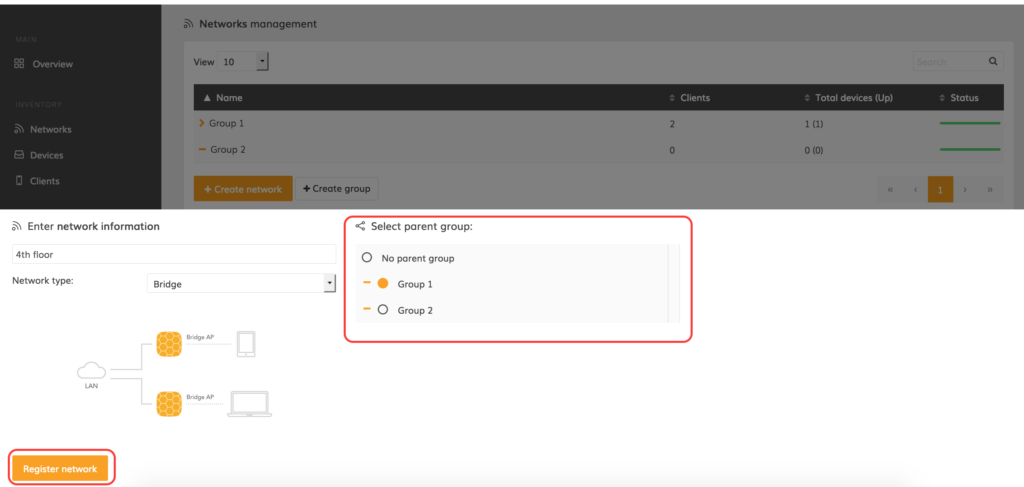
Step 5. Click Create network to add a new network.
Step 6. Indicate the network’s name and select to whether set the current network as a part of a parent group. Once done, click Register network:
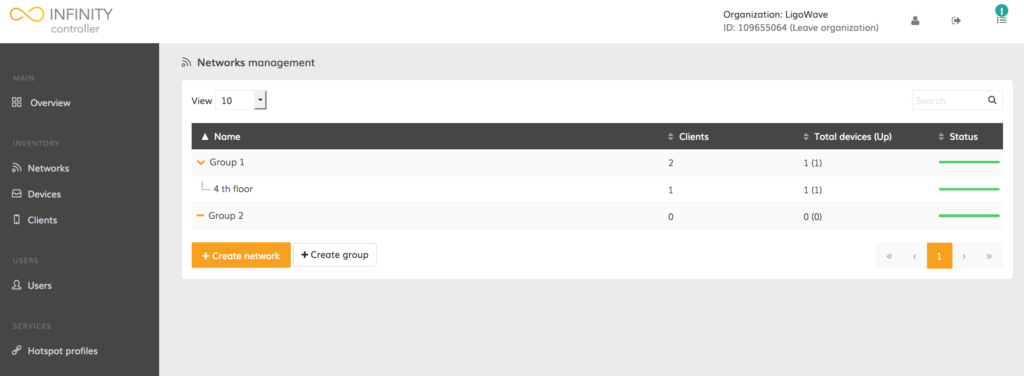
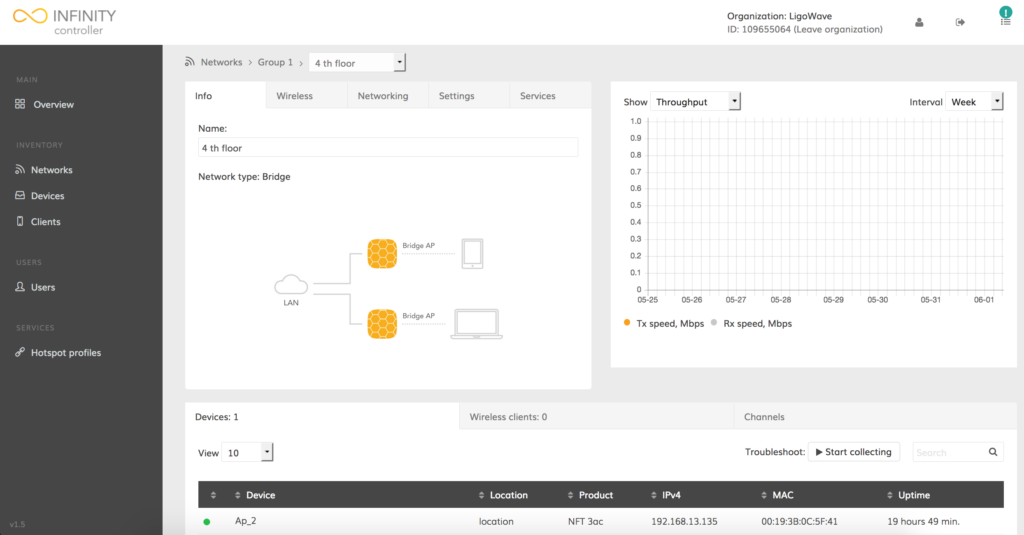
The newly-registered network will now be visible in the network management table. This table contains information on how many devices are registered onto the network, what the status is each of these devices, and the number of wireless clients present on the network.
Adding device to a network
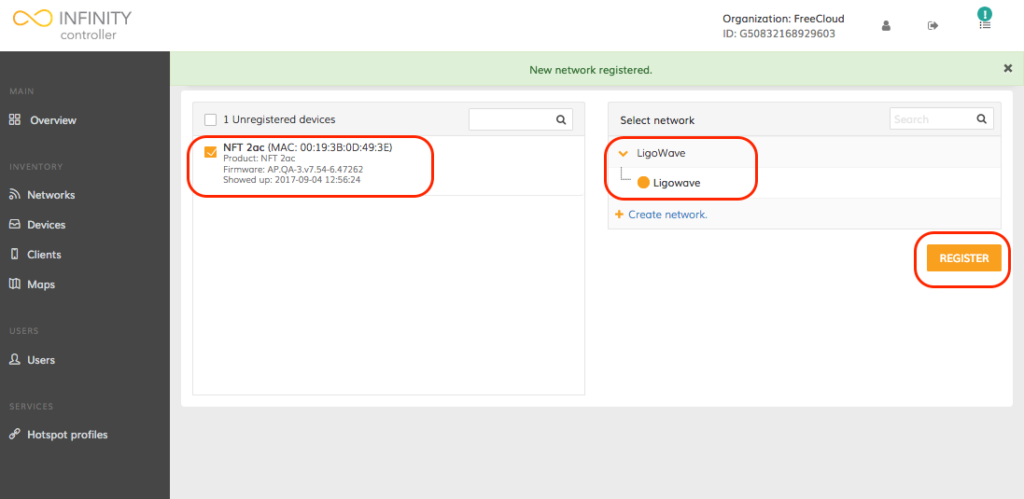
Before monitoring and configuring LigoWave devices, they must first be added to a network within the Infinity Controller. Device registration to the Infinity Controller begins on the device’s end. Only a properly configure device will be able to send information to the Infinity Controller, thus allowing registration and management. Follow these steps to add a device to the network.
Step 1. Access the device management suite
Step 2. Navigate to the Controller menu.
Step 3. Set Operating mode to Cloud AP, and indicate the Organization ID and the Controller URL of a particular Infinity Controller:
Step 4. Once the device is configured, load up the Infinity Controller Management Interface and wait for the device to appear in the list of unregistered devices.
Step 5. When a green exclamation mark appears on the upper-right corner of the management suite, click it.

Once clicked, a notification should pop up, indicating the number of unregistered devices:

Step 6. Click on the notification
Step 7. Select the devices to be registered onto the selected network and click Register:
Step 7. Once the registration process is complete, the device should be listed under the selected network:
Modifying Networks
The Infinity Controller may contain a lot of networks with many different devices. These networks should be named and/or grouped appropriately to facilitate management.
Navigate to Networks and click Edit (pencil icon) next to the appropriate network:

Here users are able to change the network name and/or assign the network to a group. Update the fields as necessary:
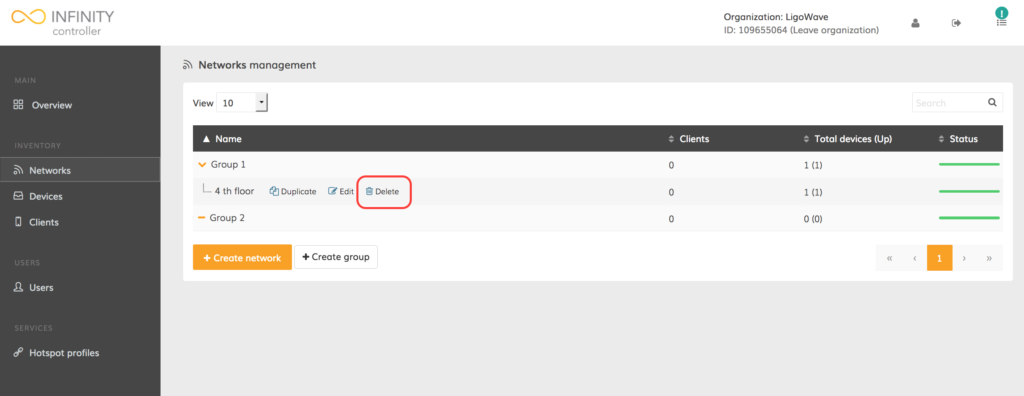
Deleting Networks
Networks can be deleted when they are no longer needed on the Infinity Controller. The devices from a deleted network will remain as unregistered devices and users will be able to assign them to new networks later.
Navigate to Networks and click Delete (trash bin icon) next to the appropriate networks:
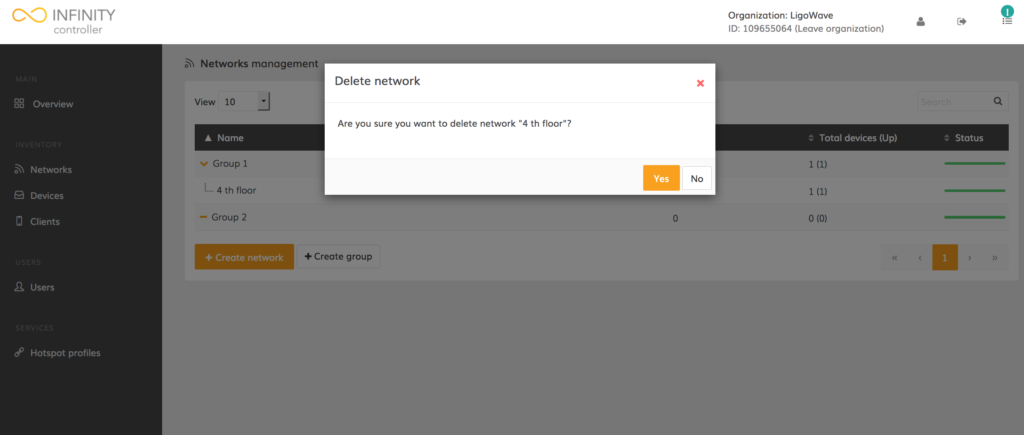
Click Yes to confirm the permanent deletion of a network:
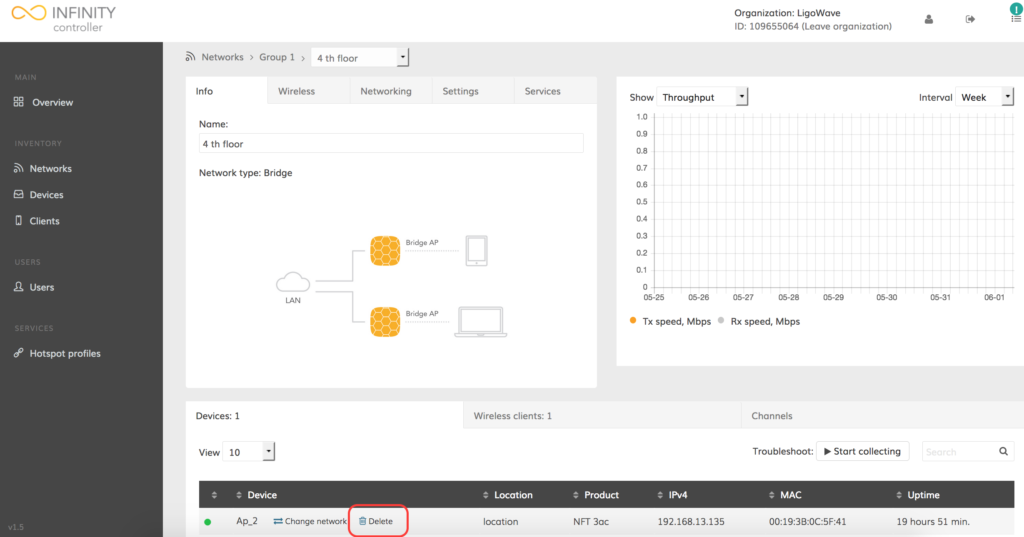
Deleting Devices
Sometimes devices need to be removed from networks or from the Infinity Controller. This can be due to replacement, moving to a different location, or other reasons. Once a user deletes a device from the network, it will be assigned to the list of unregistered devices. The only way to remove the registered device from the Infinity Controller permanently is to reset the device to its default factory settings.
Follow these steps to remove a device from the Infinity Controller:
Step 1. Find the necessary device by navigating to the Networks menu.
Step 2. Click Delete (trash bin icon) next to the necessary device:
Step 3. Click Delete to confirm the deletion process, or click Cancel to terminate deletion.
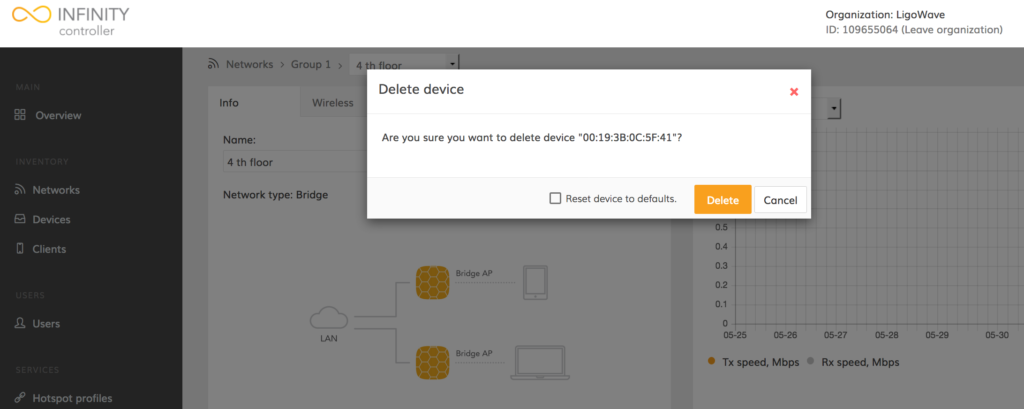
The option to reset the device to its default factory settings restores the device’s initial configuration and permanently deletes the device from the Infinity Controller.
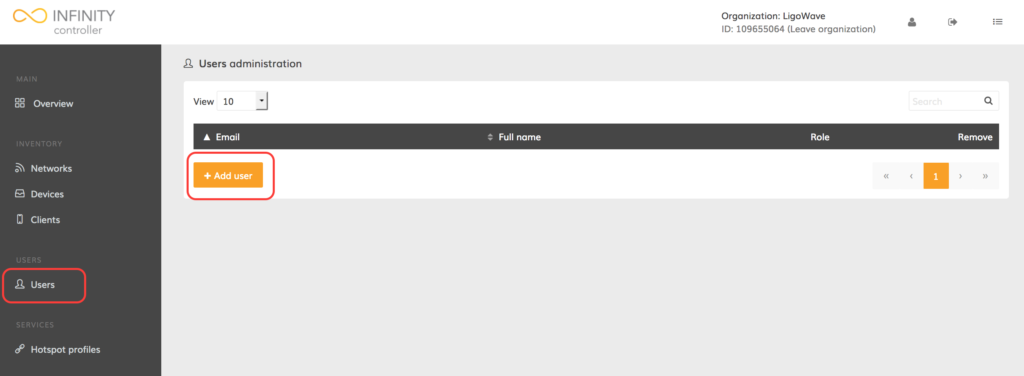
Adding/Deleting User Accounts
There are four types of user accounts, each possessing different permissions and limitations:
- Owner – this user account is provided after registration on the Infinity Controller. The owner can control all system functions and their account cannot be deleted.
- Administrator – this user has complete access to all networks and settings, including new account creation.
- Network manager – this user has read-write permissions, granting full access to the assigned network information.
- Network monitor – this user has read-only permissions, granting access to the assigned network information.
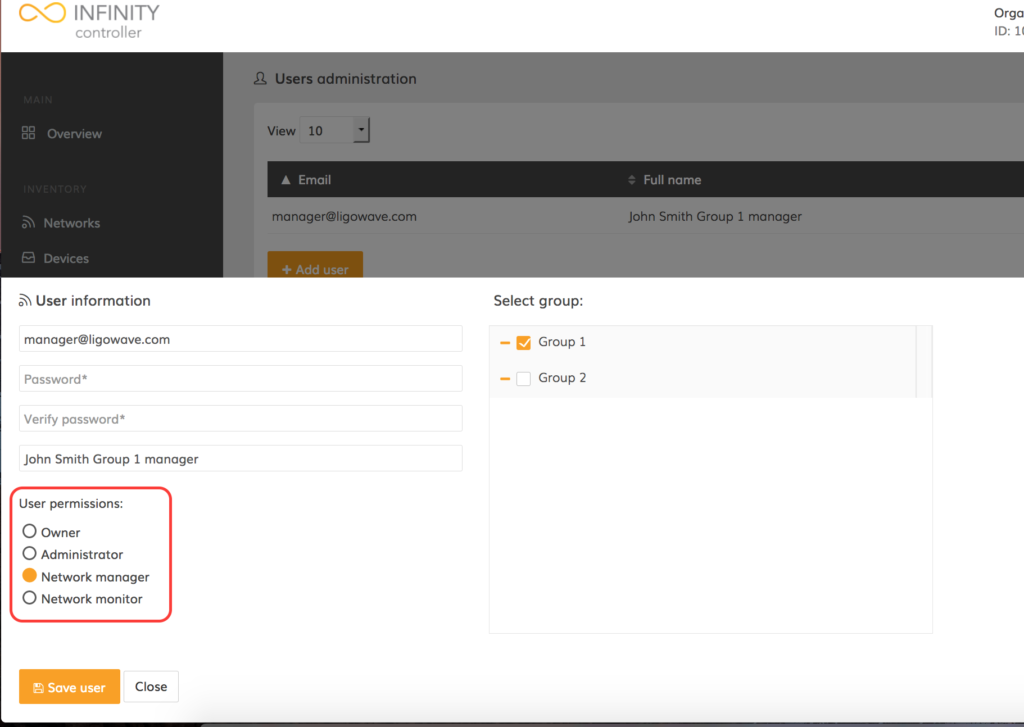
Follow these steps to add a new user with the appropriate permissions:
Step 1. Click Users to open up the user administration window.
Step 2. Click Add user:
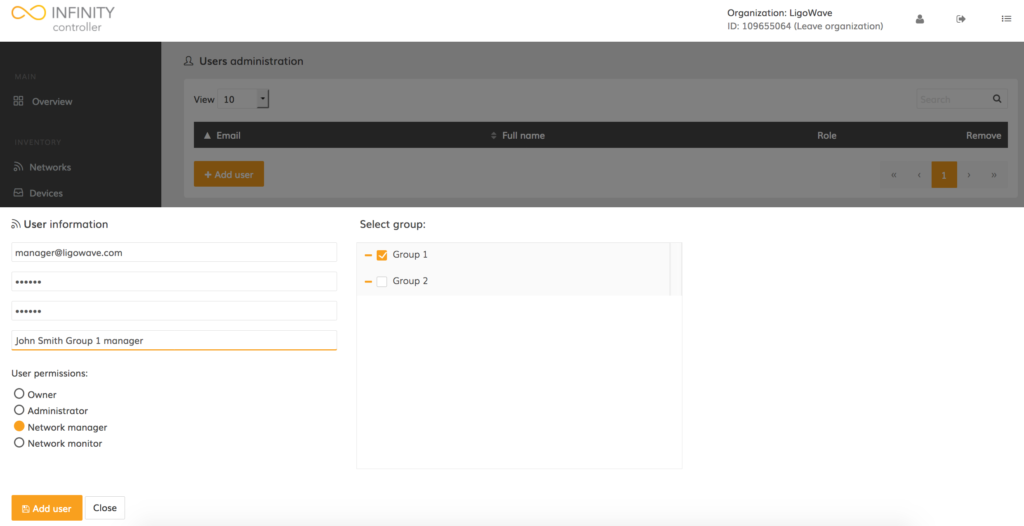
Step 3. Enter the user’s e-mail address, set a custom password, select the appropriate permissions, and assign the networks or network groups that the user will be allowed to access:
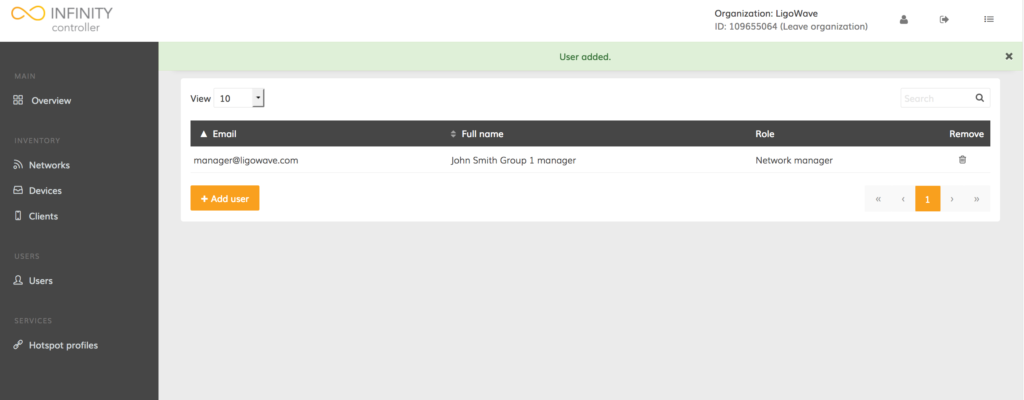
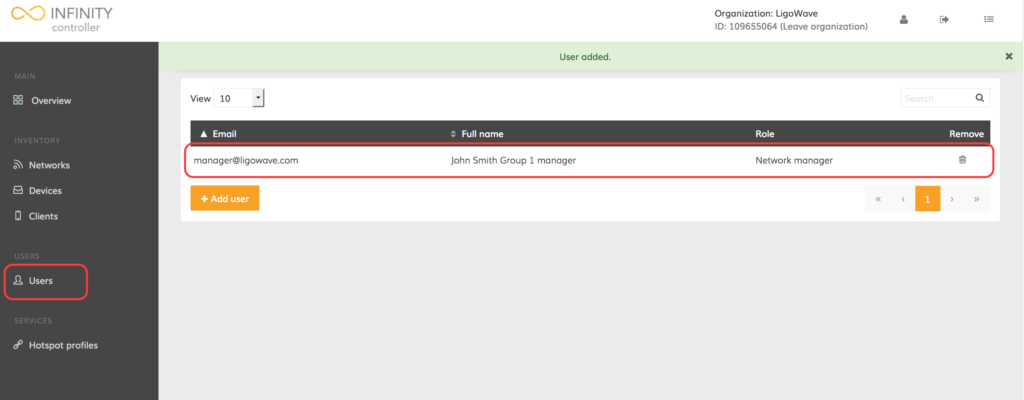
The new user account has been successfully created. This user will only be able to access 1 group.
Changing User Permissions
Follow these steps to change a user‘s permissions:
Step 1. Click Users to open the user management window.
Step 2. Click on the appropriate user to load the user’s information page:
Step 2. In the user information window, change the user account type (permissions) as necessary.
Step 3. Click Save user.
The new permission level has now been changed for the appropriate user.
Change User Password
Users who are logged in can very easily change their passwords:
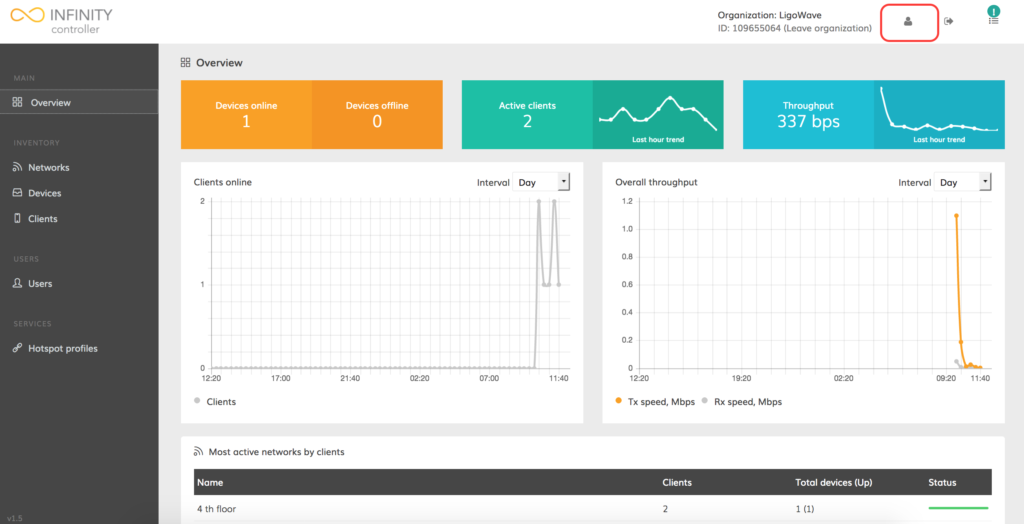
Step 1. Click on the user icon found at the top right corner to load the user profile settings:
Step 2. In the user information page, enter the current password in the Old password field and then enter the new password in the Password and Verify password fields.
Step 3. Click Save user to update the account’s password.
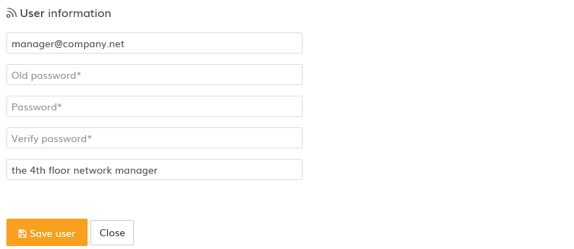
The new password has now been successfully changed.
Manual Adjustment of Wireless Channels on a Network
The Infinity Controller allows users to manage the properties of all devices within one network.
Step 1. Navigate to Networks.
Step 2. Find the necessary network name and click it to load network properties:
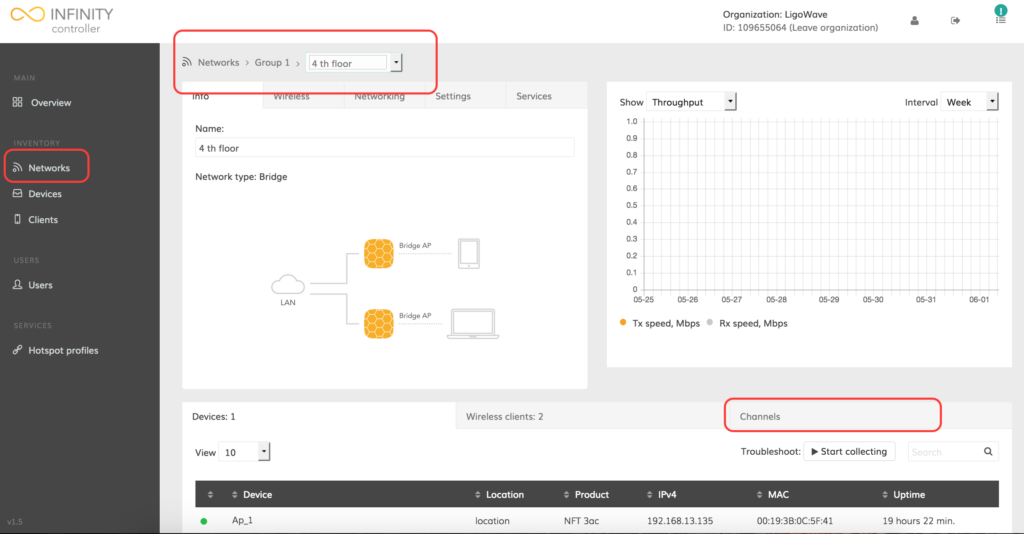
Step 3. Click Channels to load the wireless channels properties of the network devices.
Step 4. Select the required radio (2.4GHz or 5GHz) and modify the width, channel and/or enable the auto-channel feature:
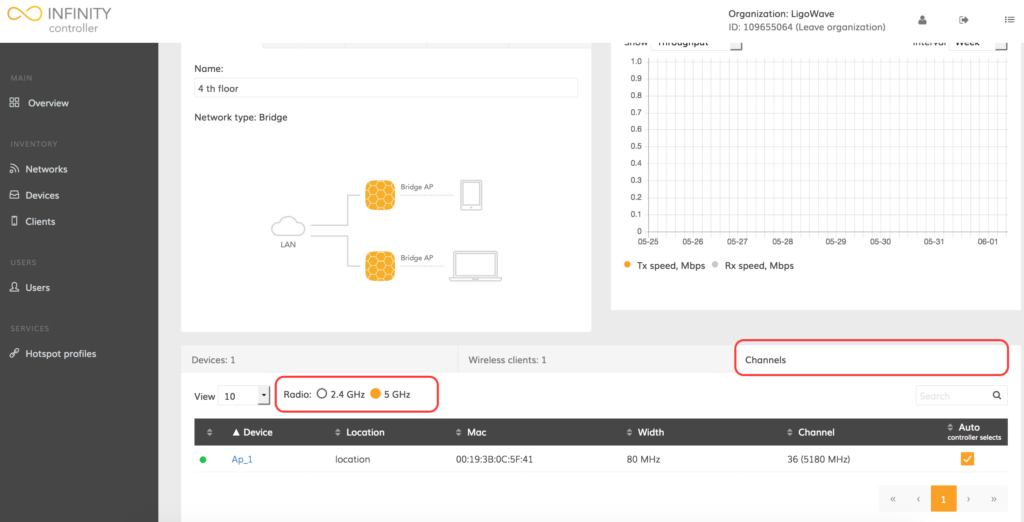
Step 5. Once the settings are changed, click Save changes.
![]()
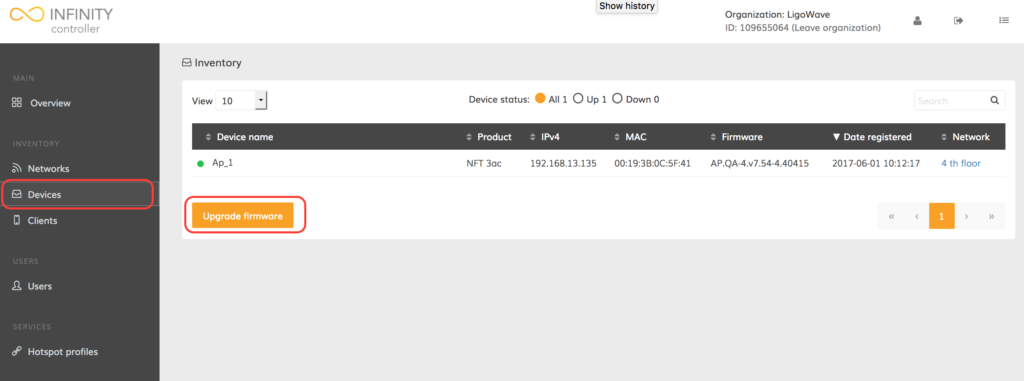
Upgrading the Firmware
Before upgrading the device, a proper firmware images must be uploaded to the Infinity Controller. Users can upgrade immediately after uploading, or schedule the device’s firmware upgrade to be performed at a later time.
Follow these steps to upgrade the firmware on the selected device(s):
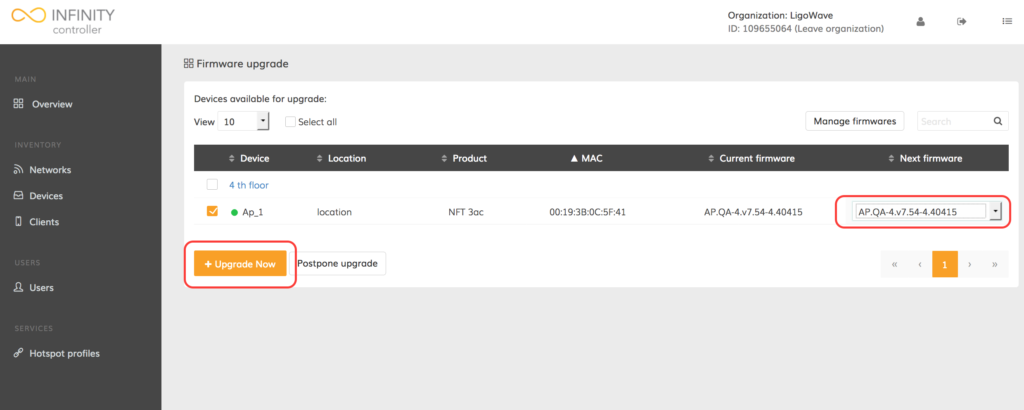
Step 1. Navigate to Devices.
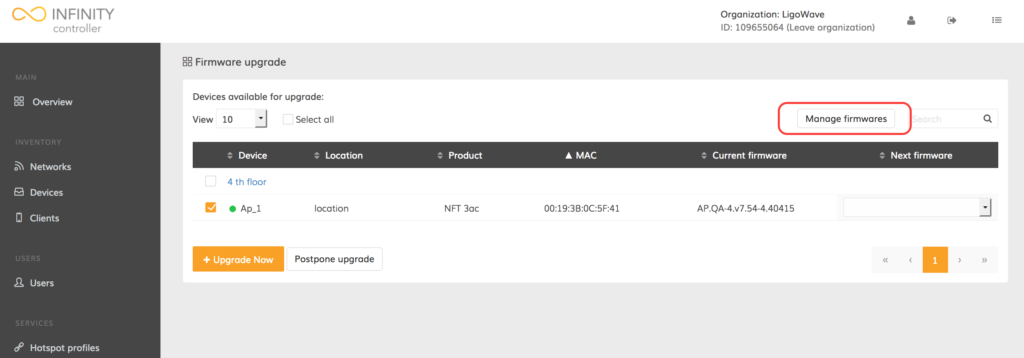
Step 2. Click Upgrade firmware. A list of upgradeable devices will be provided:
Step 3. Click Manage firmwares:
Step 4. Click Browse… to select the necessary firmware image and then click Start upload to begin the process of uploading the firmware:
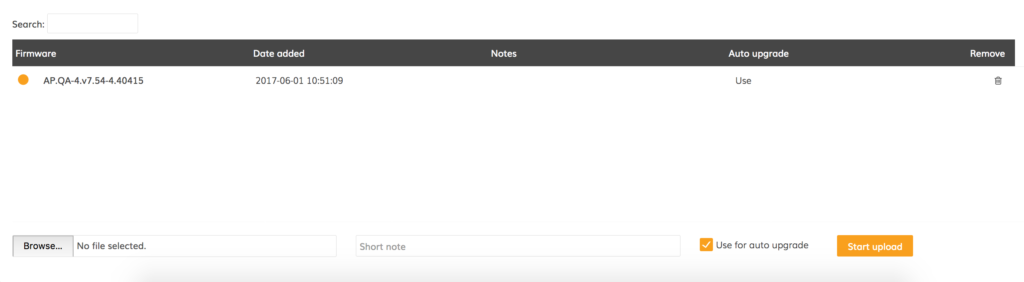
Step 5. Once the proper firmware image is uploaded to the Infinity Controller, navigate to Devices > Upgrade firmware
Step 6. Select the required device, choose the appropriate firmware image, and click Upgrade now:
Manual Device Registration
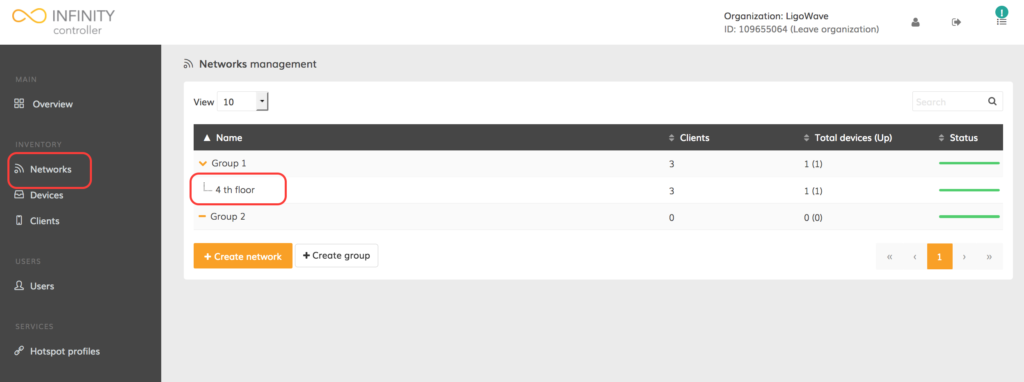
Step 1. Navigate to Networks.
Step 2. Click on the appropriate network name in the networks management table:
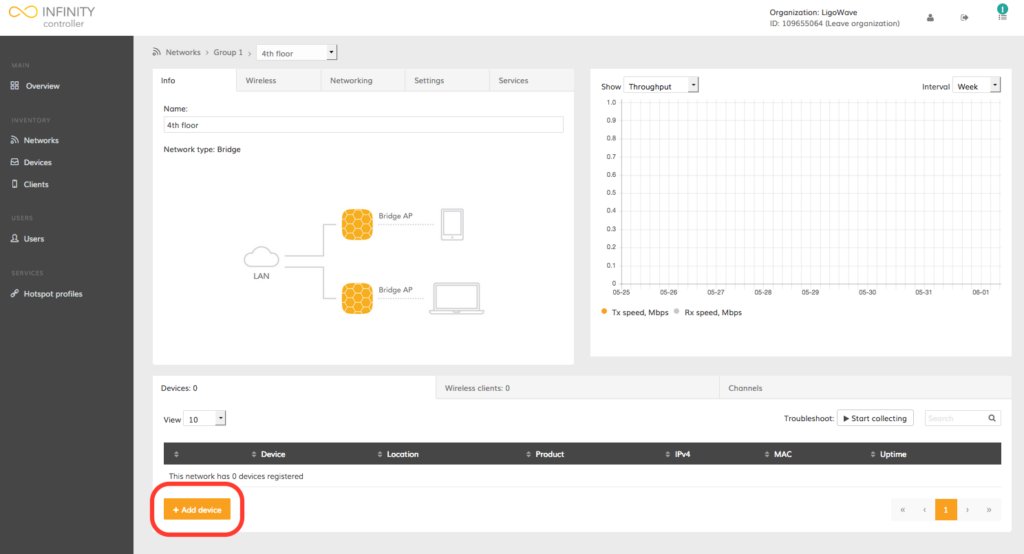
Step 3. The network page provides information about the devices within the network. To add a new device to an existing network, click Add device:
Step 4. Indicate the MAC address of a particular device(s) and click Register device:
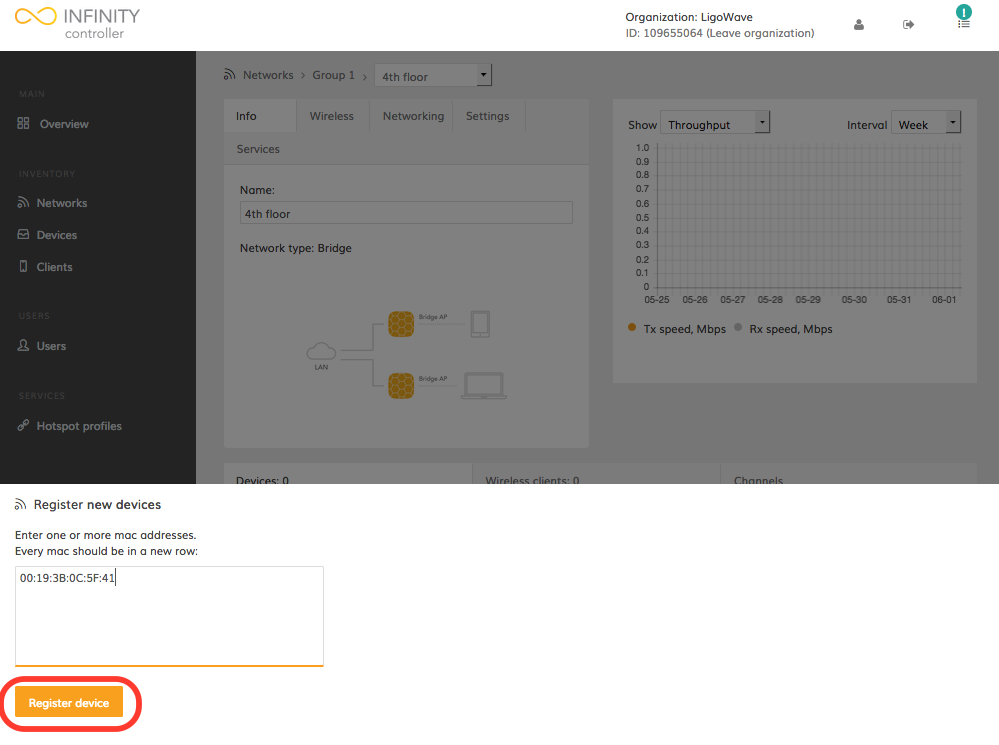
Once the device is successfully added to the network, it is necessary to wait for the device to send its information to the Infinity Cloud.
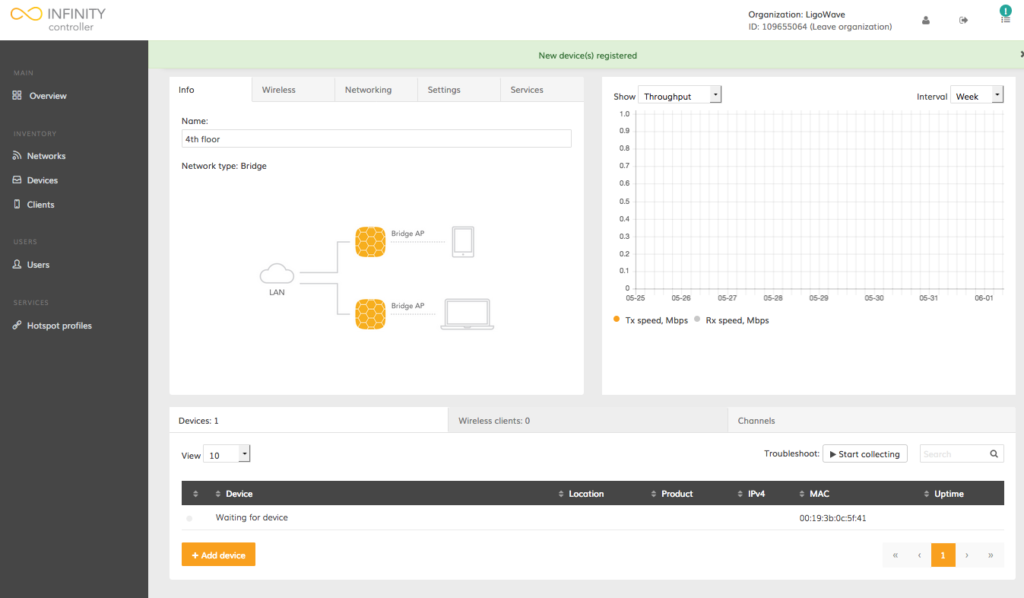
Step 5. Wait until the device sends its information:
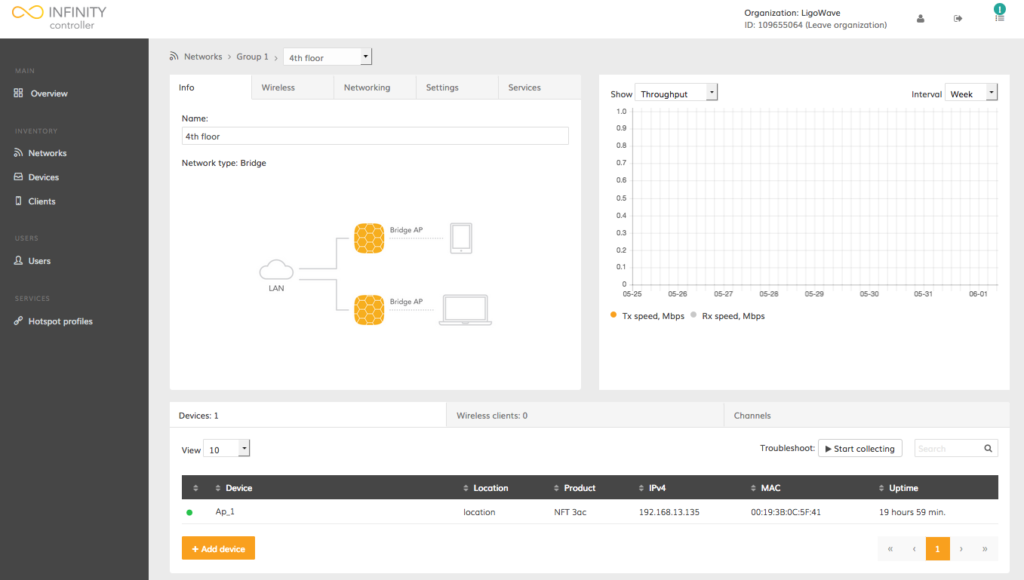
The device should now be successfully added to appropriate network, ready for configuration and monitoring.
Step 1. Get the External Infinity Controller package from LigoWave’s website:
Step 2. Install docker:
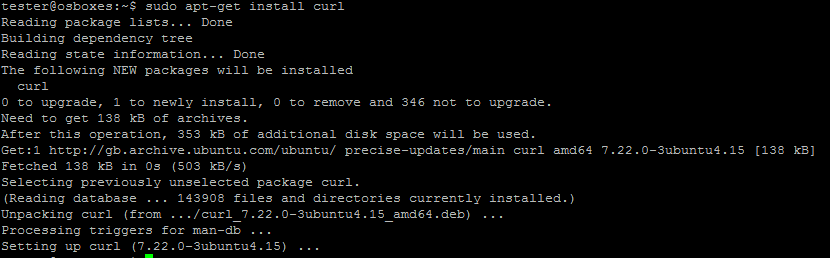
sudo apt-get install curl; curl -fsSL https://get.docker.com/ | sh

Step 3. Get the External Infinity Controller package from LigoWave’s website:
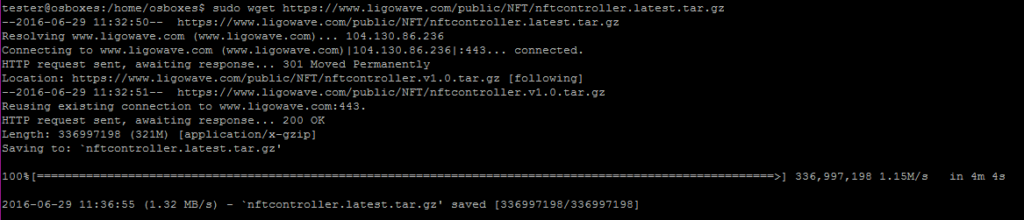
wget https://www.ligowave.com/public/downloads/nftcontroller.latest.tar.gz
Step 4. Extract the External Infinity Controller package (note that the file name can differ for each new release):
tar -xvzf nftcontroller.latest.tar.gz
![]()
Step 5. Install the External Infinity Controller:
sudo ./install.sh install
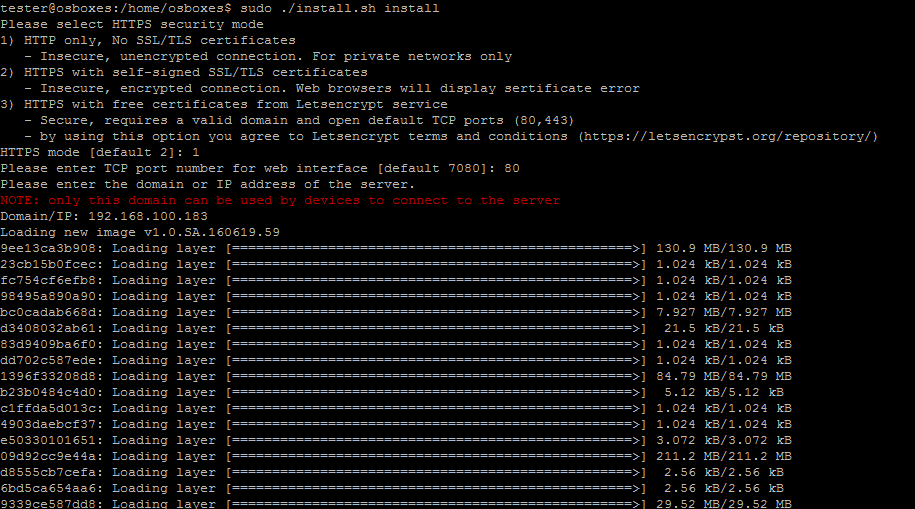
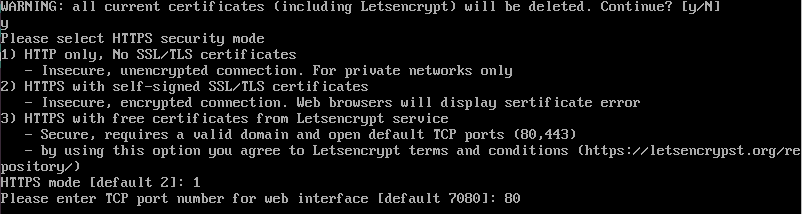
Step 6. Select the HTTPS security mode:
1) HTTP only, No SSL/TLS certificates: insecure, unencrypted connection. For private networks only.
2) HTTPS with self-signed SSL/TLS certificates: insecure, encrypted connection. Web browsers will display certificate error.
3) HTTPS with free certificates from Letsencrypt service: secure, requires a valid domain and open default TCP ports (80,443) (by using this option you agree to Letsencrypt terms and conditions).
Step 7. Enter the TCP port number for the web interface.
Step 8. Enter the domain or the IP address of the server (Linux machine).
Step 9. Launch the External Infinity Controller:
sudo nftcontroller start
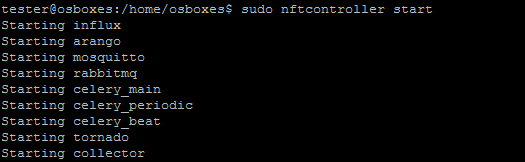
The controller should start in a couple of minutes.
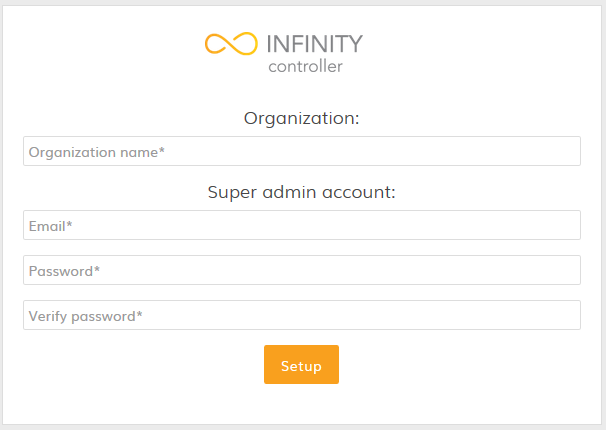
Step 10. Access the External Infinity Controller via the web interface:
Follow the steps to install External Infinity Controller on Windows OS.
Step 1. Download latest NFT-Controller VM image from the LigoWave web site:
Step 2. Download and install the latest VirtualBox software from here.
Step 3. Launch VirtualBox:
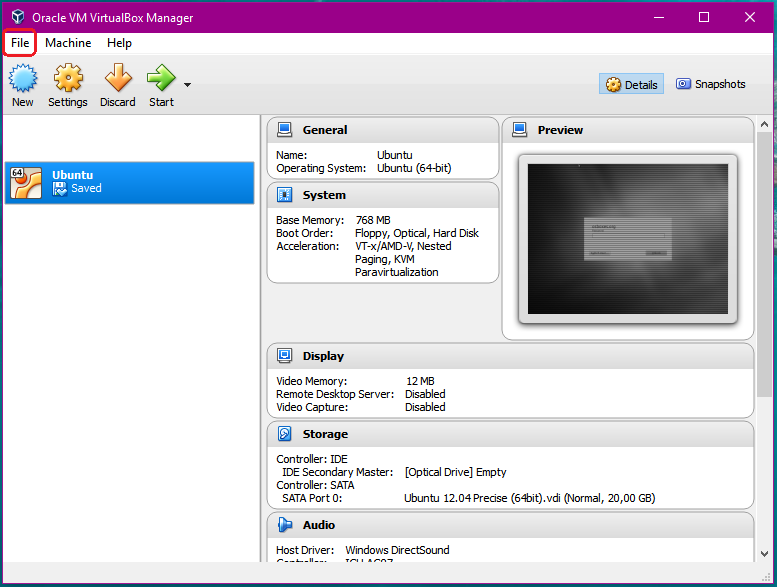
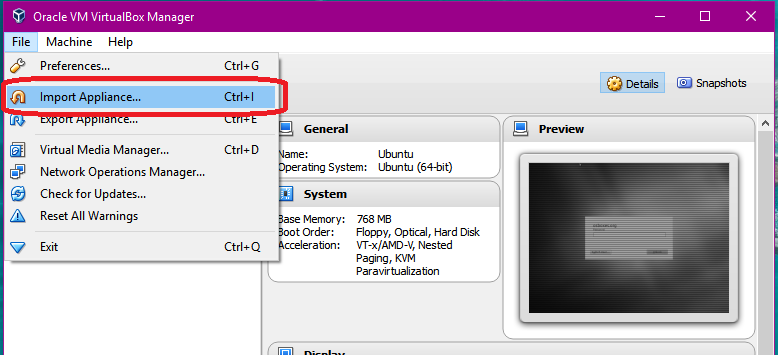
Step 3.1. Use the Import Appliance option (under File > Import Appliance) to import the NFT-Controller virtual machine (VM).
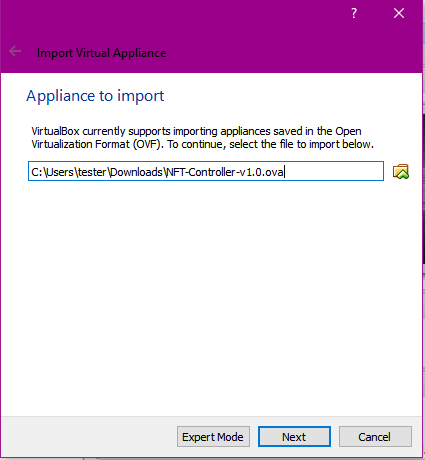
Step 3.2. Select the downloaded VM image and click Next:
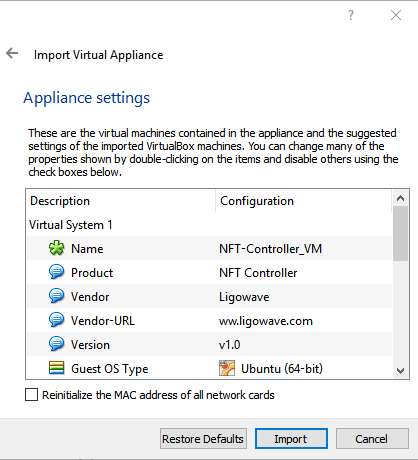
Step 3.3. Click Import:
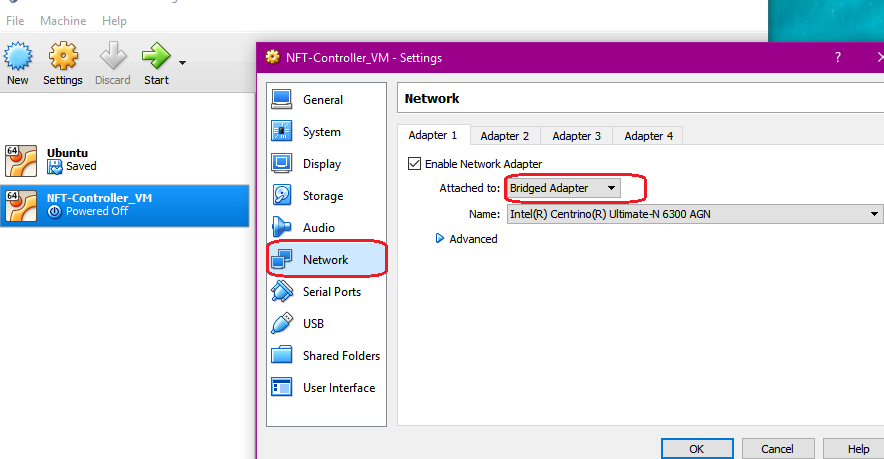
Step 4. Start the NFT Controller virtual machine. The virtual machine’s network is set to Bridge mode. VM will retrieve an IP address from the local DHCP server.
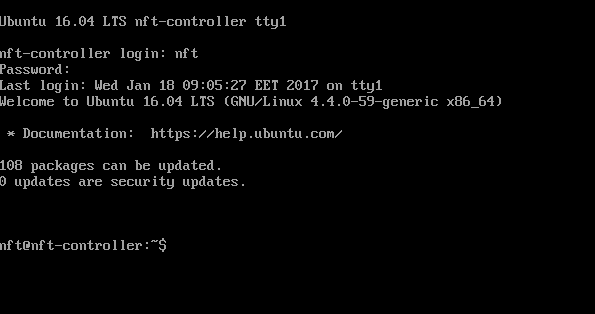
Step 5. Log in to the virtual machine. The default credentials are username nft and password admin01.
Step 5.1. Check the virtual machine IP address:
ip a

Step 6. Install the External Infinity Controller:
sudo ./install.sh install
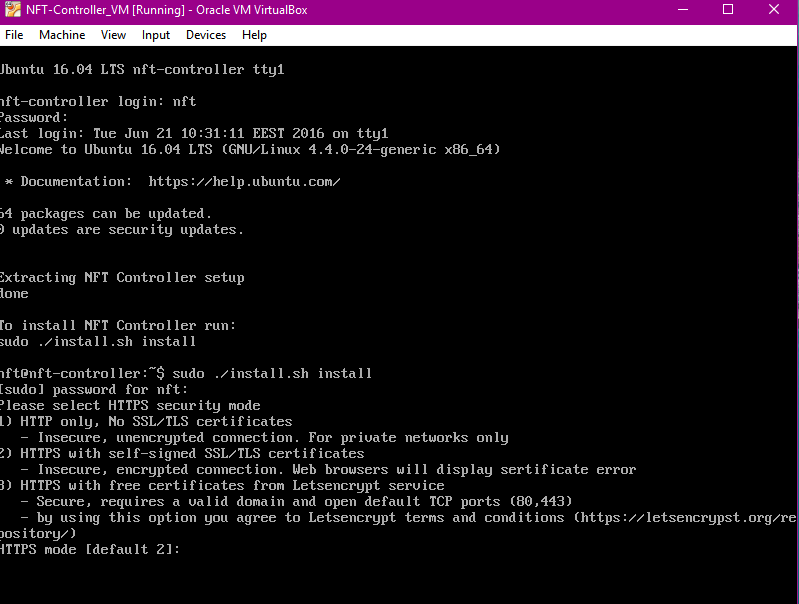
Step 7. Select the HTTPS security mode:
1) HTTP only, No SSL/TLS certificates: insecure, unencrypted connection. For private networks only.
2) HTTPS with self-signed SSL/TLS certificates (this is the default mode): insecure, encrypted connection. Web browsers will display certificate error.
3) HTTPS with free certificates from Letsencrypt service: secure, requires a valid domain and open default TCP ports (80,443) (by using this option, you agree to Letsencrypt terms and conditions).
Step 8. Enter the TCP port number for the web interface.
Step 9. Enter the domain or the IP address of the server.
Step 10. Launch the External Infinity Controller:
sudo nftcontroller start
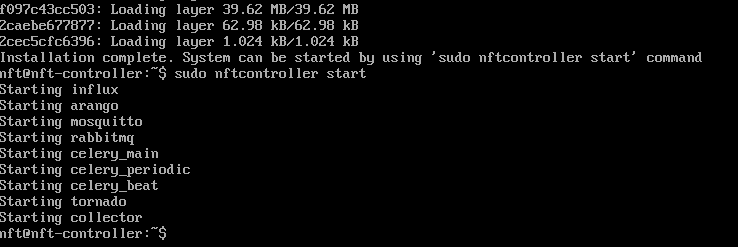
The controller should start in a couple of minutes.
Step 11. Access the External Infinity Controller via the web interface to complete the setup process.
Step 1. Use SSH to log on to the Linux server or the virtual machine where the Infinity Controller is running.
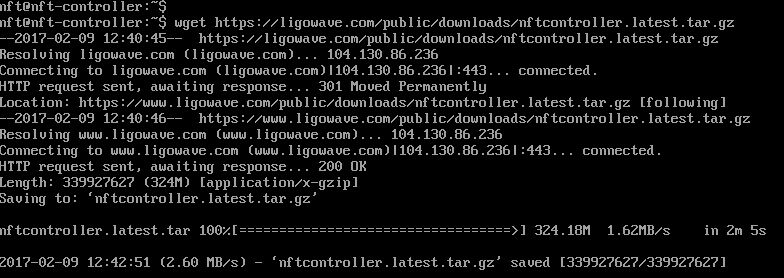
Step 2. Retrieve the External Infinity Controller package from Ligowave’s website:
wget https://www.ligowave.com/public/downloads/nftcontroller.latest.tar.gz
Step 3. Extract the External Infinity Controller:
tar -xvzf nftcontroller.latest.tar.gz
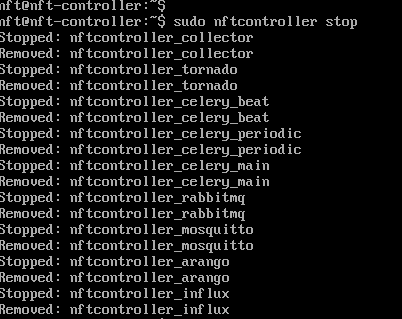
Step 4. Stop running the Infinity Controller:
sudo nftcontroller stop
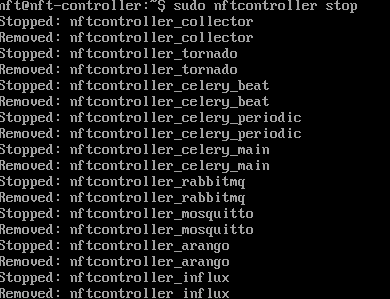
Step 5. Start upgrading the Controller:
sudo nftcontroller install
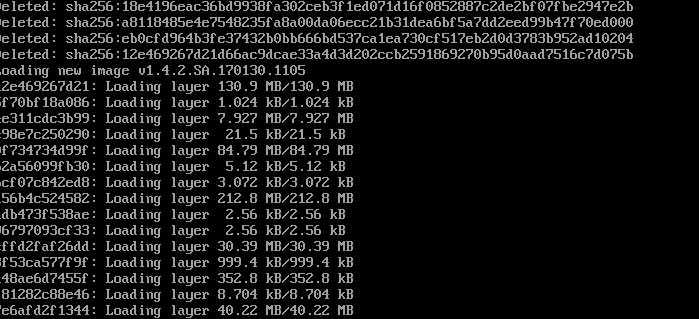
Step 6. When the installation is complete, launch the External Infinity Controller:
sudo nftcontroller start
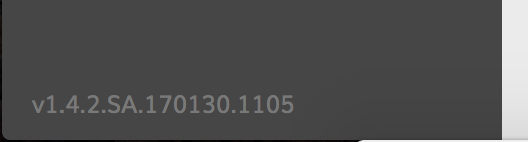
Step 7. Log on to the Infinity Controller server and verify the running version:
Step 1. Use SSH to log on to the Linux server or the virtual machine where the Infinity Controller is running:
Default username: nft and password: admin01
Step 2. Check the interface name that will be used for Infinity Controller access:
ifconfig

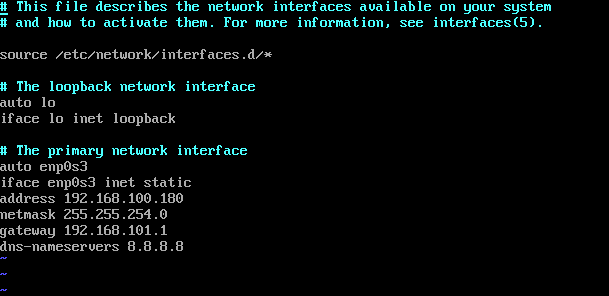
Step 3. Use the Vim text editor to edit the Network Interface configuration file:
sudo vim /etc/network/interfaces

Step 4. Delete the lines with the dynamic IP configuration:
auto eth0 iface eth0 inet dhcp
Step 5. Add new lines with the static IP on interface (“enp0s3”):
auto enp0s3
iface enp0s3 inet static
address 192.168.100.180
netmask 255.255.255.0
gateway 192.168.101.1
dns-nameservers 4.4.4.4
dns-nameservers 8.8.8.8
Step 6. Restart the network on your system:
sudo /etc/init.d/network restart
Step 7. Stop running the Infinity Controller:
sudo nftcontroller stop
Step 8. Reset the certificate that will be assigned to the new Controller IP :
sudo nftcontroller reset-crt

Step 9. Click y to reset the old certificates.
Step 10. Enter the TCP port number for the web interface.
Step 11. Select the HTTPS security mode:
1) HTTP only, No SSL/TLS certificates: insecure, unencrypted connection. For private networks only.
2) HTTPS with self-signed SSL/TLS certificates (this is the default mode): insecure, encrypted connection. Web browsers will display certificate error.
3) HTTPS with free certificates from Letsencrypt service: secure, requires a valid domain and open default TCP ports (80,443) (by using this option you agree to Letsencrypt terms and conditions).
Step 12. Enter the domain or IP address of the server.

Step 13. Start the External Infinity Controller:
sudo nftcontroller start
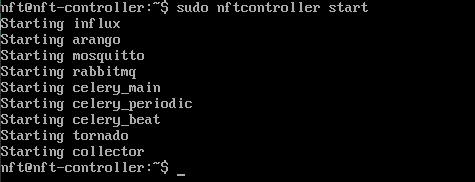
Step 14. The Controller should start in a couple of minutes.
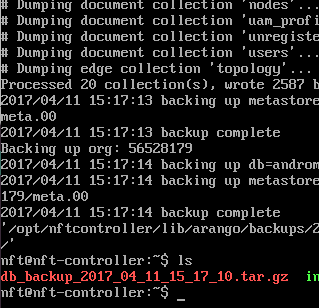
There are two options for creating a backup of the Infinity Controller: [1] back up the Controller database only and [2] back up the entire controller system:
sudo nftcontroller help
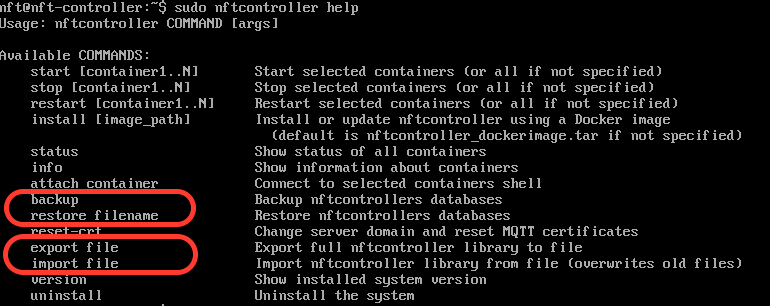
Backing up the Controller database only does not require to stop the Controller:
sudo nftcontroller backup
To restore the database from backup:
sudo nftcontroller restore db_backup_2017_04_11_15_17_10.tar.gz
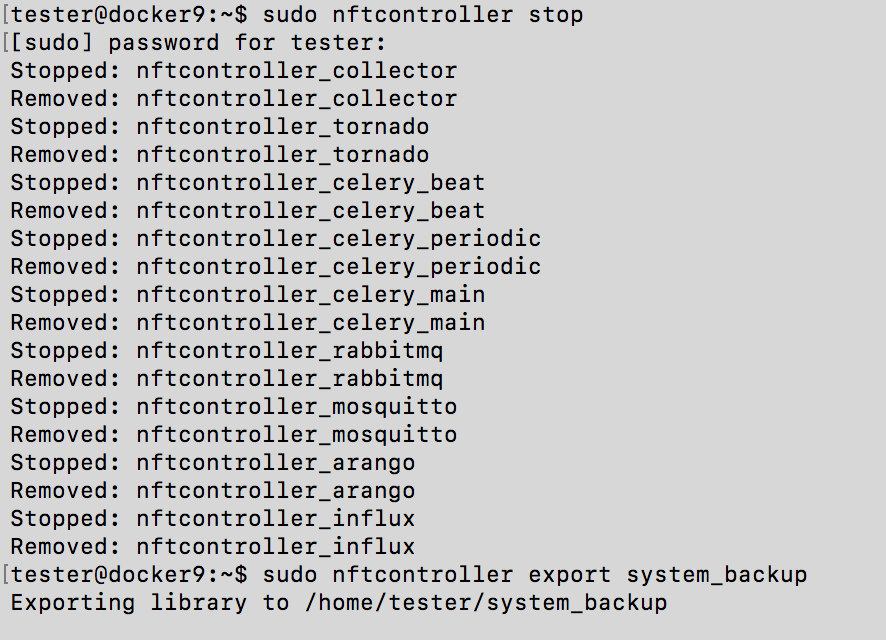
Backing up the entire Controller system requires to stop the NFT Controller:
sudo nftcontroller stop
sudo nftcontroller export system_backup
To restore the database from backup:
sudo nftcontroller stop
sudo nftcontroller import system_backup

Infinity Controller Virtual Image (for Virtual Box, VMware)
https://www.ligowave.com/public/downloads/NFT-Controller_VM.ova
(1.30GB I July 26, 2017)
Infinity Controller for Linux (Debian/Ubuntu/CentOS)
https://www.ligowave.com/public/downloads/nftcontroller.latest.tar.gz
(324MB I July 26, 2017)
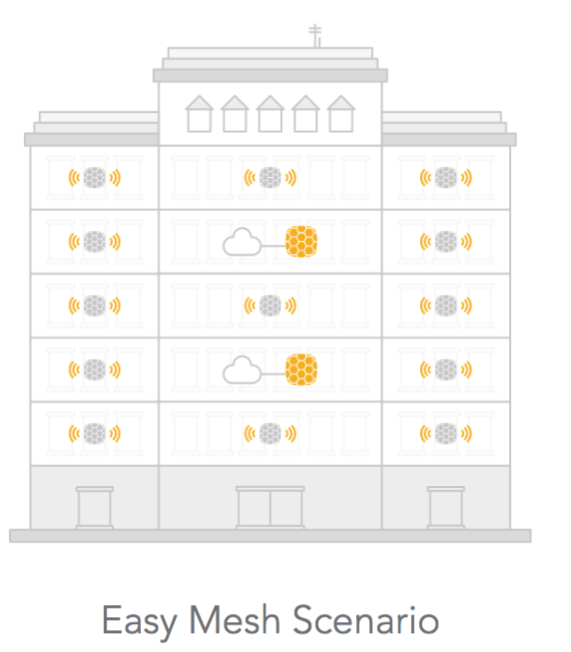
Easy Mesh Scenario Description
Terminology:
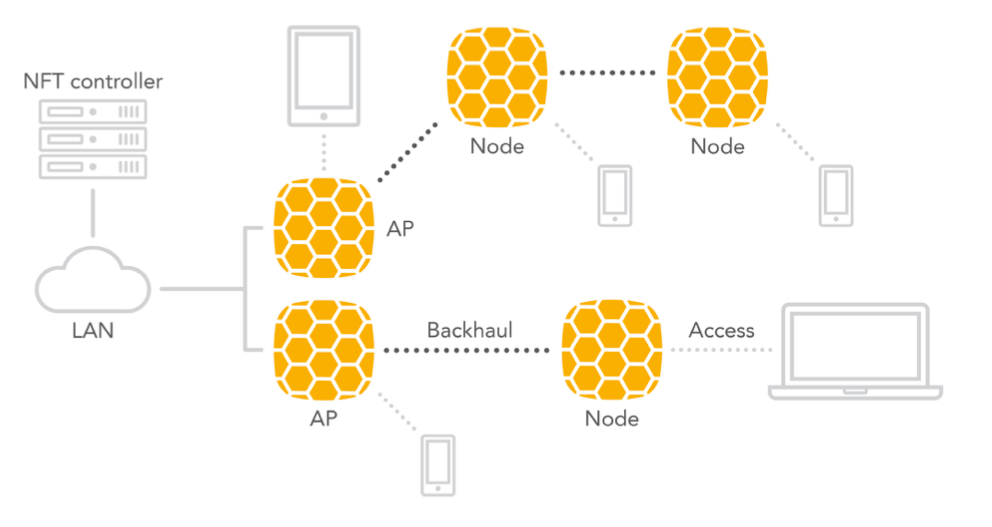
- Mesh AP – an AP that has a wired connection to the network and which provides wireless access to end users as well to Node APs.
- Node AP – an AP that is connected wirelessly to another node AP or to a Mesh AP and which provides wireless access to end users and can serve as a backhaul connection to other Node APs.
- Backhaul – a wireless connection between APs.
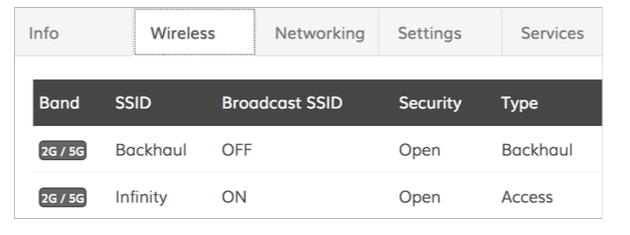
- Access – a wireless connection to end users.This feature is supported by the External NFT controller only. Any NFT AP (including LigoDLB with NFT firmware) can be used in this type of network. A single-radio AP creates a backhaul and an access at the same time. A dual-radio AP uses 5GHz for both backhaul and access, while a 2.4GHz radio is for access only.
The main idea is to extend Wi-Fi coverage without using wires and to do that in an automated way without manual configuration.
The network allows to have several mesh APs. It is recommended to connect no more than 3 mesh nodes into a single chain.
The NFT controller has a new network type called Easy Mesh. When the device is assigned to that network, it starts to act as an auto-repeater: if the AP has a wired connection, it will create two VAPs for access and backhaul; however, if the device has no wired connection, it will create an additional virtual station interface and will look for an access point with the “Backhaul” SSID. Every device should be activated this way from the controller to work under an Easy Mesh scenario. The NFT controller creates two open SSIDs by default, but the name and security settings can be changed.UAM is not allowed.
The main steps for creating an Easy Mesh network:
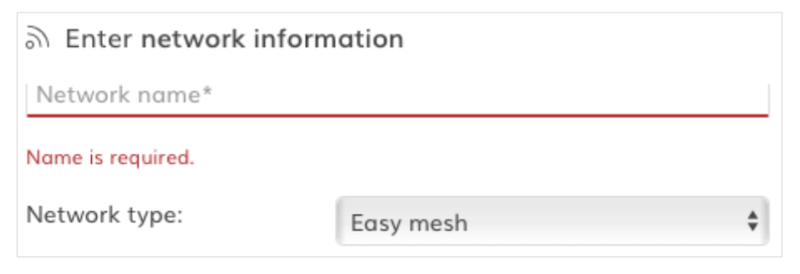
1. Create a new Easy Mesh network:
2. Change the SSID name (if necessary) and turn on encryption (highly recommend).
3. Register all devices onto the Easy Mesh network. Wait several minutes until all of the devices assume the AP type.
4. Leave at least one AP with a LAN connection. The rest of the APs can be placed in locations that will not have a LAN (Ethernet) connection. After several minutes, the APs without a LAN connection will become repeaters and will appear as Nodes in the controller.
5. The network should now be ready for use.
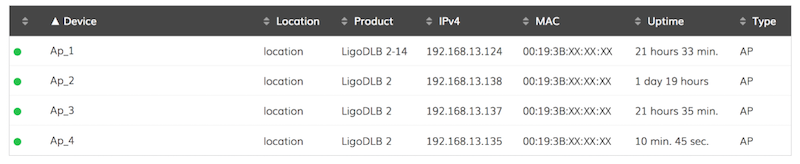
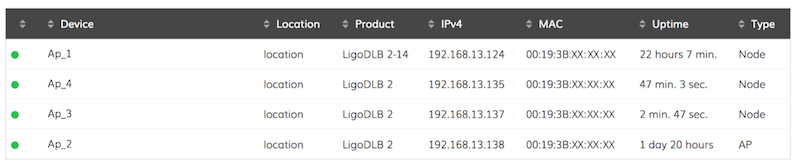
Moreover, users can see how Node APs are connected to the Mesh AP in the “Wireless clients” tab:

In the above example, two Node APs are connected on AP_2, while one Node AP is connected on AP_4.
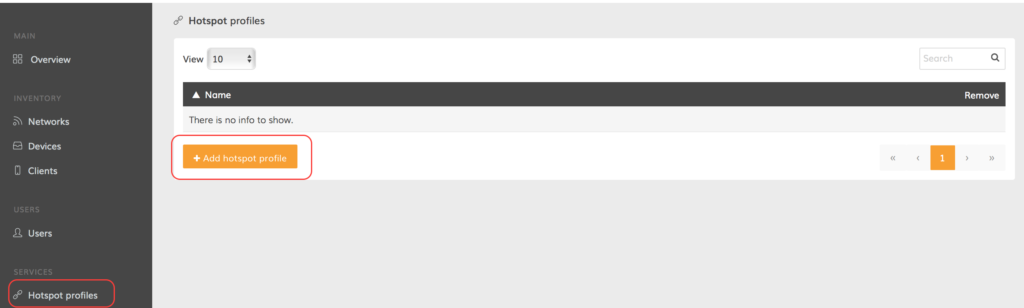
Step 1. Create a new hotspot profile in the Hotspot profiles section:
Step 2. Assign a name to the HotSpot, enter the parameters into the configuration window, and choose whether to add the hotspot to a particular group.
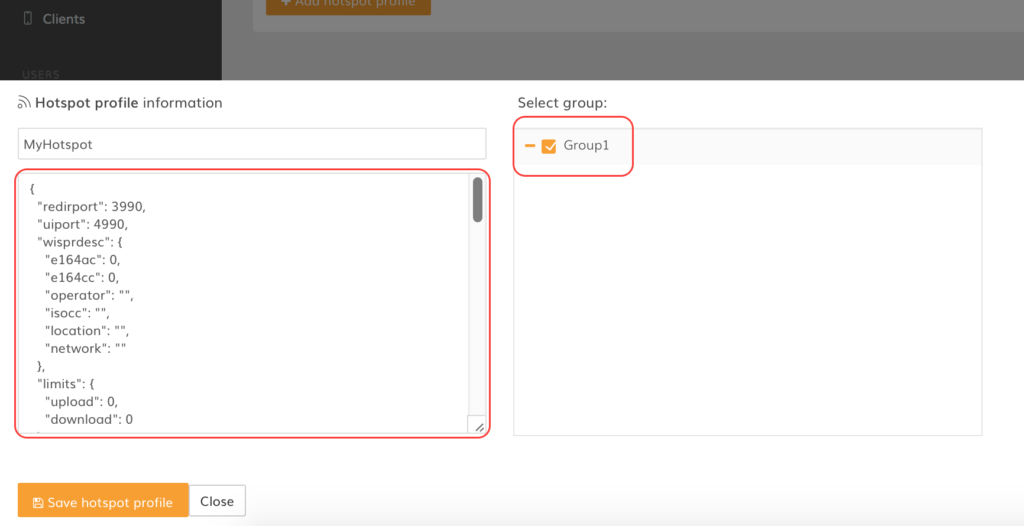
An example of configuration with an Integrated portal page:
{
  "redirport": 3990,
  "uiport": 4990,
  "wisprdesc": {
    "e164ac": 0,
    "e164cc": 0,
    "operator": "",
    "isocc": "",
    "location": "",
    "network": ""
  },
  "limits": {
    "upload": 0,
    "download": 0
  },
  "monitoring": {
    "enabled": false,
    "interval": 3600,
    "testurl": ""
  },
  "nasid": "NFT",
  "web": {
    "internal": {},
    "mode": "internal",
    "external": {
      "welcomeurl": "",
      "blacklisturl": "",
      "logouturl": "",
      "secret": "SECRET_KEY",
      "loginurl": ""
    }
  },
  "proximity": {
    "enabled": false,
    "cloud_server_poll_interval": 60,
    "hotspot": "",
    "cloud_server_register_url": "",
    "cloud_server_log_url": ""
  },
  "autoconfig": {
    "enabled": false,
    "interval": 3600,
    "url": "",
    "mode": "interval"
  },
  "acl": {
    "enabled": true,
    "autoacl": {
      "enabled": false,
      "interval": 3600,
      "mode": "interval",
      "url": ""
    },
    "blacklist": [
      {
        "host": "blacklist.com"
      },
      {
        "host": "blacklist2.com"
      },
      {
        "host": "blacklist3.com"
      }
    ],
    "whitelist": [
      {
        "host": "facebook.com"
      },
      {
        "host": "google.com"
      },
      {
        "host": "linkedin.com"
      }
    ]
  },
  "radius": {
    "authport": 1812,
    "acctport": 1813,
    "secret": "SECRET_KEY2",
    "server2": "192.168.3.1",
    "server1": "192.168.2.1"
  }
}
The following main sections must be configured:
Example of RADIUS server configuration:
  "radius":
    "authport": 1812,
    "acctport": 1813,
    "secret": "SECRET_KEY2",
    "server2": "192.168.3.1",
    "server1": "192.168.2.1"
Example of an integrated portal page configuration:
  "nasid": "NFT",
  "web": {
    "internal": {},
    "mode": "internal",
    "external": {
      "welcomeurl": "",
      "blacklisturl": "",
      "logouturl": "",
      "secret": "SECRET_KEY",
      "loginurl": ""
Example of the configuration with an external portal page:
{
  "uiport": 4990,
  "nasid": "NFT1",
  "proximity": {
    "hotspot": "",
    "cloud_server_log_url": "",
    "enabled": false,
    "cloud_server_register_url": "",
    "cloud_server_poll_interval": 60
  },
  "autoconfig": {
    "url": "",
    "mode": "interval",
    "enabled": false,
    "interval": 3600
  },
  "limits": {
    "download": 0,
    "upload": 0
  },
  "wisprdesc": {
    "network": "",
    "isocc": "",
    "location": "",
    "e164ac": 0,
    "e164cc": 0,
    "operator": ""
  },
  "redirport": 3990,
  "monitoring": {
    "enabled": false,
    "testurl": "",
    "interval": 3600
  },
  "acl": {
    "enabled": true,
    "blacklist": [],
    "whitelist": [
      {
        "host": "facebook.com"
      },
      {
        "host": "cloud4wi.com"
      },
      {
        "host": "c4wstatic.cloud4wi.com"
      },
      {
        "host": "google.com"
      }
    ],
    "autoacl": {
      "url": "",
      "mode": "interval",
      "enabled": false,
      "interval": 3600
    }
  },
  "radius": {
    "server1": "54.247.117.188",
    "acctport": 1813,
    "secret": "secret_passsowrd",
    "server2": "79.125.111.180",
    "authport": 1812
  },
  "web": {
    "internal": {
      "https": {
        "enabled": false,
        "keyfile": "",
        "certfile": ""
      }
    },
    "external": {
      "secret": "secret_password",
      "welcomeurl": "",
      "blacklisturl": "https://splashportal_black.ligowave.com",
      "logouturl": "https://splashportal_logout.ligowave.com",
      "loginurl": "https://splashportal.ligowave.com"
    },
    "mode": "external"
  }
}
The following main sections must be configured:
Example of RADIUS server configuration example:
  "radius":
    "server1": "54.247.117.188",
    "acctport": 1813,
    "secret": "secret_passsowrd",
    "server2": "79.125.111.180",
    "authport": 1812
Example of the external portal page configuration:
    "external":
      "secret": "secret_password",
      "welcomeurl": "",
      "blacklisturl": "https://splashportal_black.ligowave.com",
      "logouturl": "https://splashportal_logout.ligowave.com",
      "loginurl": "https://splashportal.ligowave.com"
    "mode": "external"
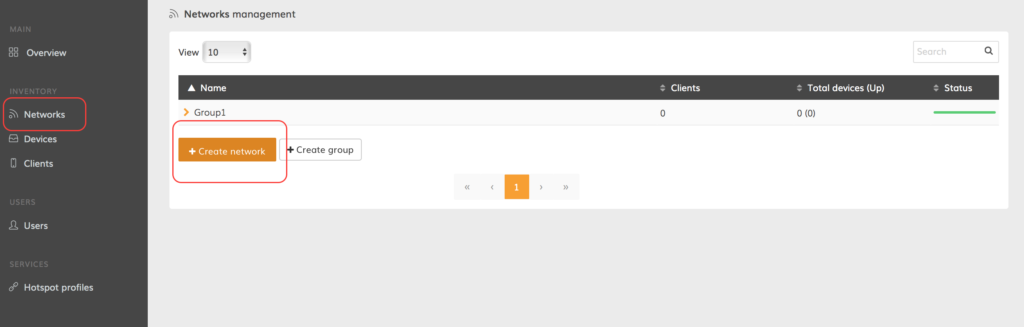
Choose Networks. A window with an empty networks management table should open.
Click Create network.
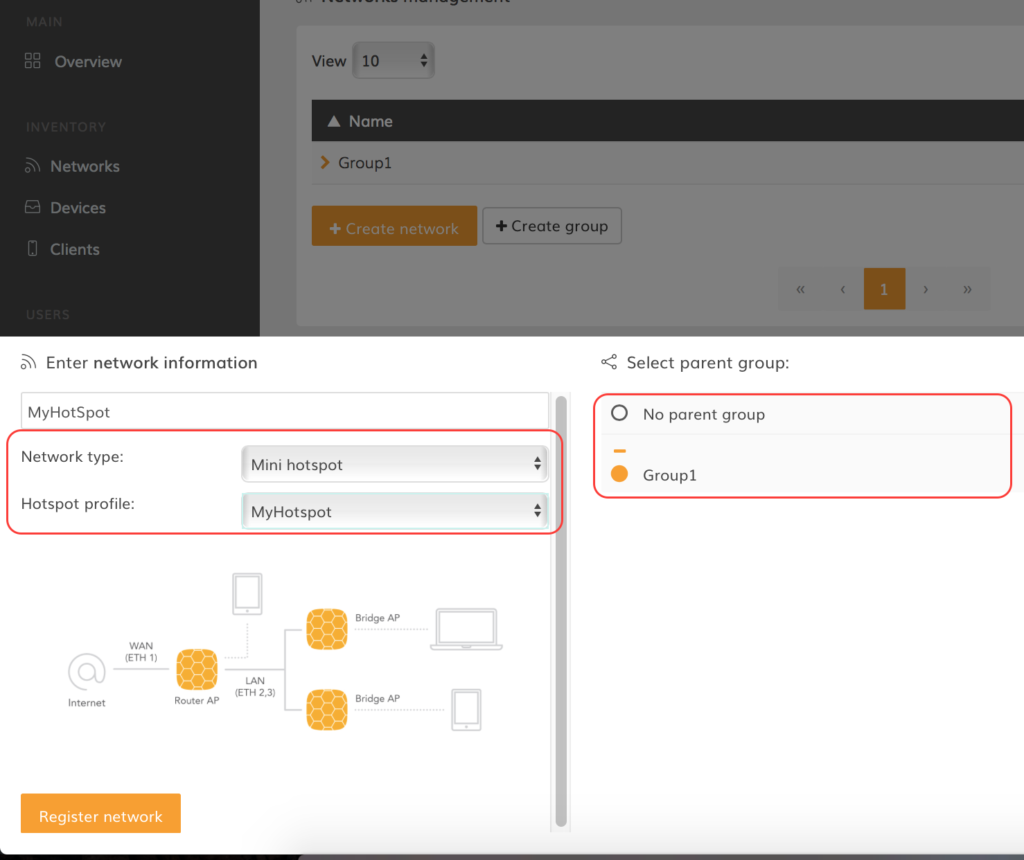
Indicate the network name and description, set Network type to Mini hotspot and assign a Hotspot profile that you have created earlier. Then choose whether to add the hotspot to a group. Then click Register network.
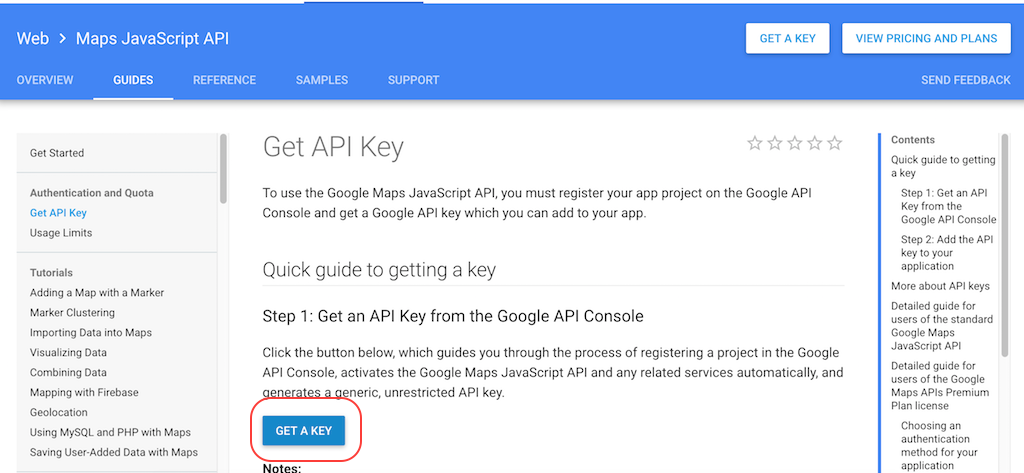
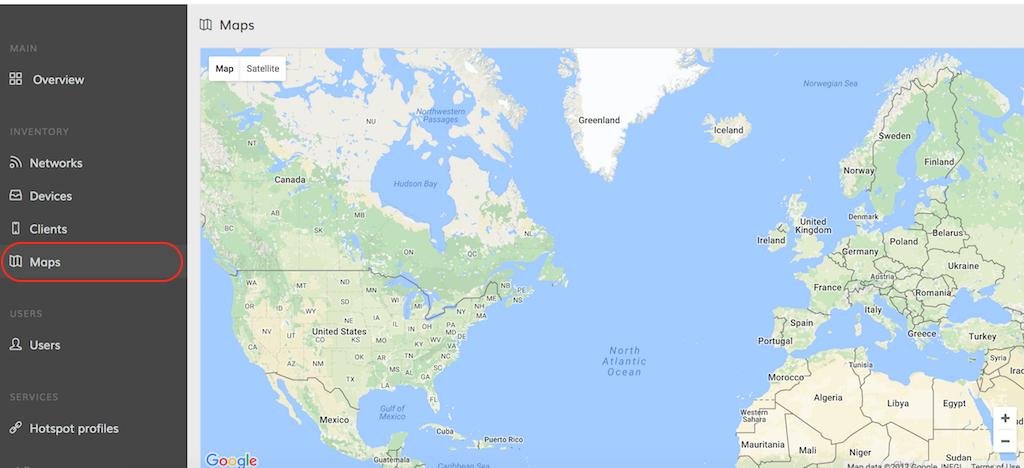
Step 1. Go here to retrieve the Google API key.
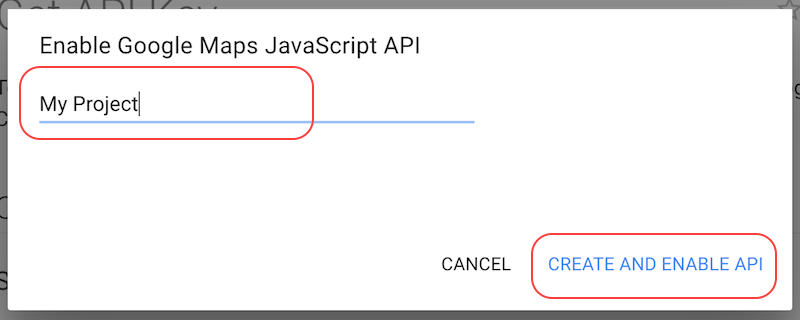
Step 2. Create a new project to enable Google Maps JavaScript API:
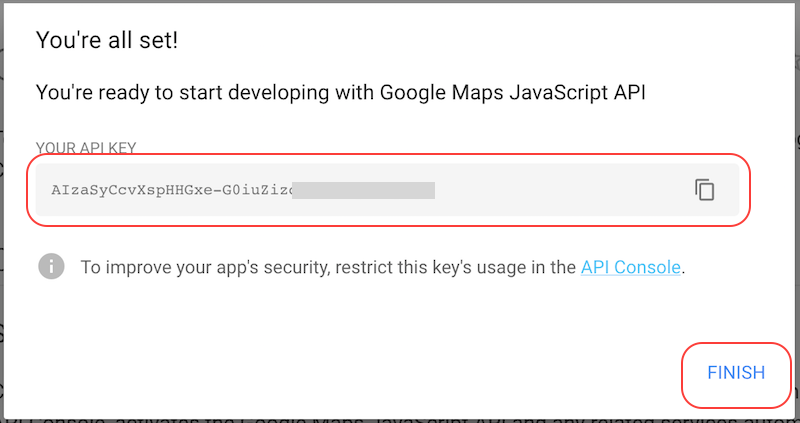
Step 3. Copy the generated API key and click Finish:
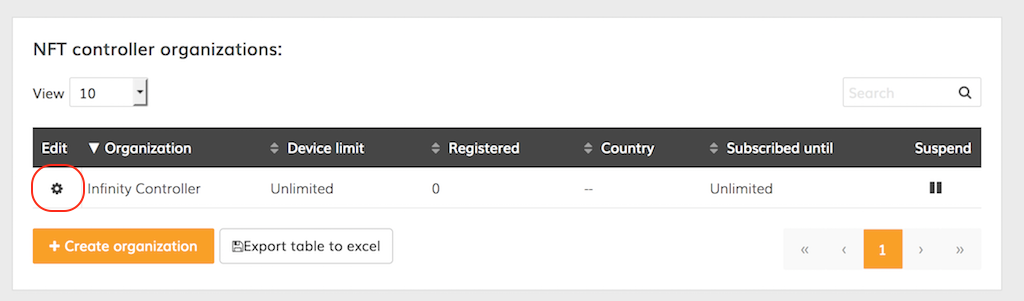
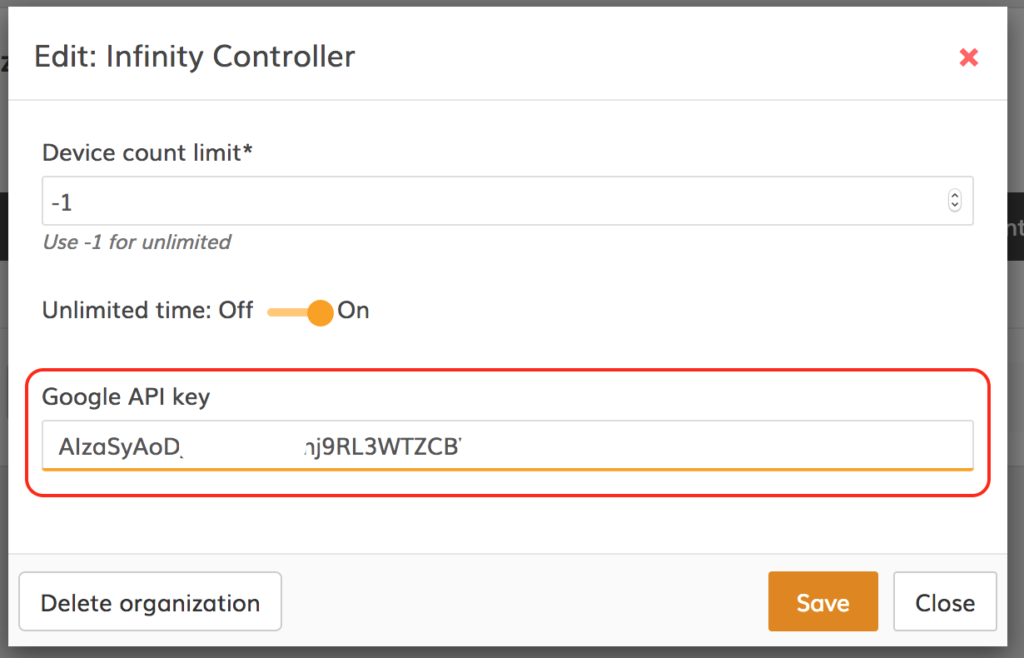
Step 4. Log on to the Infinity Controller and click the icon under the Edit column of the main organization:
Step 5. Enter the Google API key:
Step 6. The map should now be ready for use:
How to reset the certificate that will be assigned to new Controller IP?
Once the Infinity Controller server’s IP is changed, it is necessary to renew the server’s internal certificates. Otherwise, the devices will not be able to connect to it.
Follow these steps:
Step 1. Stop running the Infinity Controller:
sudo nftcontroller stop
Step 2. Reset the certificate that will be assigned to a new Controller IP :
sudo nftcontroller reset-crt
Step 3. Click y to reset old certificates.
Step 4. Enter the TCP port number for the web interface.
Step 5. Select the HTTPS security mode:
1) HTTP only, No SSL/TLS certificates: Insecure, unencrypted connection. For private networks only.
2) HTTPS with self-signed SSL/TLS certificates (this is the default mode): insecure, encrypted connection. Web browsers will display certificate error.
3) HTTPS with free certificates from Letsencrypt service: secure, requires a valid domain and open default TCP ports (80,443) (by using this option you agree to Letsencrypt terms and conditions).
Step 6. Enter the domain or IP address of the server.
Step 7. Start the External Infinity Controller:
sudo nftcontroller start
Step 8. The Controller should start in a couple of minutes.